Integrate Jira with GitHub
Integrate Git services with your Jira board to track development tasks and activities.
Description
This How-To guides you through integrating Git services with Jira using a third-party integration application. By completing this integration, you'll be able to track code changes, commits, pull request updates, deployments, and branches directly from your Jira board. While we use GitHub as an example, similar steps apply to other Git services like GitLab.
The integration enables:
- Viewing code activity alongside Jira issues
- Automatic issue transitions based on repository events
- Linking commits and pull requests to Jira tickets
- Creating branches from Jira issues
While this guide uses GitHub as an example, similar integration is available for other Git services. For GitLab-specific integration, see the GitLab documentation.
Preconditions
- Admin Access: Administrator access to both Jira and GitHub accounts
- Permissions: Authority to install applications in both platforms
Step-by-Step Guide
1. Install the Git Integration for Jira
1.1. Access Jira Settings:
- Log into your Jira account
- Go to Settings from the top right corner
- Click on Applications
- Click on "Manage Apps"
1.2. Find the Integration App:
- Navigate to "Find New Apps"
- Search for "Git Integration"
- Select "Git Integration for Jira"
1.3.Install the App:
-
Choose between the free trial version or purchasing a license
-
Click on "Get it now" to start the installation
2. Connect Jira to GitHub
2.1. Start the Connection:
-
After installation completes, click on "Get Started"
-
Click on "Connect on GitHub organization"
💡tipEnsure you're logged into your GitHub account with admin privileges before proceeding.
2.2. Authorize Access:
- Verify your GitHub identity when prompted
- Click on "Authorize Jira"
- For first-time installation, you'll see a warning that no GitHub organizations with Jira are installed
2.3. Configure Repository Access:
-
Click on "Install GitHub for Jira on a new organization"
-
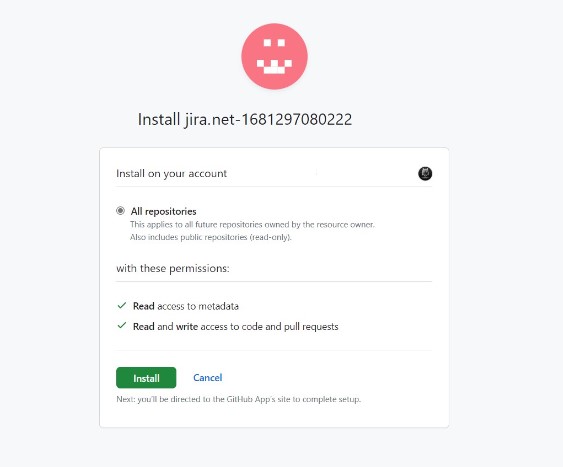
Select either "All Repositories" or "Only selected Repositories" based on your requirements
-
Click on "Install"
2.4. Complete Authentication:
-
Enter your GitHub password when prompted
-
Click on "Connect"
-
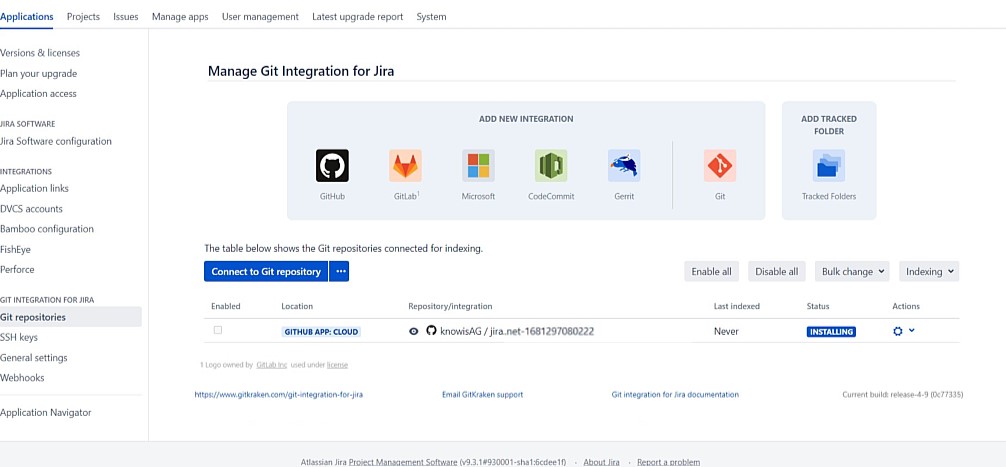
Verify that your repositories appear in the GitHub configuration window in Jira
3. Set Up Automatic Updates on Jira
3.1. Configure Workflow Triggers:
-
To automatically update issue status, configure workflow triggers
-
Example: Transition an issue from 'To Do' to 'In Progress' when a branch is created
💡tipFor detailed instructions on trigger configuration, see Atlassian's workflow triggers documentation.
3.2. Manual Updates with Commit Messages:
- Developers can use Jira issue keys in commit messages to update issues
- Example format:
git commit -m "closes #120; YOUR COMMIT MESSAGE" - For multiple issues:
git commit -m "closes #1, closes #2, closes #3; YOUR COMMIT MESSAGE"
3.3. Advanced Automation Rules:
-
For more complex automations, set up Jira Automation Rules
-
These can trigger based on various Git events and perform multiple actions
❗️infoFor more information about Jira Automation Rules, see the Jira Cloud Automation documentation
Conclusion
Congratulations! You have successfully integrated your GitHub repository with your Jira board. This integration enables your team to track development activities directly within Jira, improving visibility and coordination between planning and implementation.