Create and edit custom Project Baselines
You want to create a custom project baseline with your own set of Open Modeling Language (OML) profiles or custom recipes (skills, commands and rules) as modeling configuration that you want to make accessible to the IBM DevOps Solution Workbench.
Description
This How-To shows you
- how to create your own custom project baseline
- how to make the project baseline accessible to the IBM DevOps Solution Workbench
For more information about OML and how key concepts such as baselines and profiles are tied to each other, please read the Product Documentation - Building Blocks.
The product documentation also provides a basic guide for creating custom project baselines. You might check it out here before starting this How-To, which is more detailed.
Prerequisites
- You have already created profiles that you want to include to your project baseline.
- All these profiles are already accessible to the IBM DevOps Solution Workbench.
If you need help in creating and uploading your custom OML profile to the Workbench, please check out How-To: Create and edit custom OML Profiles.
Use Case 1: Customize the set of OML profiles as modeling configuration
In this use case, you want to create a project baseline that includes a custom OML profile that you want to use in the IBM DevOps Solution Workbench.
Example
We will use the following scenario as an example:
The architecture team is asked to modernize a legacy core system without disrupting business. In a workshop, they have to build a mindmap to move from strategy to concrete actions via the following steps:
1. Frame the challenge.
2. Define strategic decisions.
3. Break decisions into execution actions.
4. Make risks visible.
5. Connect mitigations to risks.
The result is desired to be mindmap of a shared modernization plan with clear ownership, priorities, and timeline.
Before creating the actual mindmap, the team defined the elements and relationships that exist in their mind map:
- The central element of this mind map is the topic or challenge.
- First-level branch elements are the decisions. They give a well-founded strategy on how to approach the challenge.
- Second-level branch elements are action items. They are concrete executable steps based on the decisions.
- Topics can branch into decisions, which can branch into action items.
- Decisions and action items can be dependent on other decisions and action items.
- Potential risks can be mitigated by action items.
The following steps showcase how you are able to create the project baseline that includes a mindmap OML profile and make the project baseline accessible to the IBM DevOps Solution Workbench.
The OML profile that is used for the mindmap structure described above is created in a separate How-To: Create and edit custom OML Profiles and described with more detail there.
Steps
The following steps show you how to create and upload the custom project baseline to the workbench.
In general, you are able to create a project baseline from scratch with all required files. But here we will show you the recommended way by using a system project baseline as a starting point. For more information on system project baselines, please check out the Product Documentation - System Project Baselines.
Download a system baseline from the Workbench
In order to use a system baseline as a starting point for your custom project baseline, you need to download the system baseline from the IBM DevOps Solution Workbench. Therefore, you need to go to the Solution Designer.
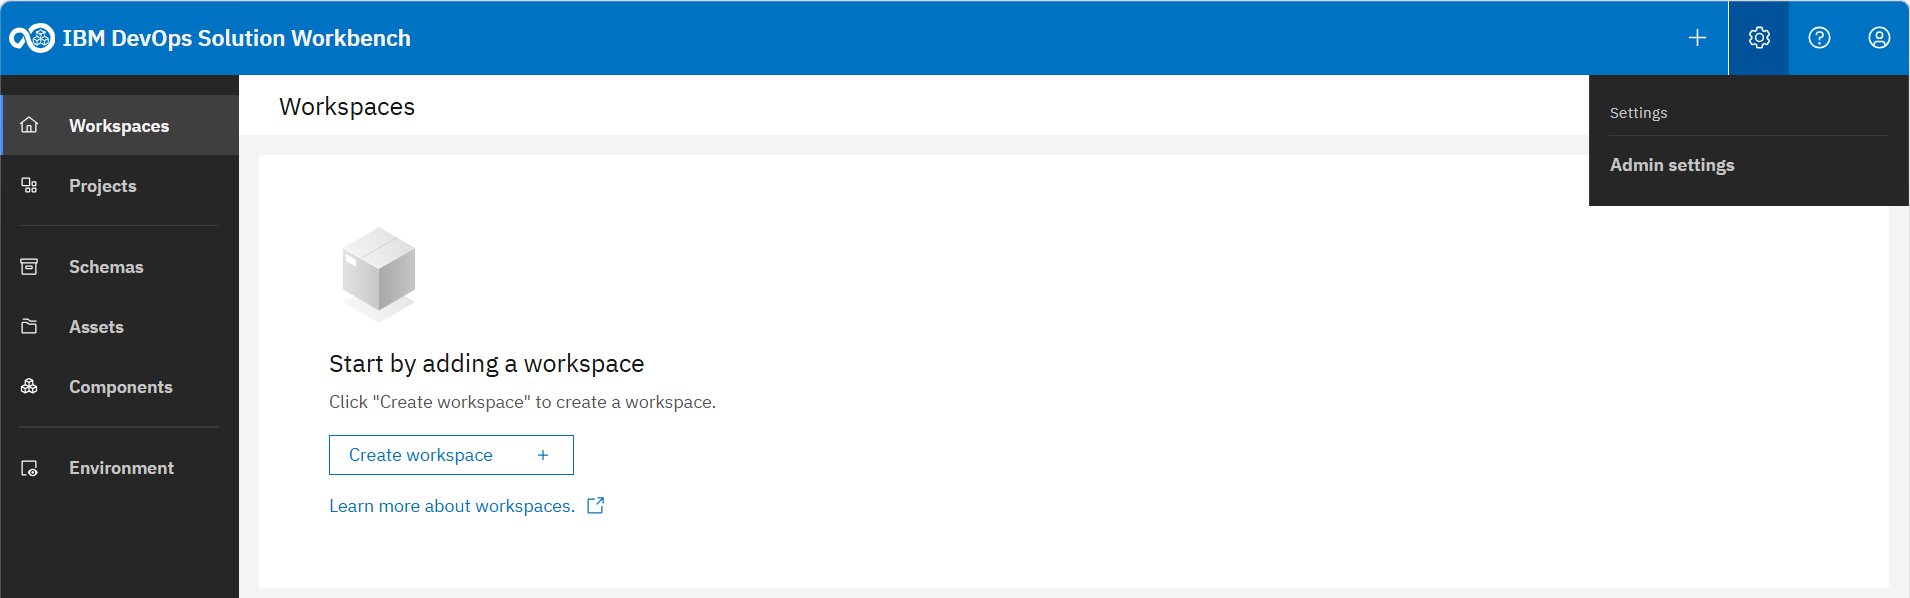
Click on the gear symbol at the top right and then on "Admin settings".
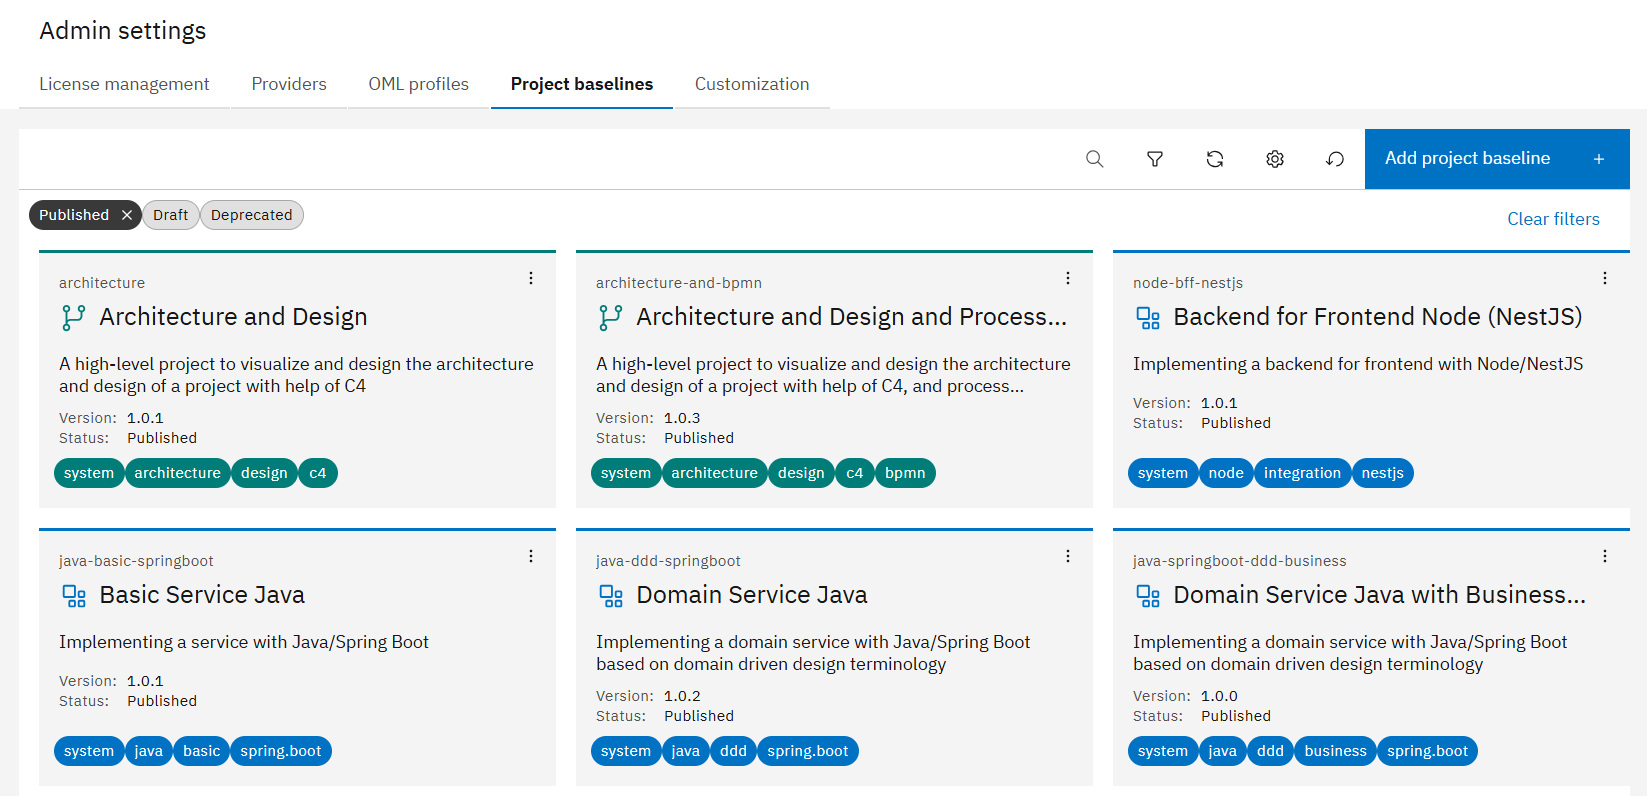
In the Admin settings, switch to tab "Project baselines".
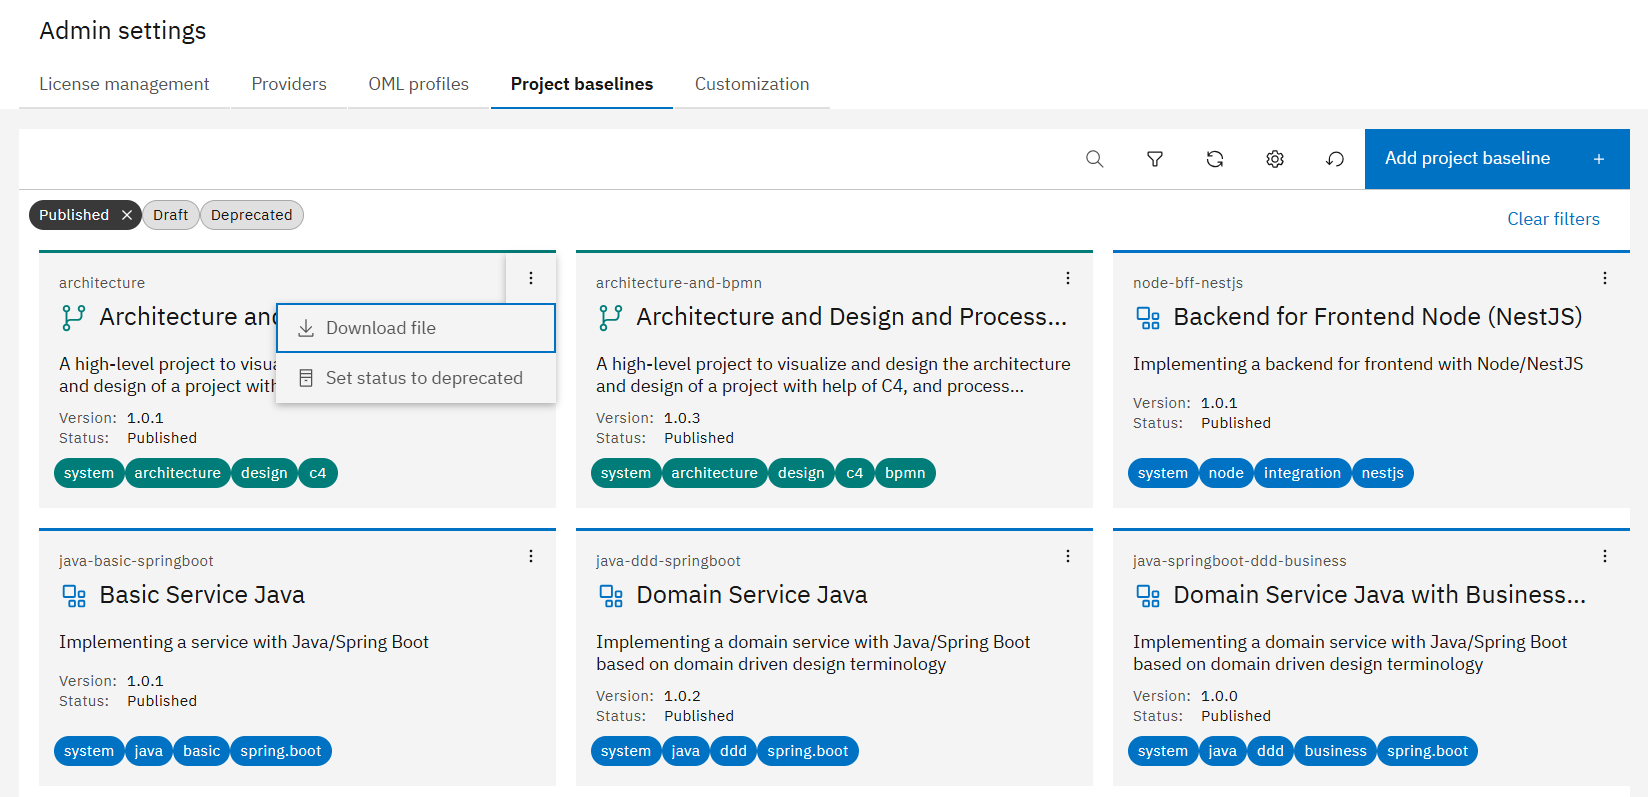
Select one of the already available project baselines, click on the three dots at the top right corner of the corresponding card and then click on "Download file". In our example, we will use the "architecture" baseline.
Modify the system baseline locally
-
On your machine, unzip the zip-file of the downloaded system baseline into a new directory (which will be called "baseline-directory" in the following).
-
Go to the baseline-directory and open file
k5-baseline.yamlin an IDE and change the values according to your needs. In our scenario, the result could look like this:k5-baseline.yamlid: "architecture-and-mindmap"
version: "1.0.0"
name: "Architecture and Design with Mindmap"
description: "A high-level project to visualize and design the architecture and design of a project with help of C4, and to create a mind map with governance and risk integration for structured workshops"
tags:
- "system"
- "architecture"
- "design"
- "c4"
- "mindmap"
icon: "Concept"
color: "#007d79"
codingAssistantPreferences:
bob:
baseFolder: "./.bob"
copliot:
baseFolder: "./.github"
cursor:
baseFolder: "./.cursor"❗️ID and Name of project baselinesIt is important that ID and name of a baseline are unique and meaningful since these two fields are used as references when creating a new project.
-
Now open file
k5-oml.yamlin an IDE and reference the custom OML profile in theprofilessection. In our scenario, the result could look like this:k5-oml.yamlid: "architecture-model"
version: "1.0.0"
...
# System Definitions (centrally defined, cannot be modified)
systemDefinitions:
- id: "k5-oml-system"
version: "1.0.0"
# Modeling Profiles
# When the file is provided within the git project, specify the source
profiles:
# Basic Shapes
- id: "basic-shapes-profile"
version: "1.0.0"
# C4 Model
- id: "c4-profile"
version: "1.0.0"
# Domain-Driven Design
- id: "ddd-profile"
version: "1.0.0"
# Risks, Tech Debt and Health
- id: "a3-risks-techdebt-health-profile"
version: "1.0.0"
# Collaboration
- id: "basic-collaboration-profile"
version: "1.0.0"
# Mindmap for with governance and risk integration
- id: "mindmap-profile"
version: "1.0.0" -
After all changes are done, create a new zip-file with all content (files and folders) inside the baseline-directory and name it as this pattern suggests
<baseline-id>-<version>.zip. In our scenario, we name the zip-filearchitecture-and-mindmap-1.0.0.zipas we left the "architecture" baseline untouched except adding the "mindmap" OML profile in the previous steps.⚠Content of the baseline's zip-fileYou have to take care that the zip-file has the correct folder structure, so it contains e.g. the files
k5-baseline.yamlandk5-oml.yamlin its root directory. For more information, please check out the Product Documentation - Baseline Folder Structure.
Upload the new custom project baseline to the Workbench
As the custom project baseline is complete now, you need to add it to the IBM DevOps Solution Workbench. This is done in the Solution Designer.
Go back to the Admin settings, switch to tab "Project Baselines" and then click on "Add Project Baseline" on the right.
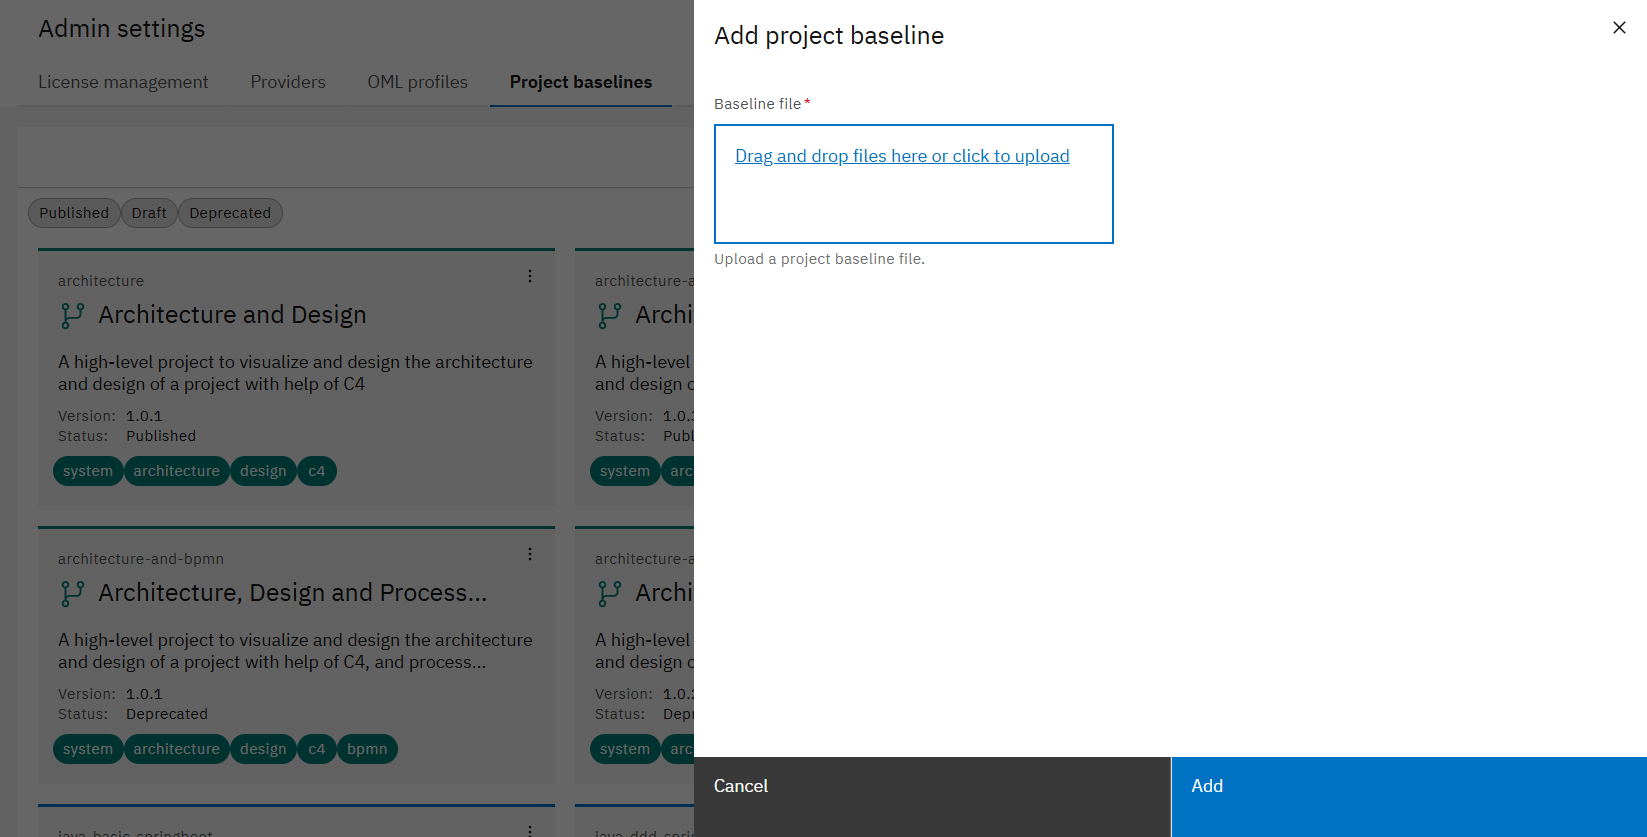
A modal opens where you can upload the file for the project baseline.
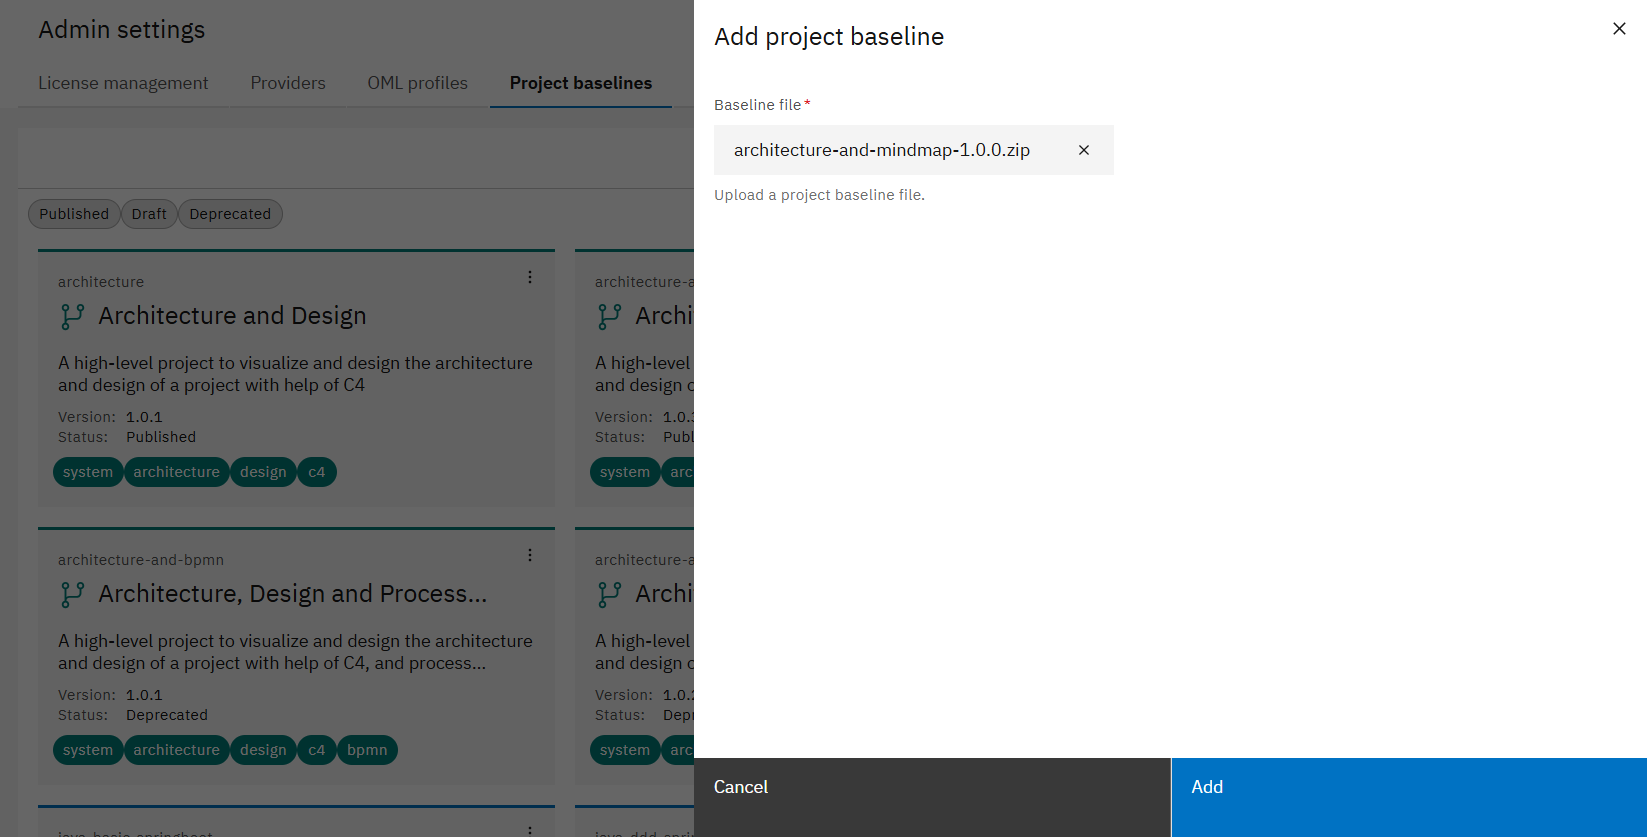
Upload your project baseline zip-file and click on "Add".
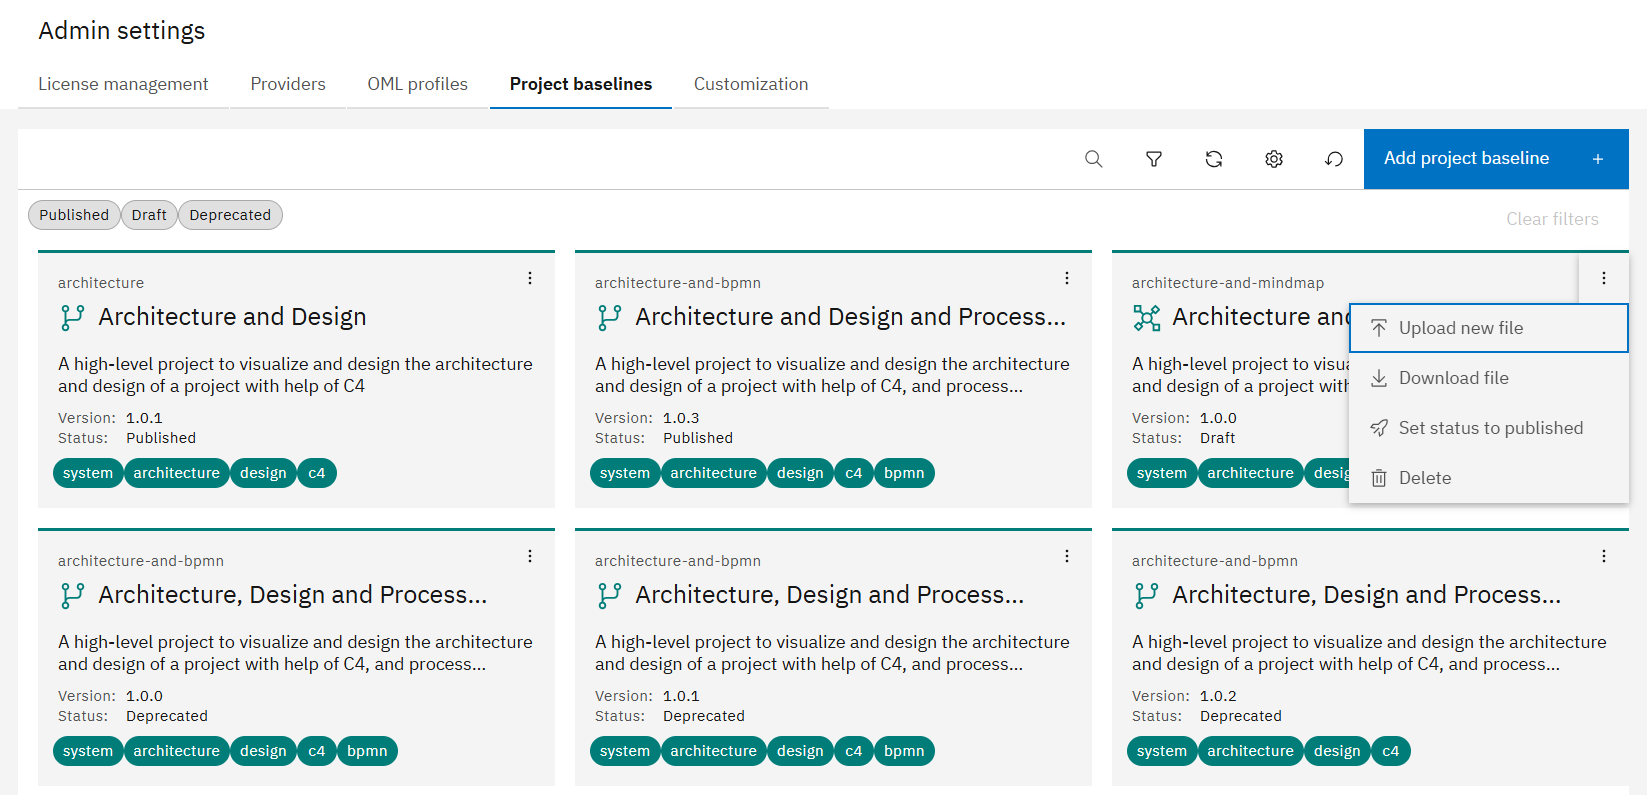
Search for the baseline you just uploaded, click on the three dots at the top right corner of the corresponding card and then click on "Set status to published".
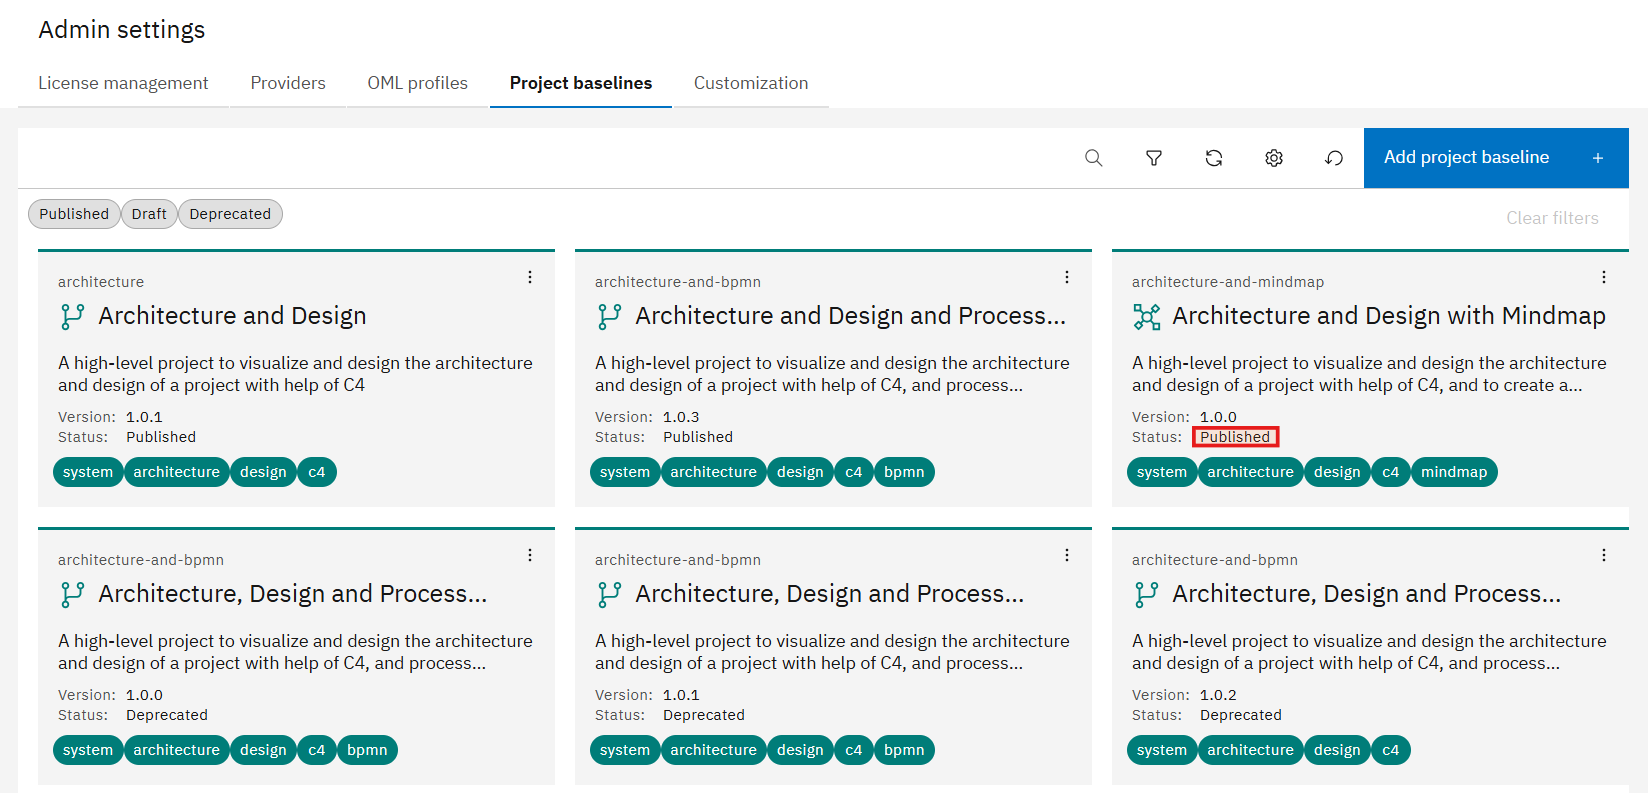
The project baseline is now available for all users in the Workbench.
If you want to see how a project baseline with a custom set of OML profiles is actually used in a project, check out How-To: Use custom OML Profiles and Project Baselines in Graphical Design.
Use case 2: Create and integrate custom recipes
What are recipes?
Recipes are customizable instructions that guide your coding assistant's behavior and capabilities within a project. They include three distinct types of components, each serving a specific purpose:
Skills provide domain-specific knowledge and step-by-step instructions for specialized tasks. They enable the coding assistant to perform complex operations like generating REST APIs from design files, implementing specific architectural patterns, or following technology-specific best practices. Skills are invoked when the assistant needs expert guidance on a particular task.
Commands allow users to trigger predefined actions or workflows through simple invocations. They act as shortcuts for common operations, making it easy to execute multi-step processes or generate boilerplate code with a single instruction.
Rules define guidelines, conventions, and constraints that the coding assistant must consistently follow across all interactions. Unlike skills that are task-specific, rules apply globally to ensure code quality, maintain naming conventions, enforce architectural patterns, and adhere to project-wide standards.
Skills follow an open standard and are supported by a large number of AI tools and coding assistants. Rules and commands are not standardized and work differently across coding assistants. In this how-to we will therefore only focus on skills. You can add rules and commands using the same approach as skills.
For more information about recipes, please check out the Product Documentation - Recipes.
Example
In this use case, you want to create a project baseline that includes custom skills for your coding assistant.
We will use the following scenario as an example:
The development team will soon begin to work on a new project. In this project there will be services written in Python using the FastAPI web framework. As this is the first time Python is used at the company, the senior developers with Python experience will create a project baseline with skills.
The following steps showcase how you are able to create the project baseline that includes skills for your coding assistant and make the project baseline accessible to the IBM DevOps Solution Workbench.
Steps
The following steps show you how to create and upload the custom project baseline to the workbench.
In general, you are able to create a project baseline from scratch with all required files. But here we will show you the recommended way by using a system project baseline as a starting point. For more information on system project baselines, please check out the Product Documentation - System Project Baselines.
Download a system baseline from the Workbench
In order to use a system baseline as a starting point for your custom project baseline, you need to download the system baseline from the IBM DevOps Solution Workbench. Therefore, you need to go to the Solution Designer.
Click on the gear symbol at the top right and then on "Admin settings".
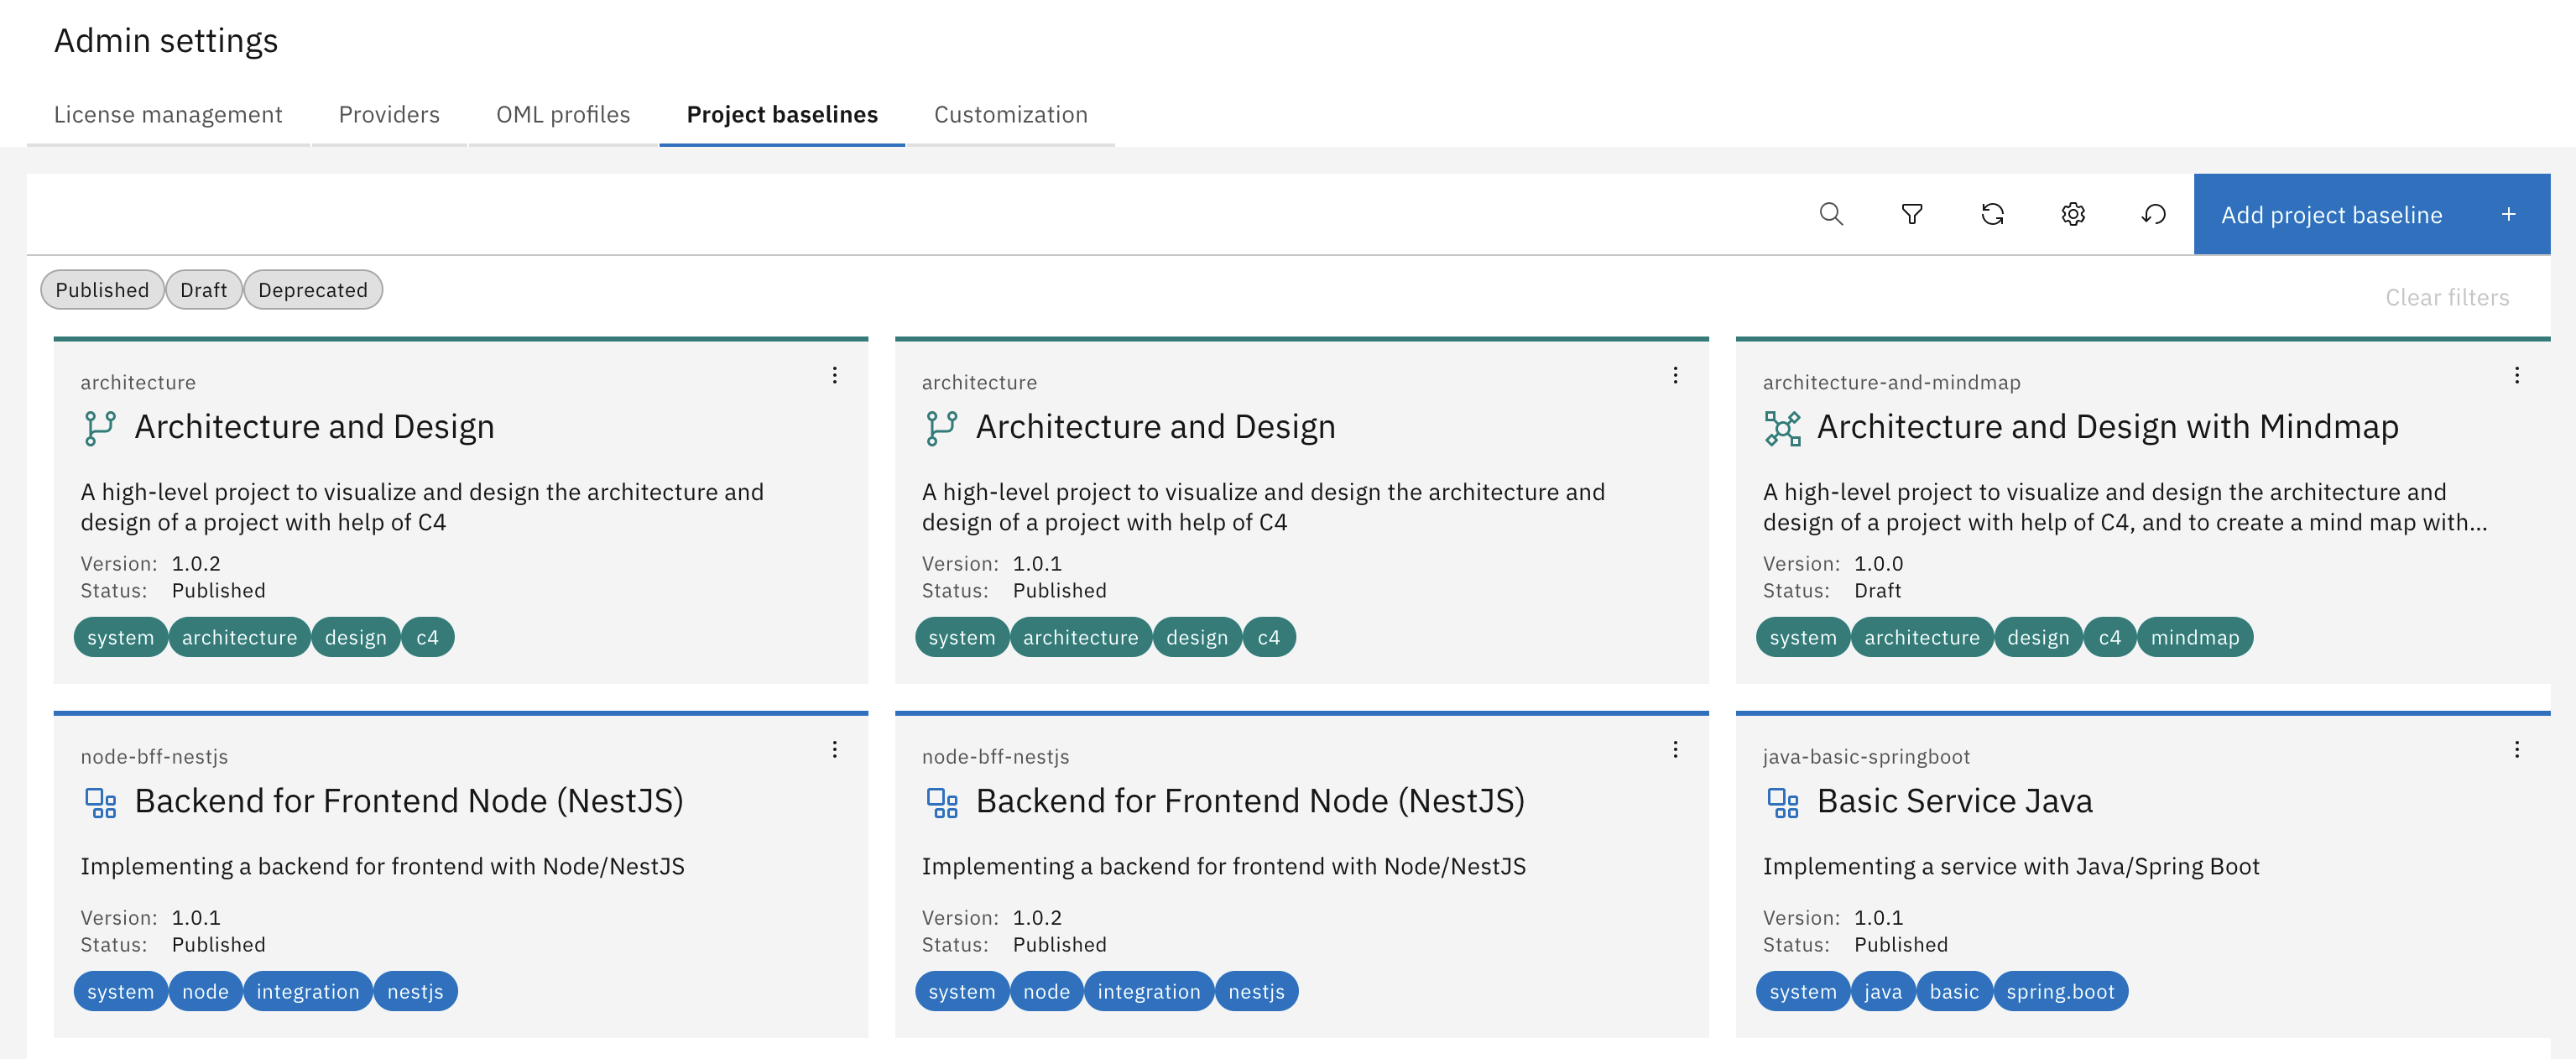
In the Admin settings, switch to tab "Project baselines".
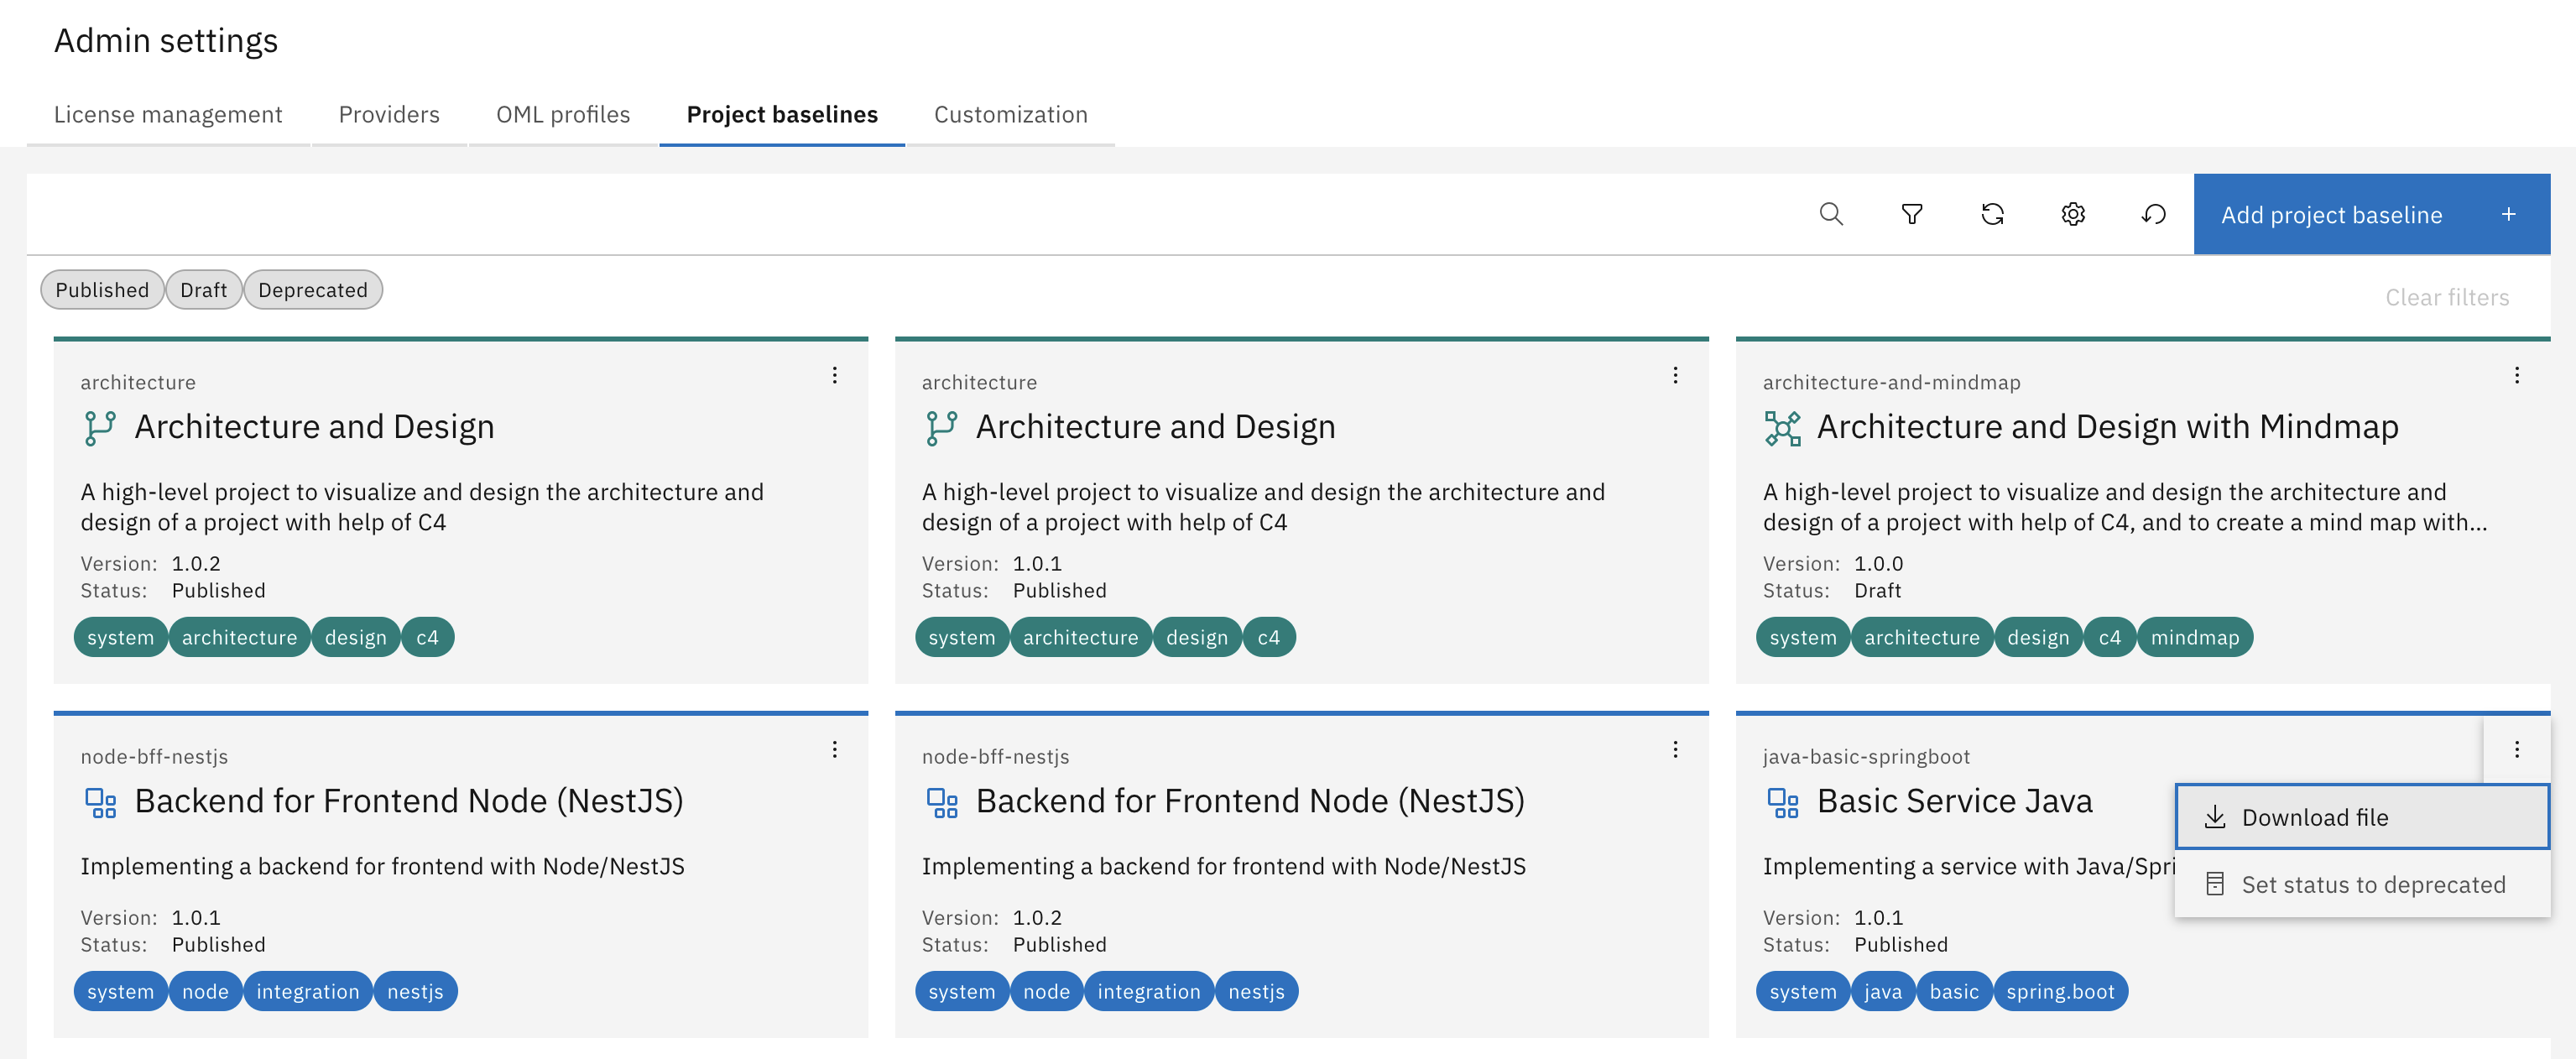
Select one of the already available project baselines, click on the three dots at the top right corner of the corresponding card and then click on "Download file". In our example, we will use the "java-basic-springboot" baseline.
Modify the system baseline locally
-
On your machine, unzip the zip-file of the downloaded system baseline into a new directory (which will be called "baseline-directory" in the following).
-
Go to the baseline-directory and open file
k5-baseline.yamlin an IDE and change the values according to your needs. In our scenario, the result could look like this:k5-baseline.yamlid: "python-basic-fastapi"
version: "1.0.0"
name: "Basic Service Python"
description: "Implementing a service with Python/FastAPI"
tags:
- "system"
- "python"
- "basic"
- "fastapi"
icon: "Application"
color: "#0072c3"
codingAssistantPreferences:
bob:
label: "IBM Bob"
mapping:
- source: ".recipes/*"
target: ".bob"
overwrite: true
copilot:
label: "GitHub Copilot"
mapping:
- source: ".recipes/*"
target: ".github"
overwrite: true
cursor:
label: "Cursor"
mapping:
- source: ".recipes/*"
target: ".cursor"
overwrite: true❗️ID and Name of project baselinesIt is important that ID and name of a baseline are unique and meaningful since these two fields are used as references when creating a new project.
-
Delete everything under the
.recipes/skillsfolder. -
Now you can add your own skills in the corresponding folders. In our scenario, we create two folders under the skills folder and name them
coding-guidelinesandgenerate-rest-apiand create aSKILL.mdfile in them. -
The
coding-guidelinesskill gives the coding assistant guidelines when implementing any code in this project. Place the following content in theSKILL.mdfile:---
name: coding-guidelines
description: Coding guidelines for Python FastAPI services. Apply these guidelines in every generation skill and when implementing any code.
---
## Overview
Comprehensive coding guidelines for Python FastAPI service implementation. These guidelines ensure consistency, maintainability, security, and quality across the entire codebase. Apply these guidelines in every generation skill and when implementing any code.
## Technology Stack
### Programming Language and Framework
- Python 3.11+ is the target Python version
- FastAPI is the web framework for building REST APIs
- use async/await patterns for I/O-bound operations
- Pydantic v2 for data validation and settings management
### Dependency Management
- use `pyproject.toml` for dependency management
- pin major and minor versions in production dependencies
- separate development dependencies from production dependencies
### Testing Framework
- use pytest as the primary testing framework
## Naming conventions
- variable names should be snake_case and all lowercase
- function names should be snake_case and all lowercase
## Project Structure
Organize code following a clean architecture pattern:
project_root/
├── app/
│ ├── __init__.py
│ ├── main.py # FastAPI app initialization
│ ├── config.py # Configuration and settings
│ ├── dependencies.py # Dependency injection
│ ├── api/ # API layer
│ │ ├── __init__.py
│ │ ├── v1/ # API version
│ │ │ ├── __init__.py
│ │ │ ├── routers/ # Route handlers
│ │ │ └── models.py # Pydantic models for requests/responses
│ ├── services/ # Business logic layer
│ │ ├── __init__.py
│ │ └── *.py
│ ├── repositories/ # Data access layer
│ │ ├── __init__.py
│ │ └── *.py
│ ├── models/ # Domain models
│ │ ├── __init__.py
│ │ └── *.py
│ ├── integrations/ # External service integrations
│ │ ├── __init__.py
│ │ └── *.py
│ └── utils/ # Utility functions
│ ├── __init__.py
│ └── *.py
├── tests/
│ ├── __init__.py
│ ├── conftest.py # Pytest fixtures
│ ├── unit/
│ └── integration/
├── pyproject.toml
└── README.md -
The
generate-rest-apiskill gives the coding assistant instructions on how to generate the REST APIs from the design files. Place the following content in theSKILL.mdfile:---
name: generate-rest-api
description: This skill provides instructions on how to generate the REST API based on design files
---
## Programming language and framework
This project uses the FastAPI framework for building APIs with Python.
## Overview
Generate the REST API from the design files in src-design/elements/implementation/rest-api and src-design/elements/implementation/rest-api-operation folders. The skill handles two types of REST APIs based on the interaction-type property.
## Providing REST APIs (interaction-type: providing)
- REST APIs exposed by the system to external clients
- for every REST API in src-design/elements/implementation/rest-api generate a file in /app/api/routers
- implement the corresponding api operations defined in src-design/elements/implementation/rest-api-operation
## Consuming REST APIs (interaction-type: consuming)
- external REST APIs consumed by the system
- generate integration service files in the /app/integrations folder for external API communication -
The folder structure of your
.recipesfolder should now look like this:.recipes/
└── skills/
├── coding-guidelines/
│ └── SKILL.md
└── generate-rest-api/
└── SKILL.md -
After all changes are done, create a new zip-file with all content (files and folders) inside the baseline-directory and name it as this pattern suggests
<baseline-id>-<version>.zip. In our scenario, we name the zip-filepython-basic-fastapi-1.0.0.zipas our baseline-id ispython-basic-fastapiand version1.0.0.⚠Content of the baseline's zip-fileYou have to take care that the zip-file has the correct folder structure, so it contains e.g. the files
k5-baseline.yamlandk5-oml.yamlin its root directory. For more information, please check out the Product Documentation - Baseline Folder Structure.
Upload the new custom project baseline to the Workbench
As the custom project baseline is complete now, you need to add it to the IBM DevOps Solution Workbench. This is done in the Solution Designer.
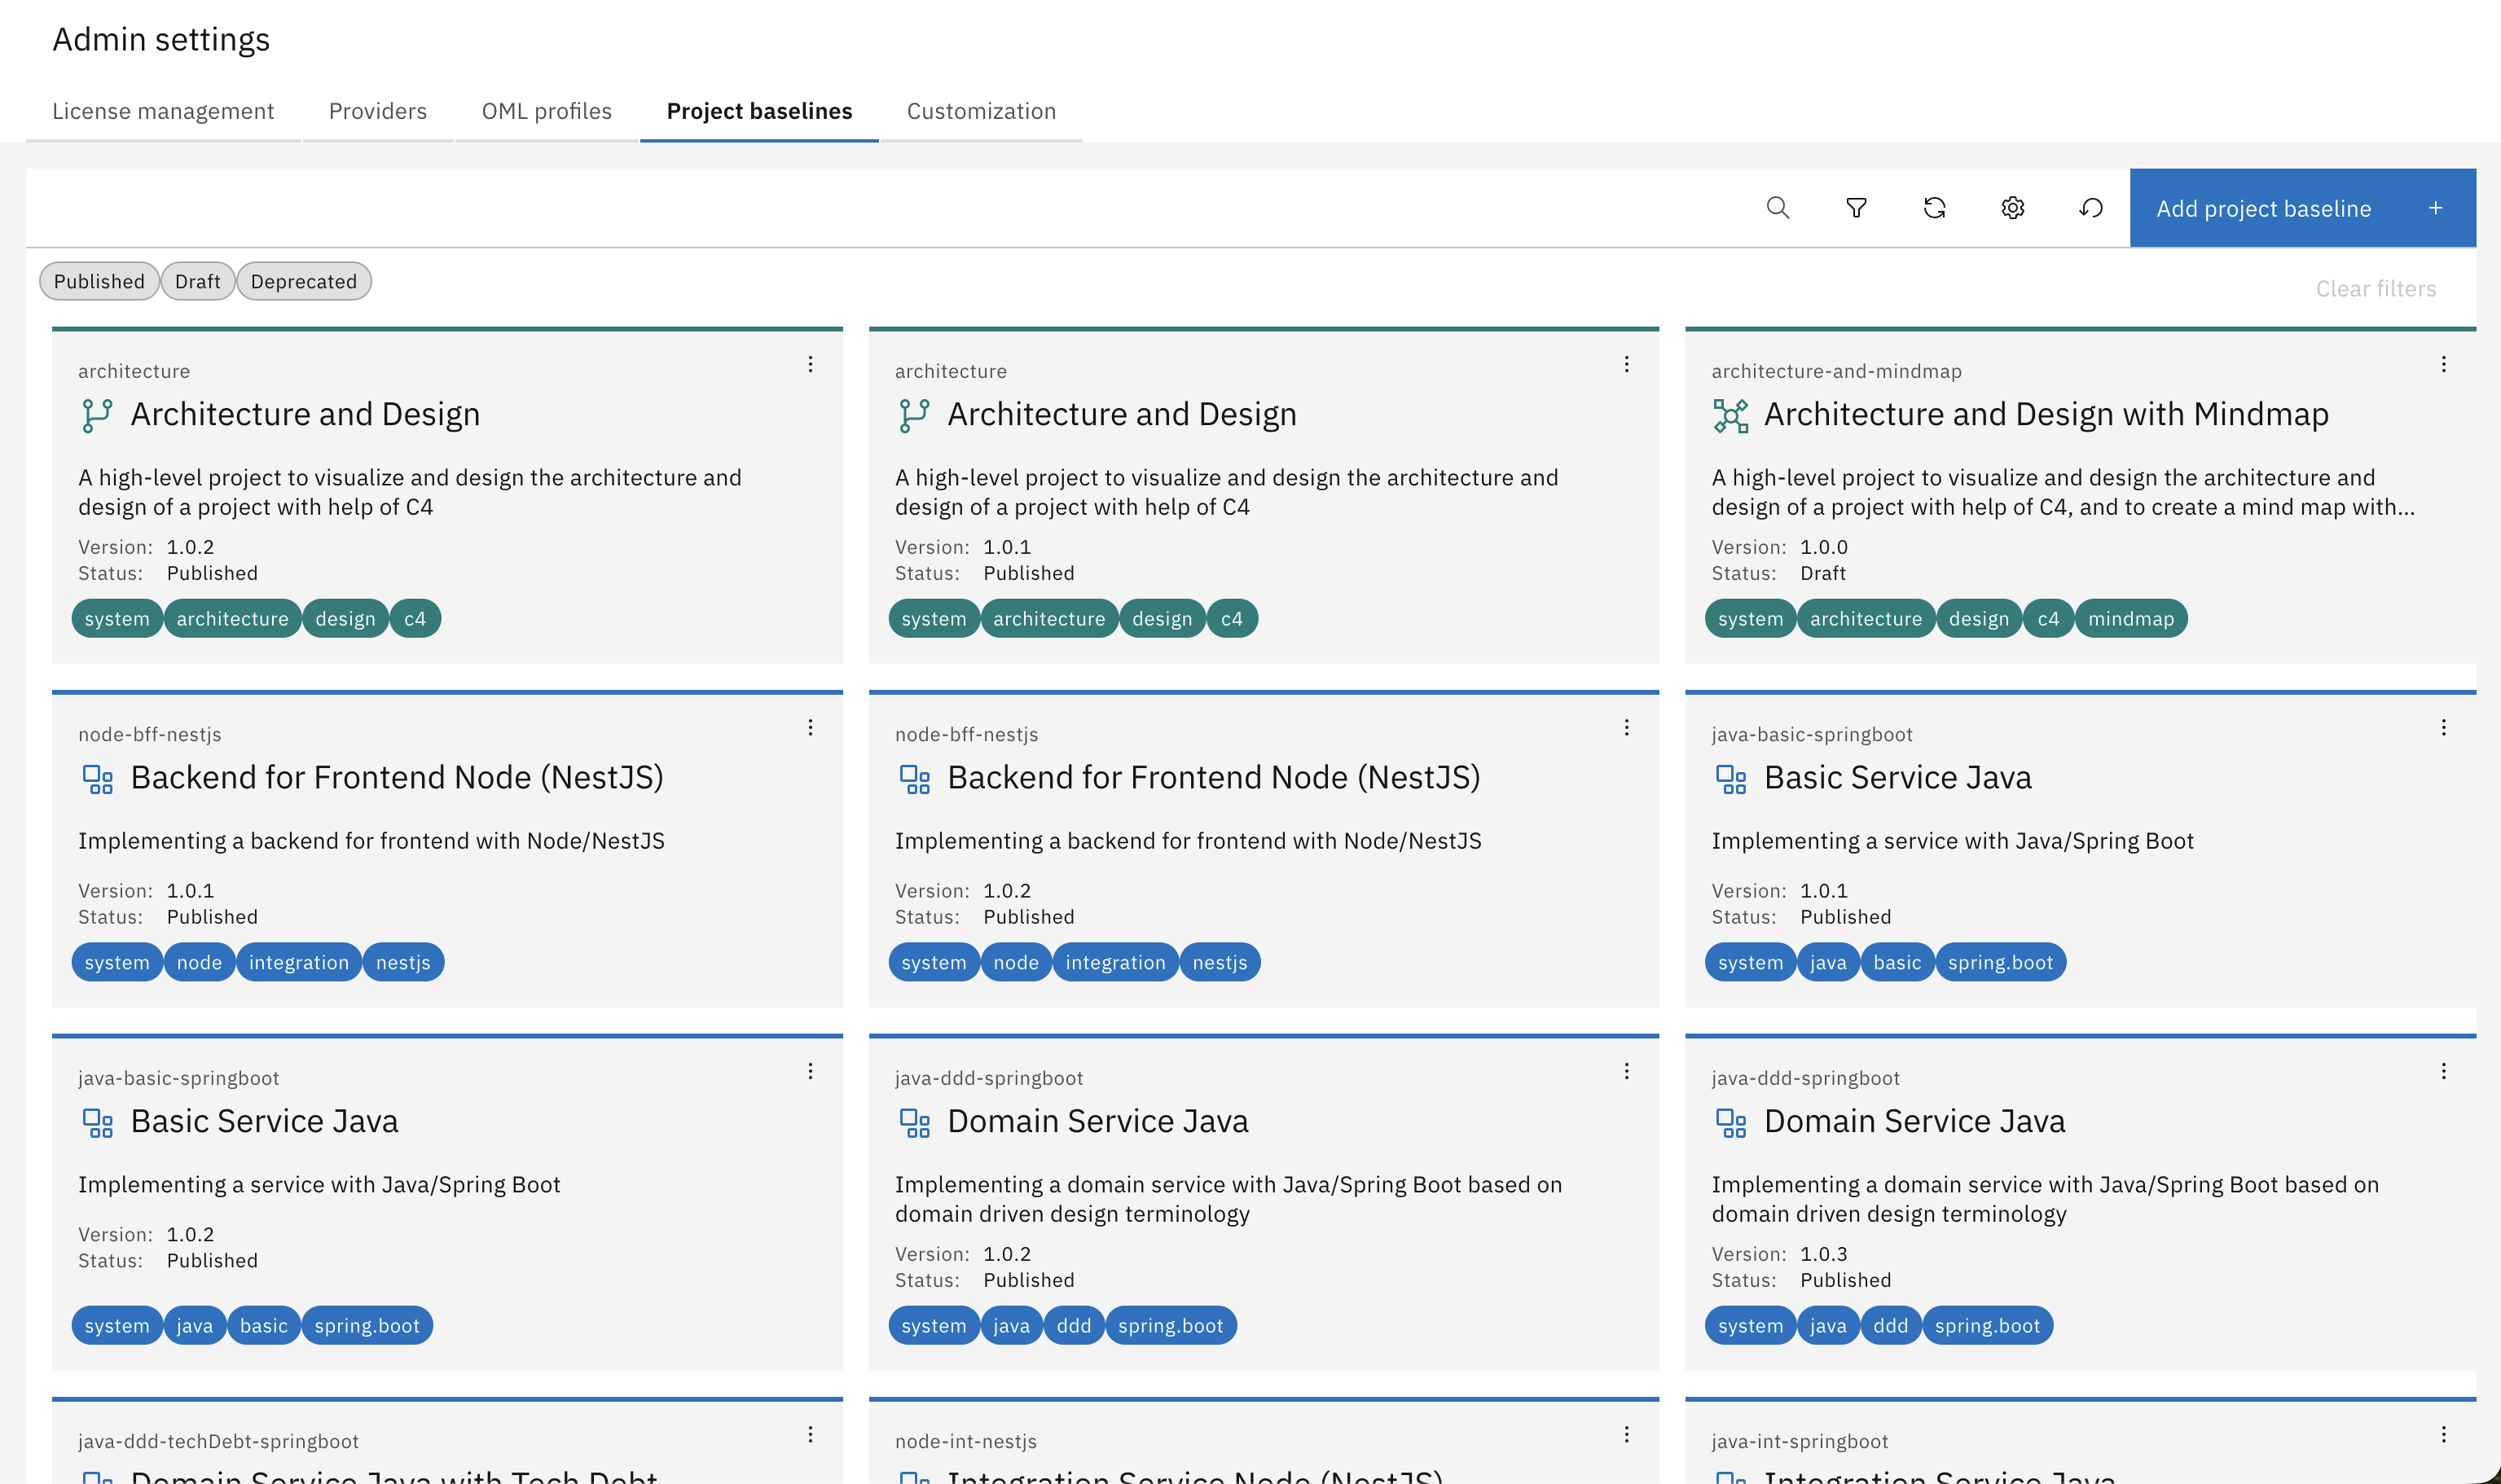
Go back to the Admin settings, switch to tab "Project Baselines" and then click on "Add Project Baseline" on the right.
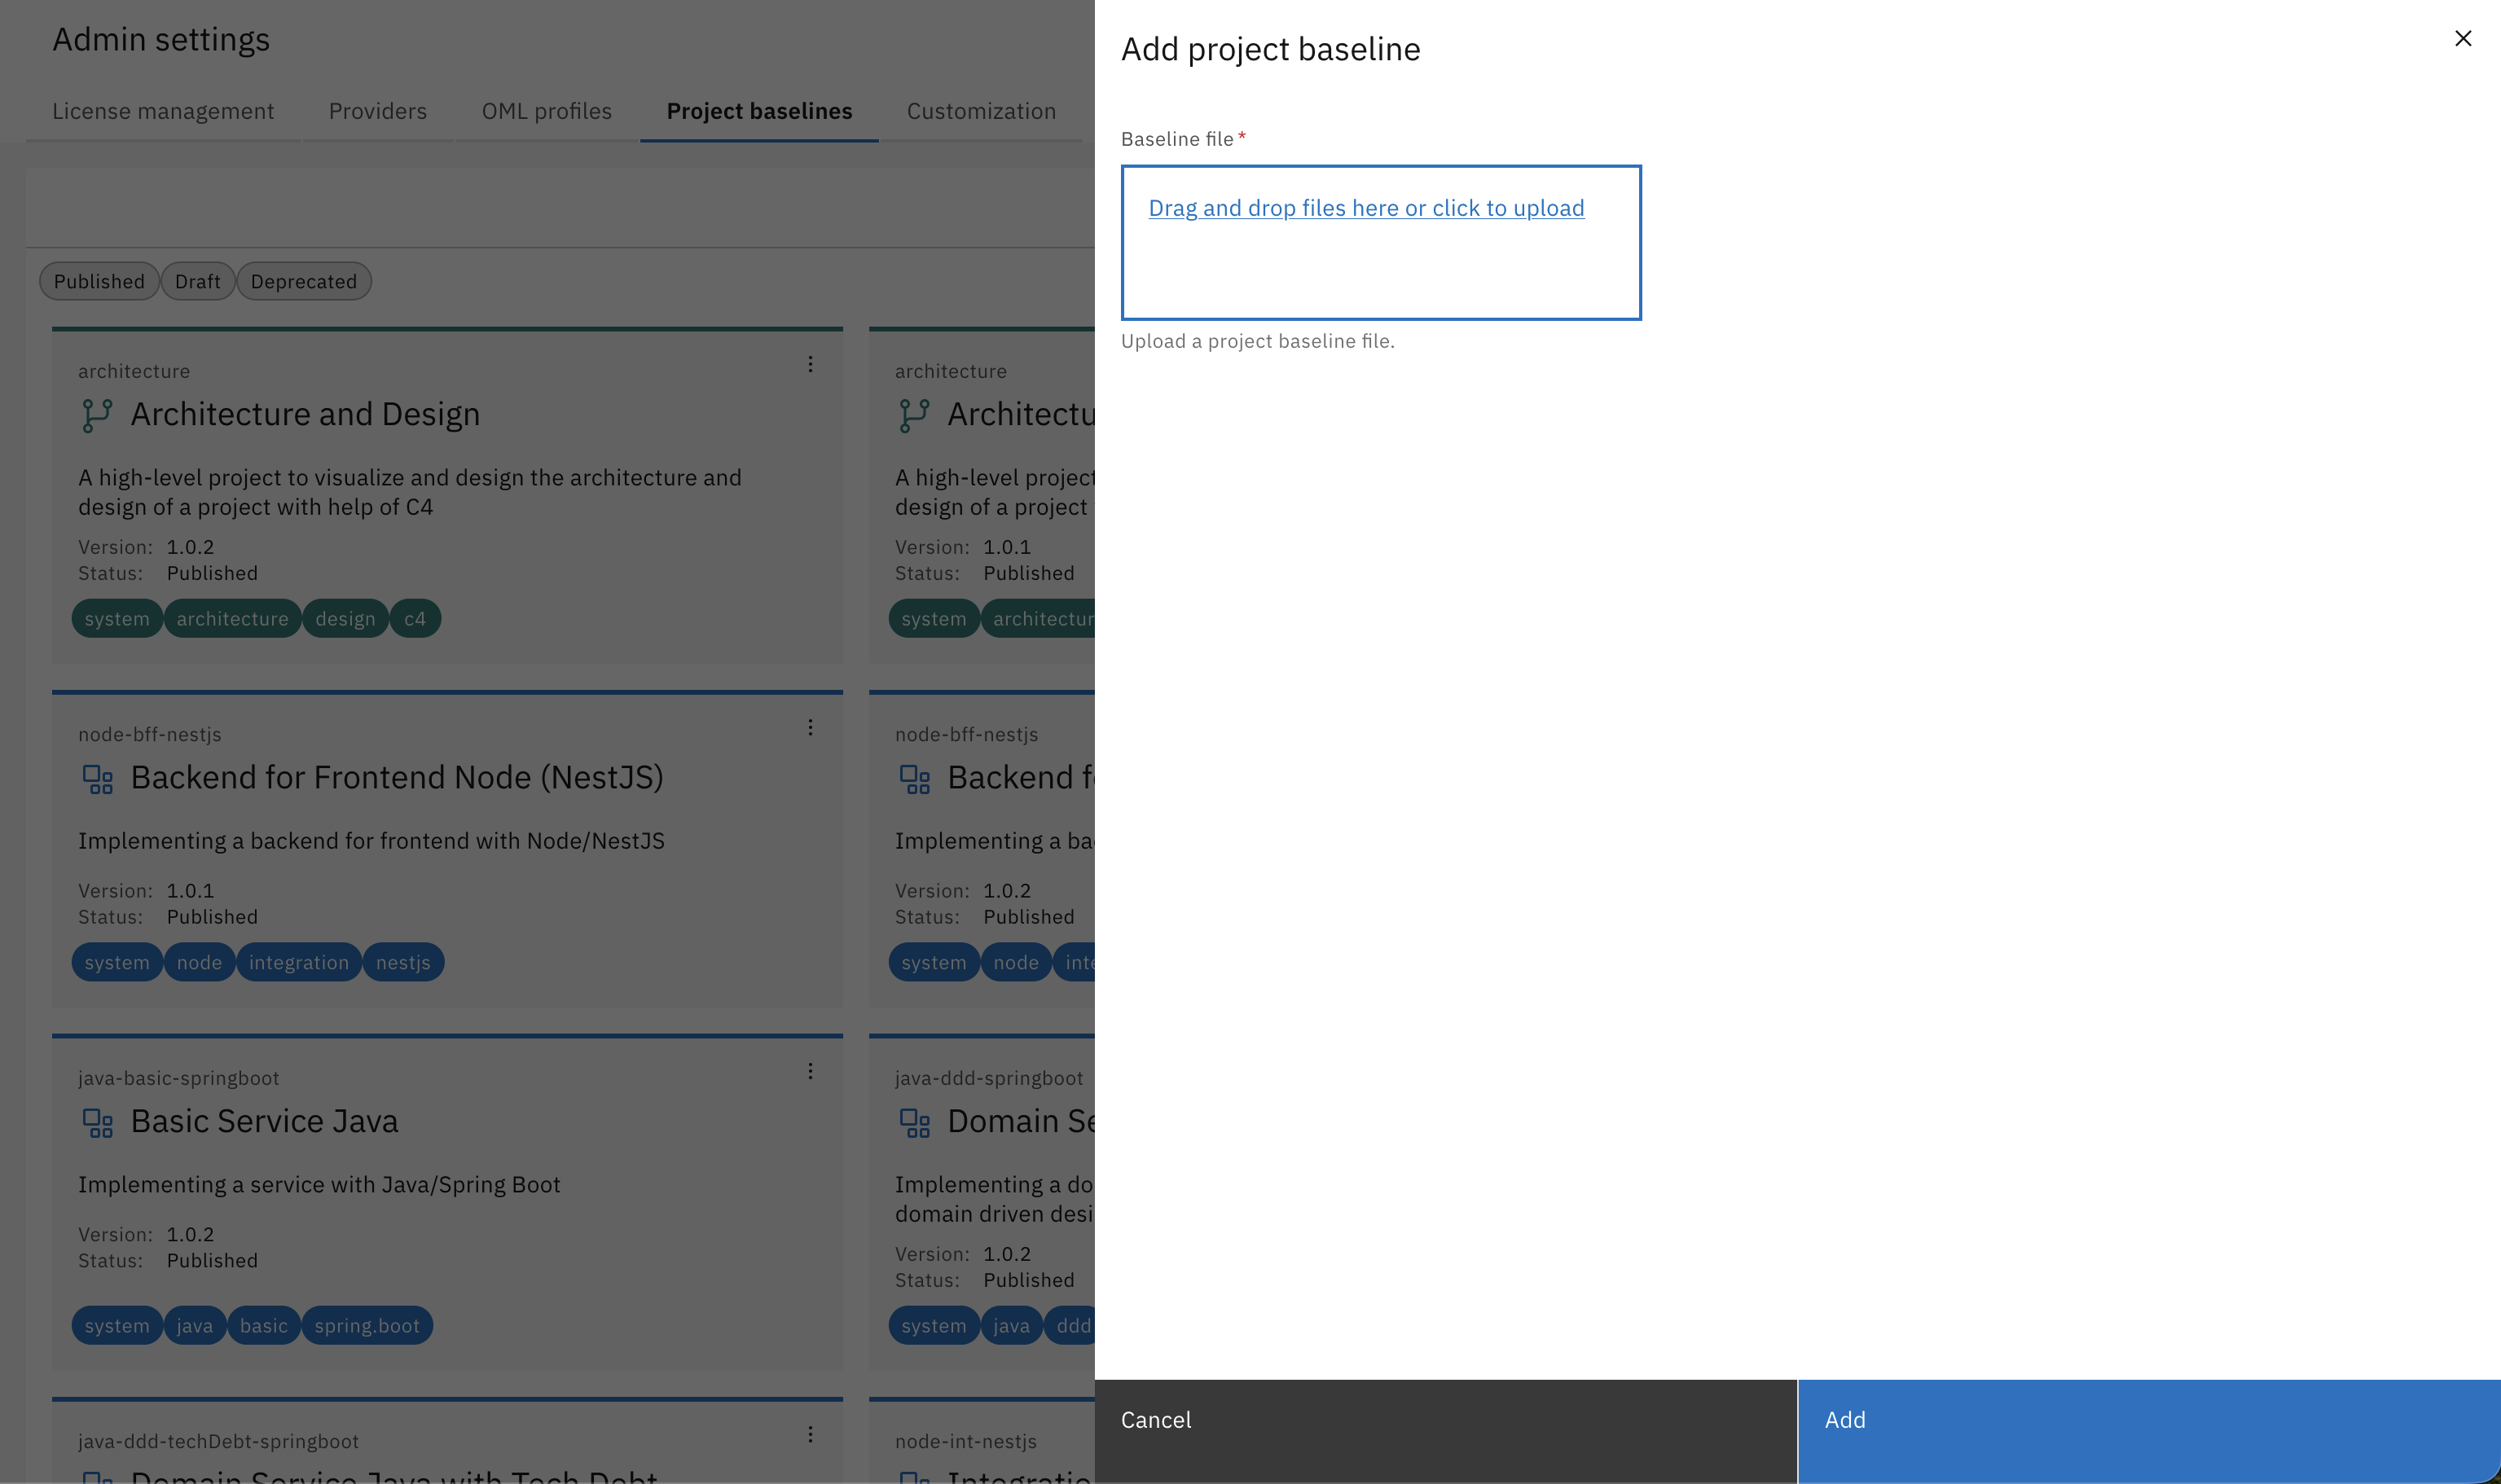
A modal opens where you can upload the file for the project baseline.
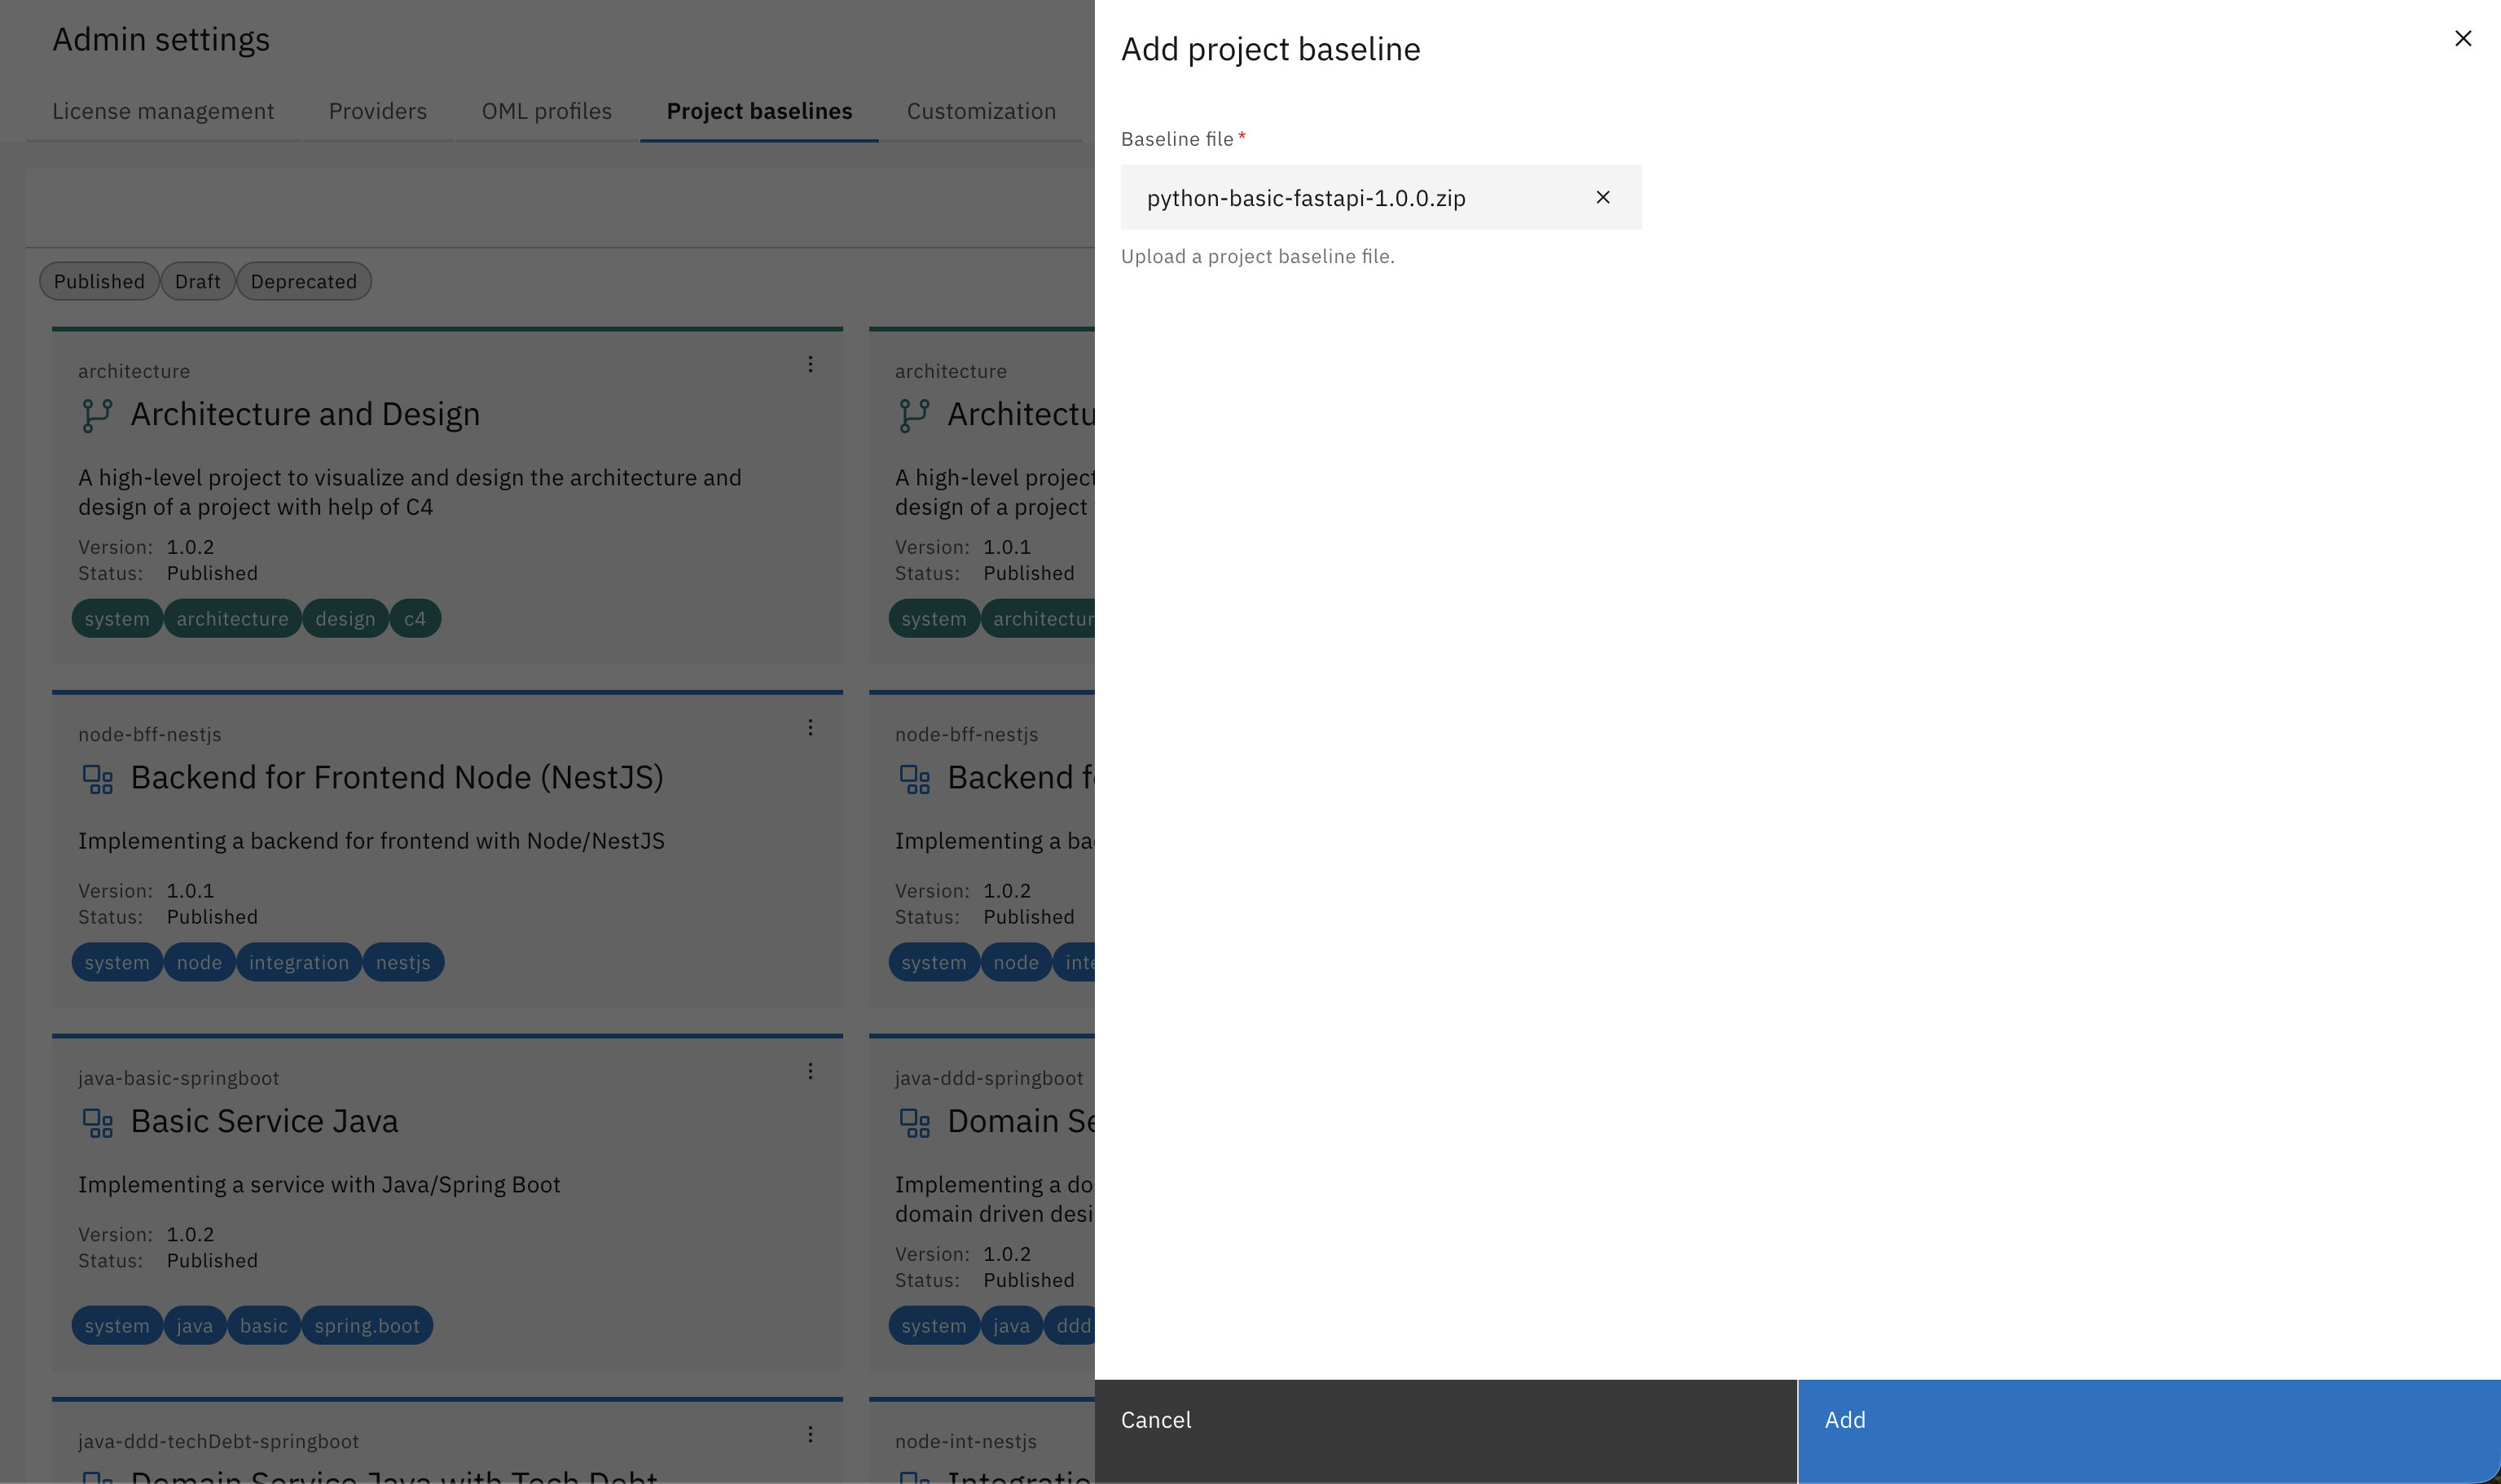
Upload your project baseline zip-file and click on "Add".
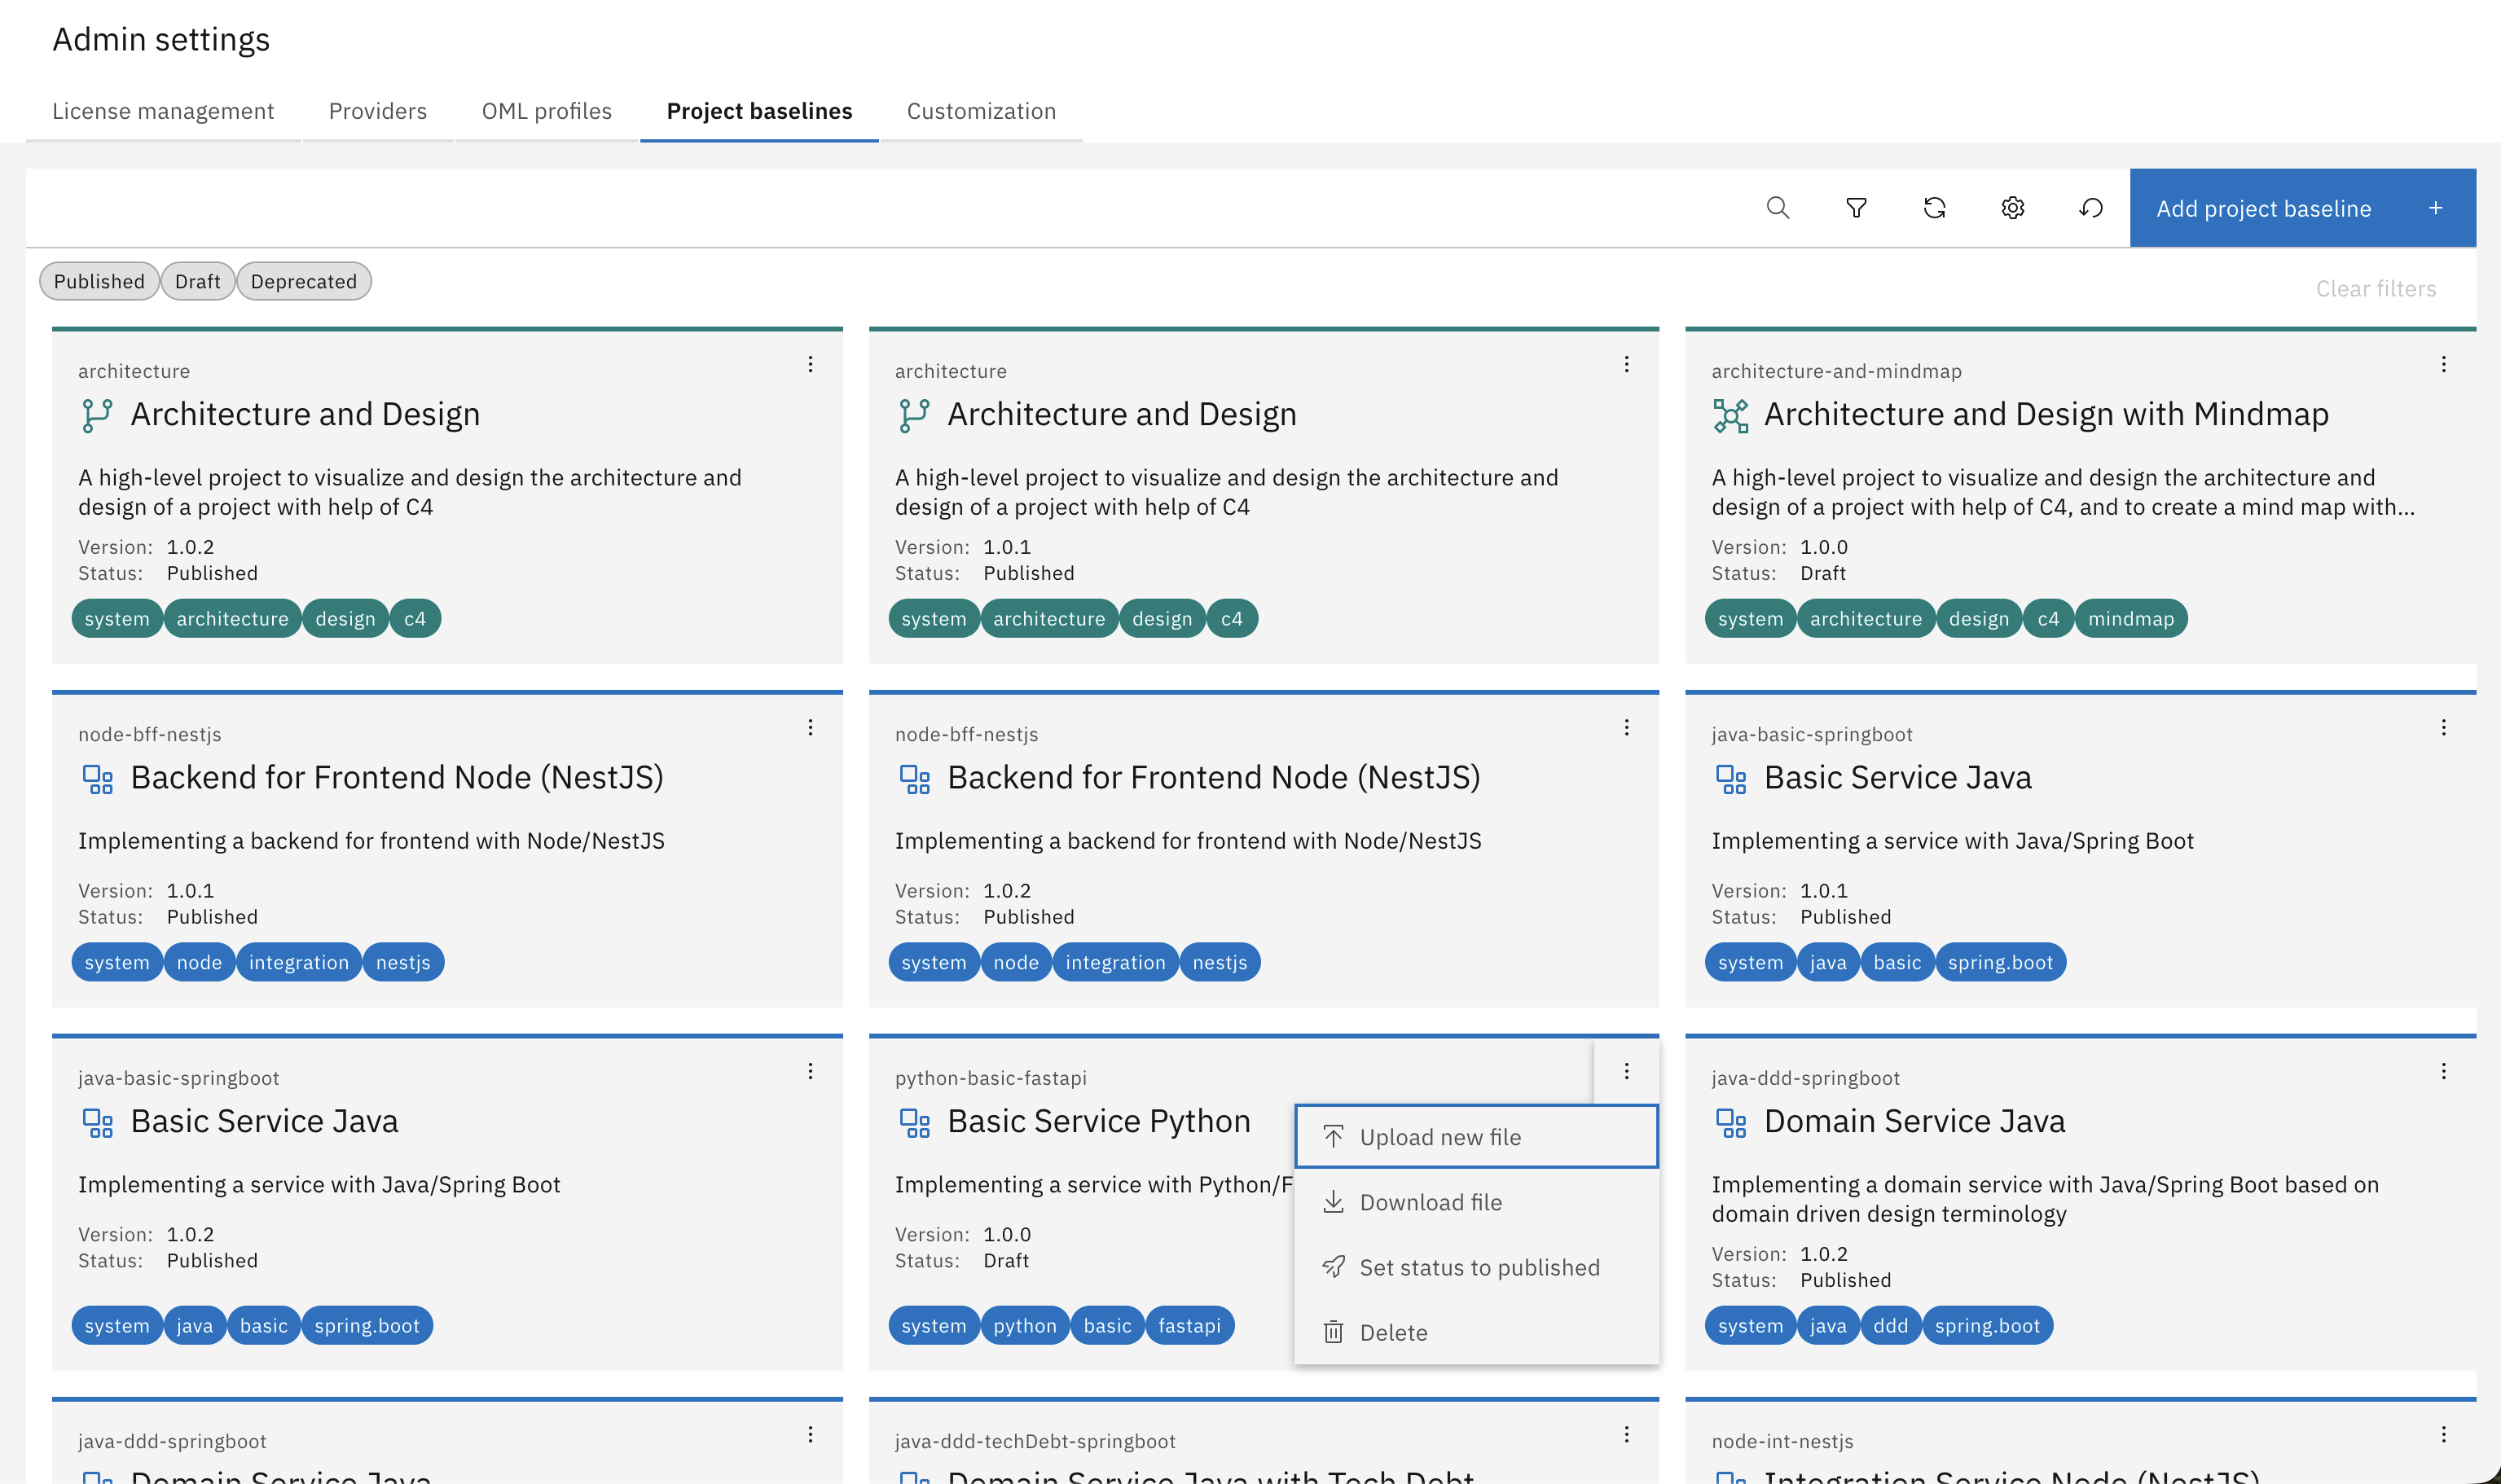
Search for the baseline you just uploaded, click on the three dots at the top right corner of the corresponding card and then click on "Set status to published".
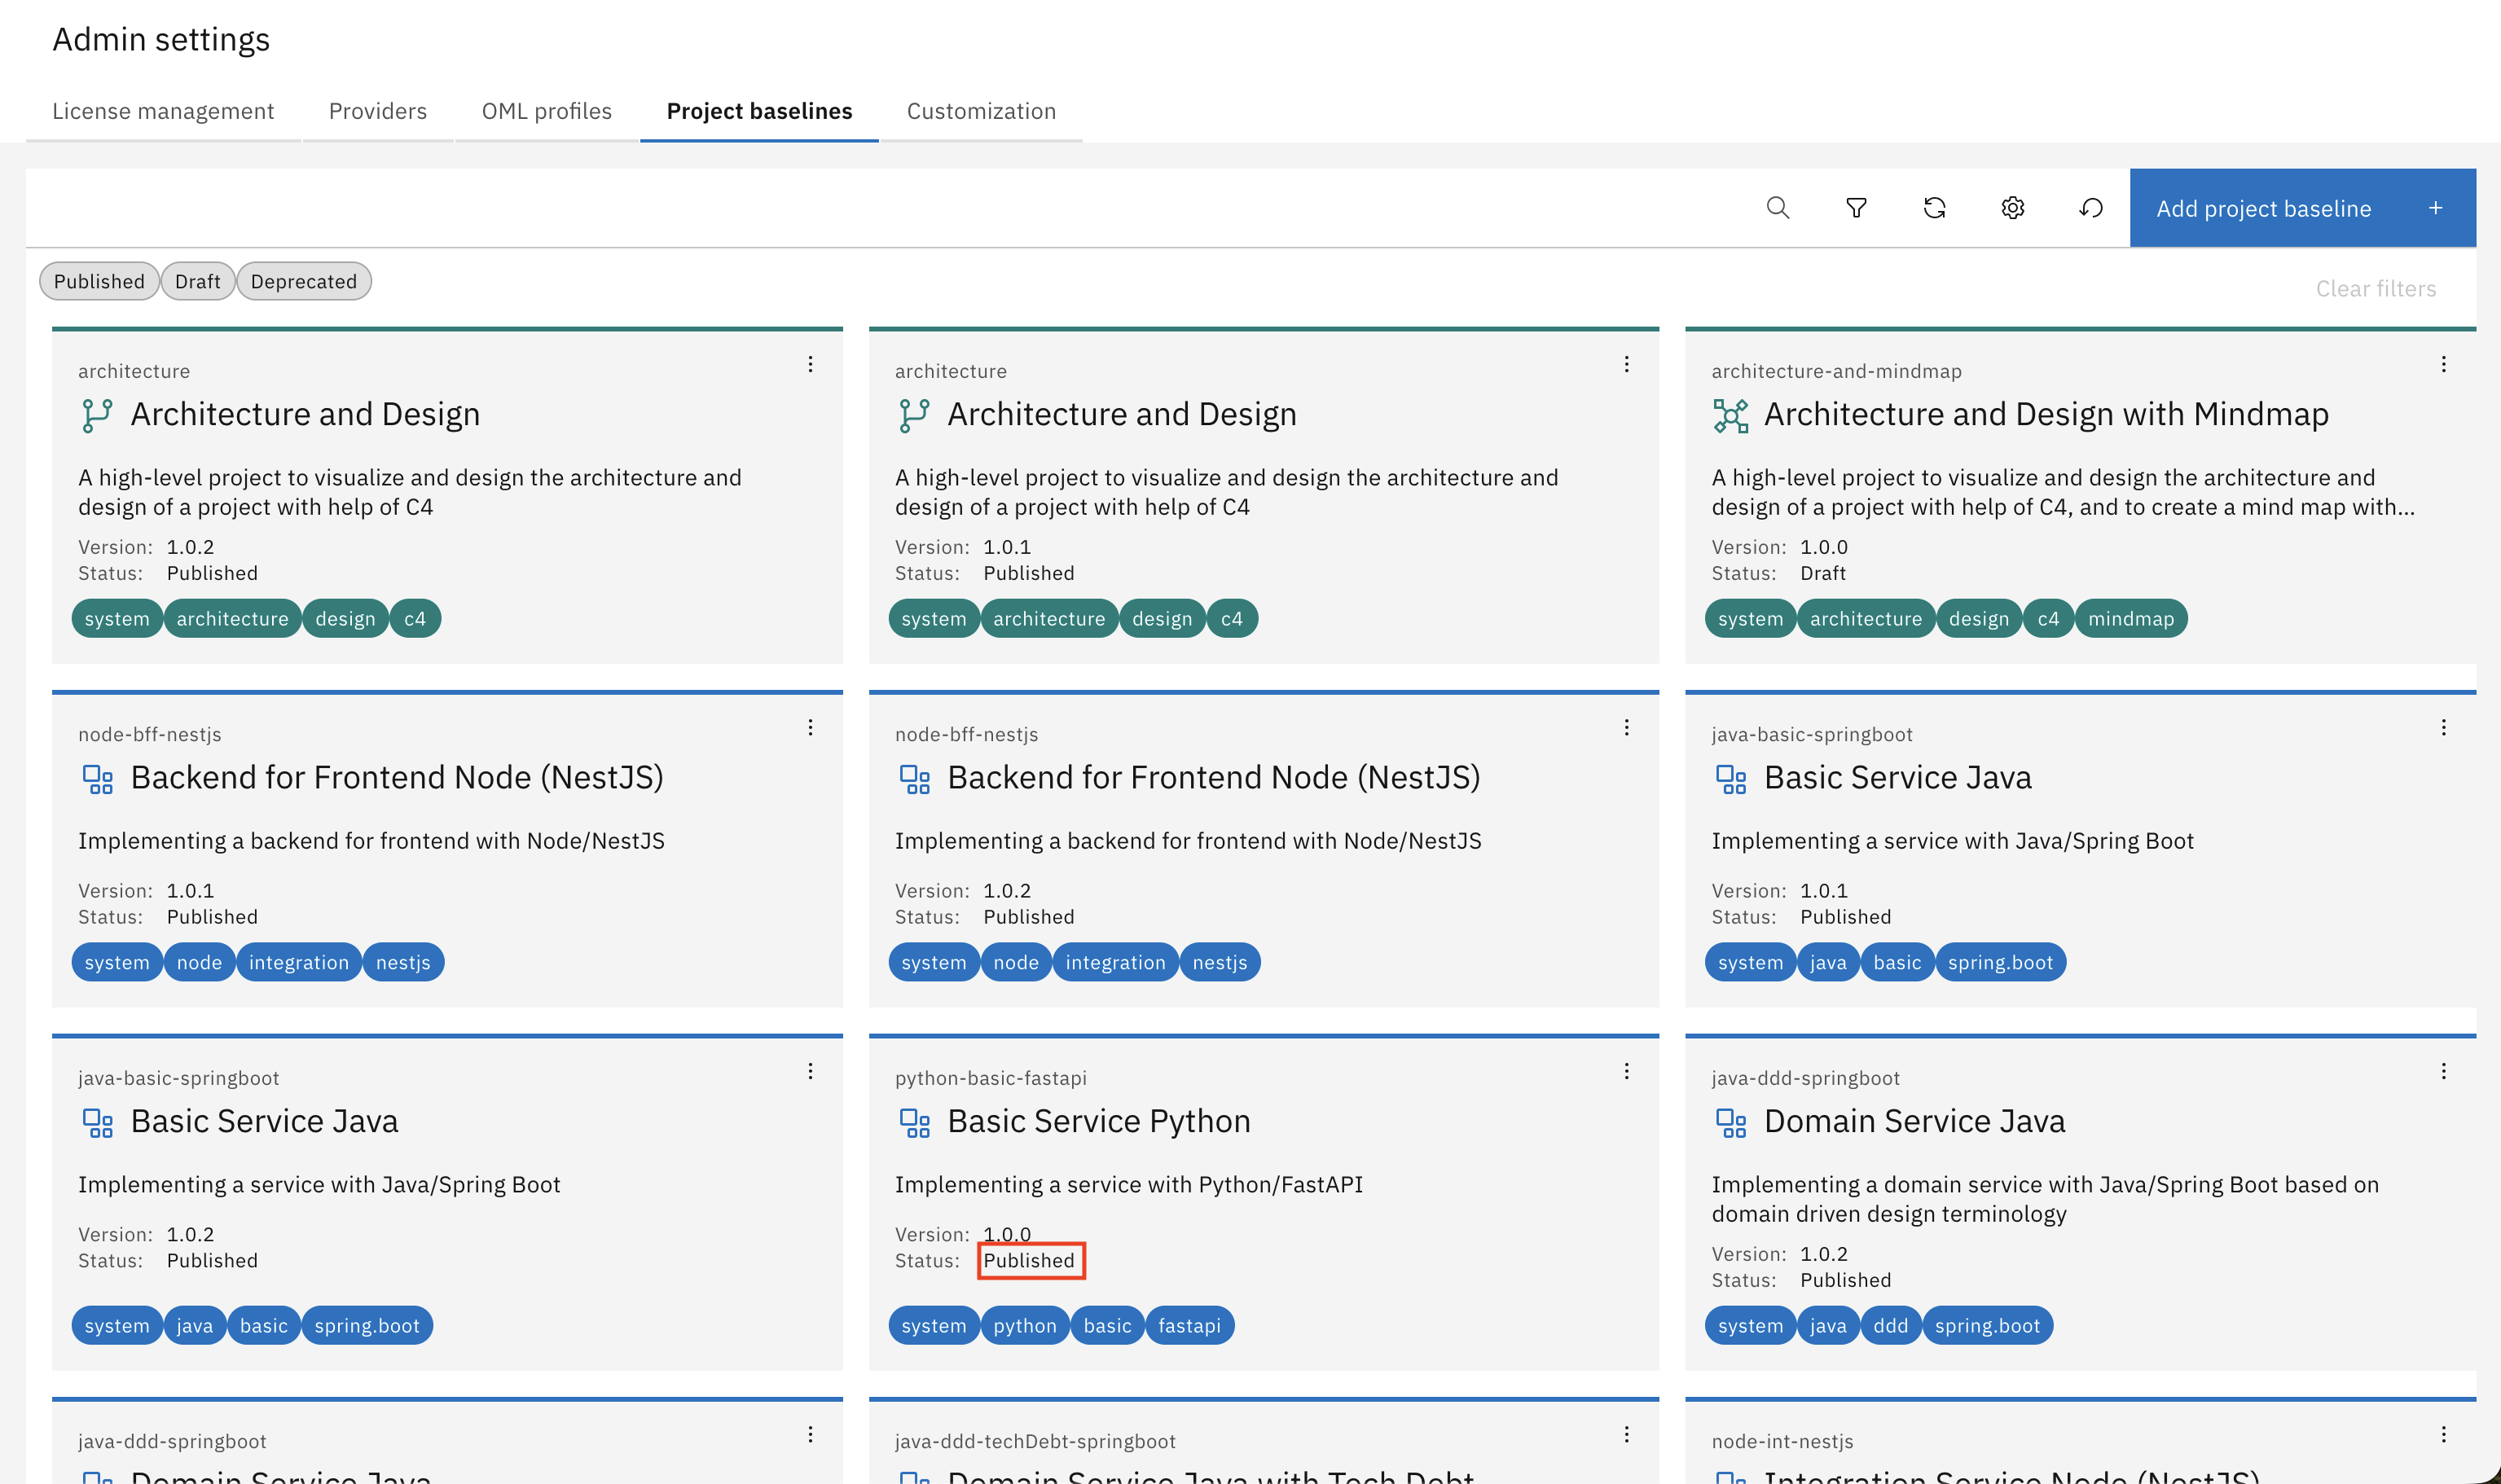
The project baseline is now available for all users in the Workbench.
If you want to see how a project baseline with custom recipes is actually used in a project, check out How-To: Use custom Recipes and Project Baselines for Code Generation.
You have successfully created a custom project baseline and made it available in the IBM DevOps Solution Workbench, so that it can be referenced in projects. You are now able to customize the modeling configuration and recipes of a project baseline.