Bootstrap a Service from a Shared Design Model
In this hands-on trial, you will bootstrap a production-ready microservice from a shared design model and experience first-hand how structured design intent transforms your coding assistant from guessing to consistently implementing your organisation's standards.
Before you start
Estimated time: 15-20 minutes
What you need: Your own IDE and coding assistant, access to our trial environment.
About your trial environment
Your trial environment includes everything you need to get started: a dedicated, isolated tenant in the IBM DevOps Solution Workbench, and a GitLab instance with repositories for all your projects - including our reference application Roboflow ready for you to explore.
You bring your own IDE and coding assistant — whatever you normally use. In our screenshots throughout these trials we use Visual Studio Code with GitHub Copilot.
Solution Designer
The Solution Designer is your main workspace in Workbench. This is where architecture is modelled,
design decisions are captured, and structured context is created for your coding assistant.
Your trial comes with a dedicated, isolated tenant. Log in using the credentials from your trial onboarding email.
GitLab
Every project in the Solution Designer is backed by a Git repository in your trial's dedicated GitLab group. Throughout the trial, you usually access GitLab repositories
through the Solution Designer since URLs are specific to your tenant.
To find the Repository URL for any project:
- Open the project in the Solution Designer
- On the Overview page that opens, you'll find "General Information" on the right hand side.
- The link under "Acronym" takes you directly to the GitLab repository for that project.
- Log into GitLab using the "Keycloak" button.
Cloning a project to work in your own IDE requires a Personal Access Token (PAT). To create one:
- Log into your Trial GitLab (using the Keycloak button)
- Click your profile icon in the upper right corner and select Preferences
- Go to Access → Personal Access Tokens
- Create a token with
read_repository,write_repositoryandapiscope
Cloning a project
To clone a project, you can either use the "Code" button in the GitLab UI and copy the "Clone with HTTPS" URL or you can copy the URL directly from the Solution Designer project page. To do this:
- Open the project in the Solution Designer
- Expand the footer bar that says "Git"
- Copy the URL
In both cases, use a terminal and run git clone <URL> -b <optional-branch-name> and use your username and the created PAT as the password when prompted.
Cloning via SSH is disabled in the trial environment for security reasons.
RoboFlow
Your trial environment comes preloaded with RoboFlow — a fictional B2B webshop for robotics parts that serves as the reference
application across all trial experiences. Its services are already designed and documented in the Solution Designer, ready for you to explore and build on.
Step 1 — Orient yourself
You are working with RoboFlow — a fictional B2B webshop for robotics parts that serves as the reference application across all trial experiences. If you are new to the scenario or want a quick overview of the system and its services, expand the section below.
About the RoboFlow reference application
The RoboFlow reference application
The trials in this section are built around RoboFlow — a fictional B2B webshop for robotics parts that serves as the reference application across all trial experiences. If you want to find out about RoboFlow's ambitions and requirements, you can head to the RoboFlow overview page for a quick introduction.
RoboFlow's system is composed of multiple microservices, each designed and documented in the Workbench. The starting point is an architecture project — a high-level view of the system that shows which services exist, how they relate, and what responsibilities they carry. RoboFlow's architecture is modelled using C4 notation, one of the modelling languages IBM DevOps Solution Workbench supports out of the box.
The diagram below is the Container Diagram (Level 2) of the RoboFlow system in the RoboFlow architecture project — one level below the overall system context (L1), showing the individual services and their relationships. You can also open it directly in the Workbench.
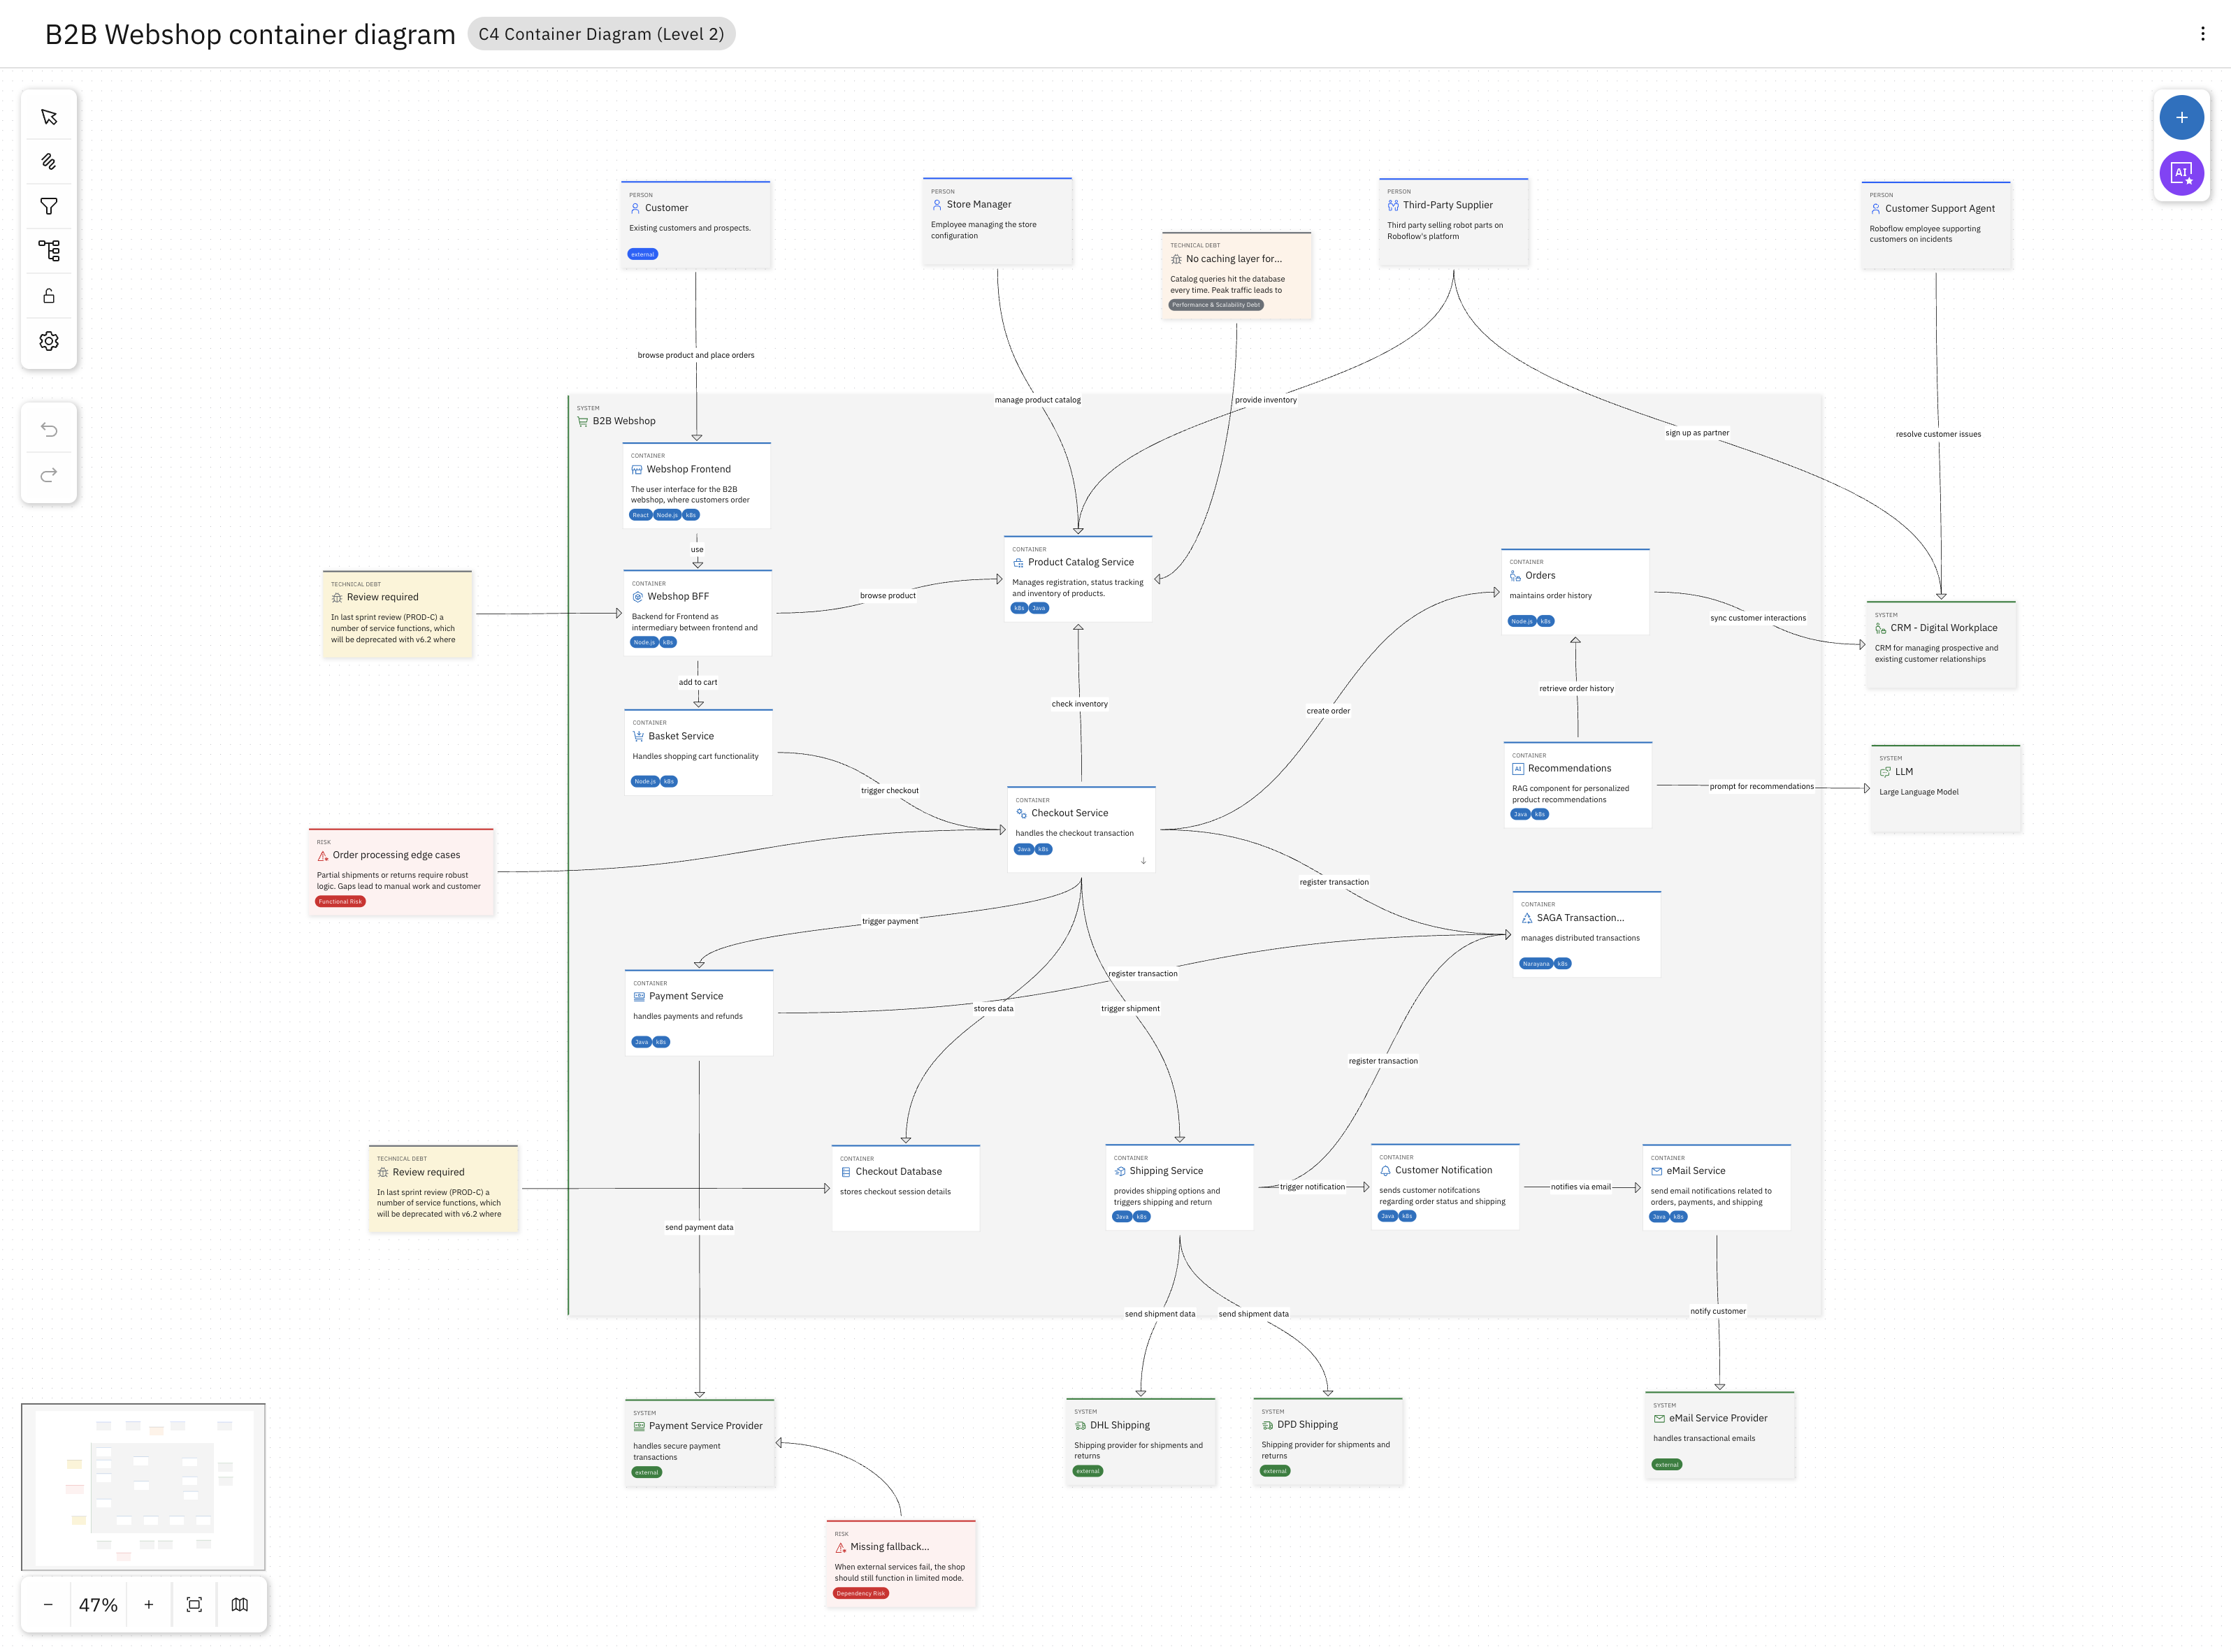
The system includes a WebShop Frontend, a Basket Service, a Checkout Service, a Payment Service, and others. Three services are central to the trials:
- Checkout Service — orchestrates the checkout flow, applies discounts, and initiates payment
- Payment Service — handles all payment processing and integrates with external payment providers
- Gift Card Service — manages gift card balances, validates voucher codes, and tracks redemptions
Each service usually has its own service project in the Workbench — a separate, more detailed specification that defines the service's boundaries, domain model, interfaces, and the architectural decisions that apply to it. This is where the real design work happens.
Explore a service
As an example, let's look at the Checkout Service.
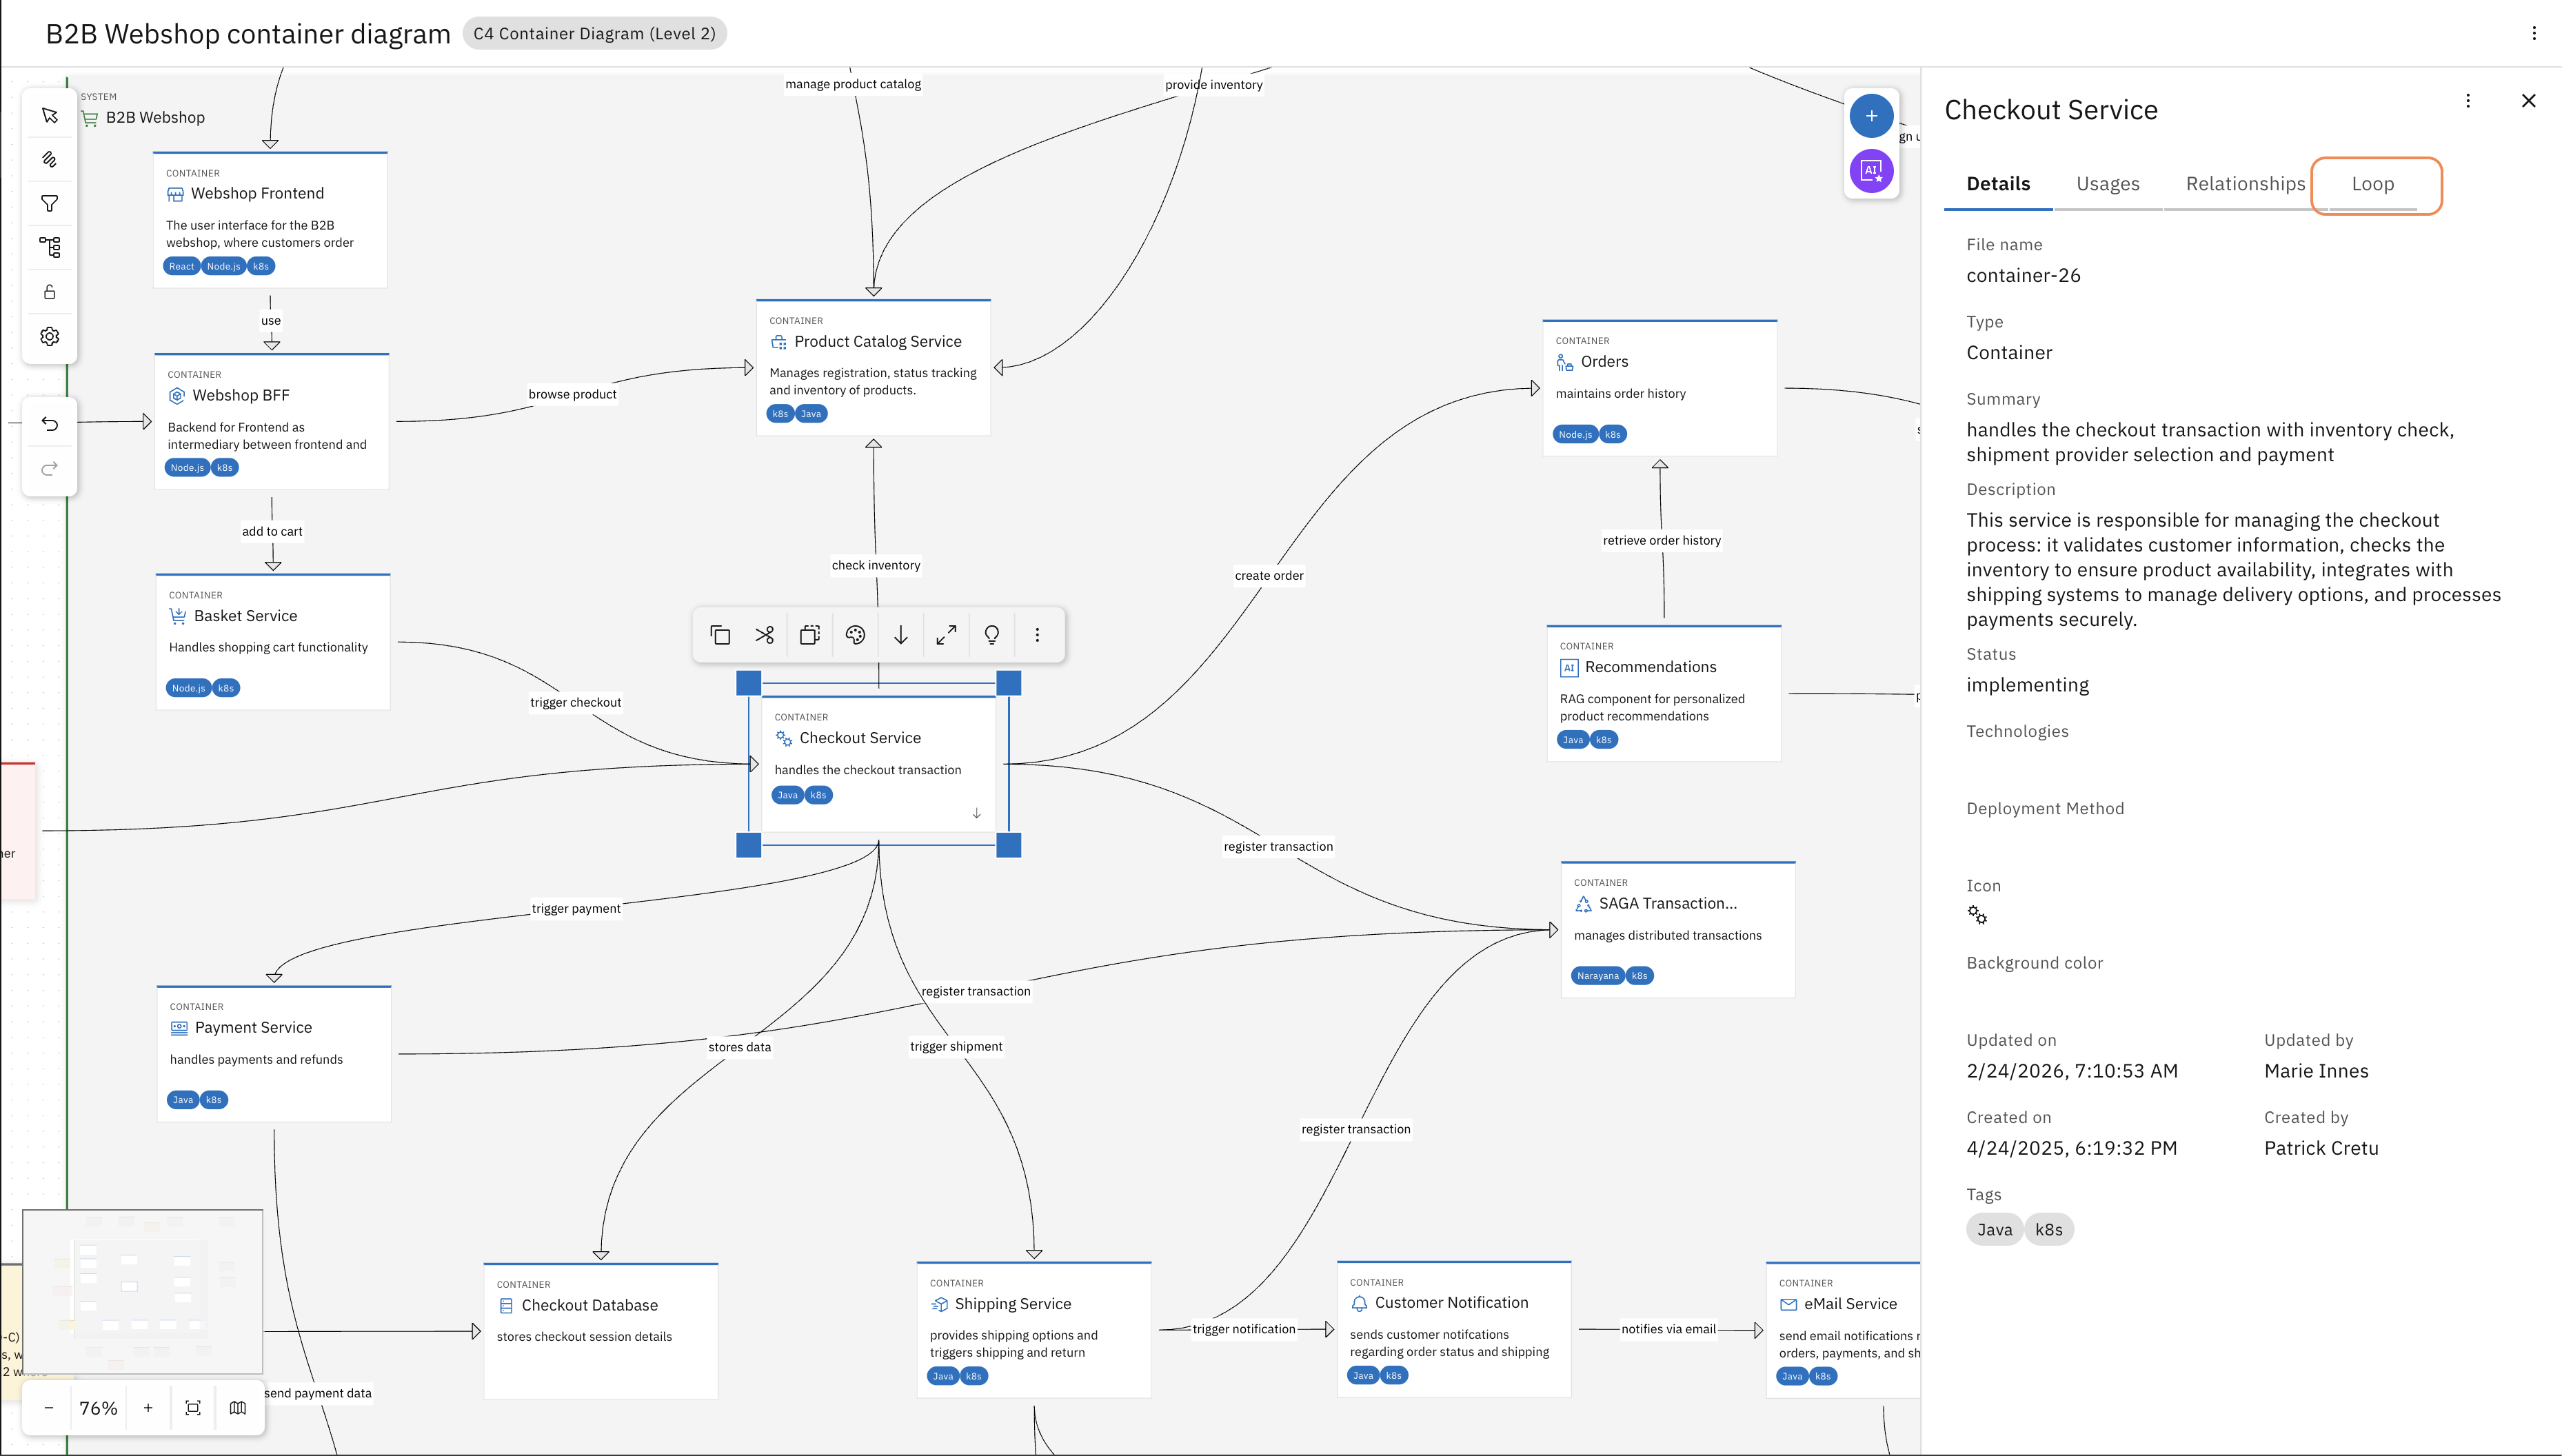
Select the Checkout Service on the L2 diagram and in the sidebar on the right (you might need to expand it) navigate to the Loop tab.
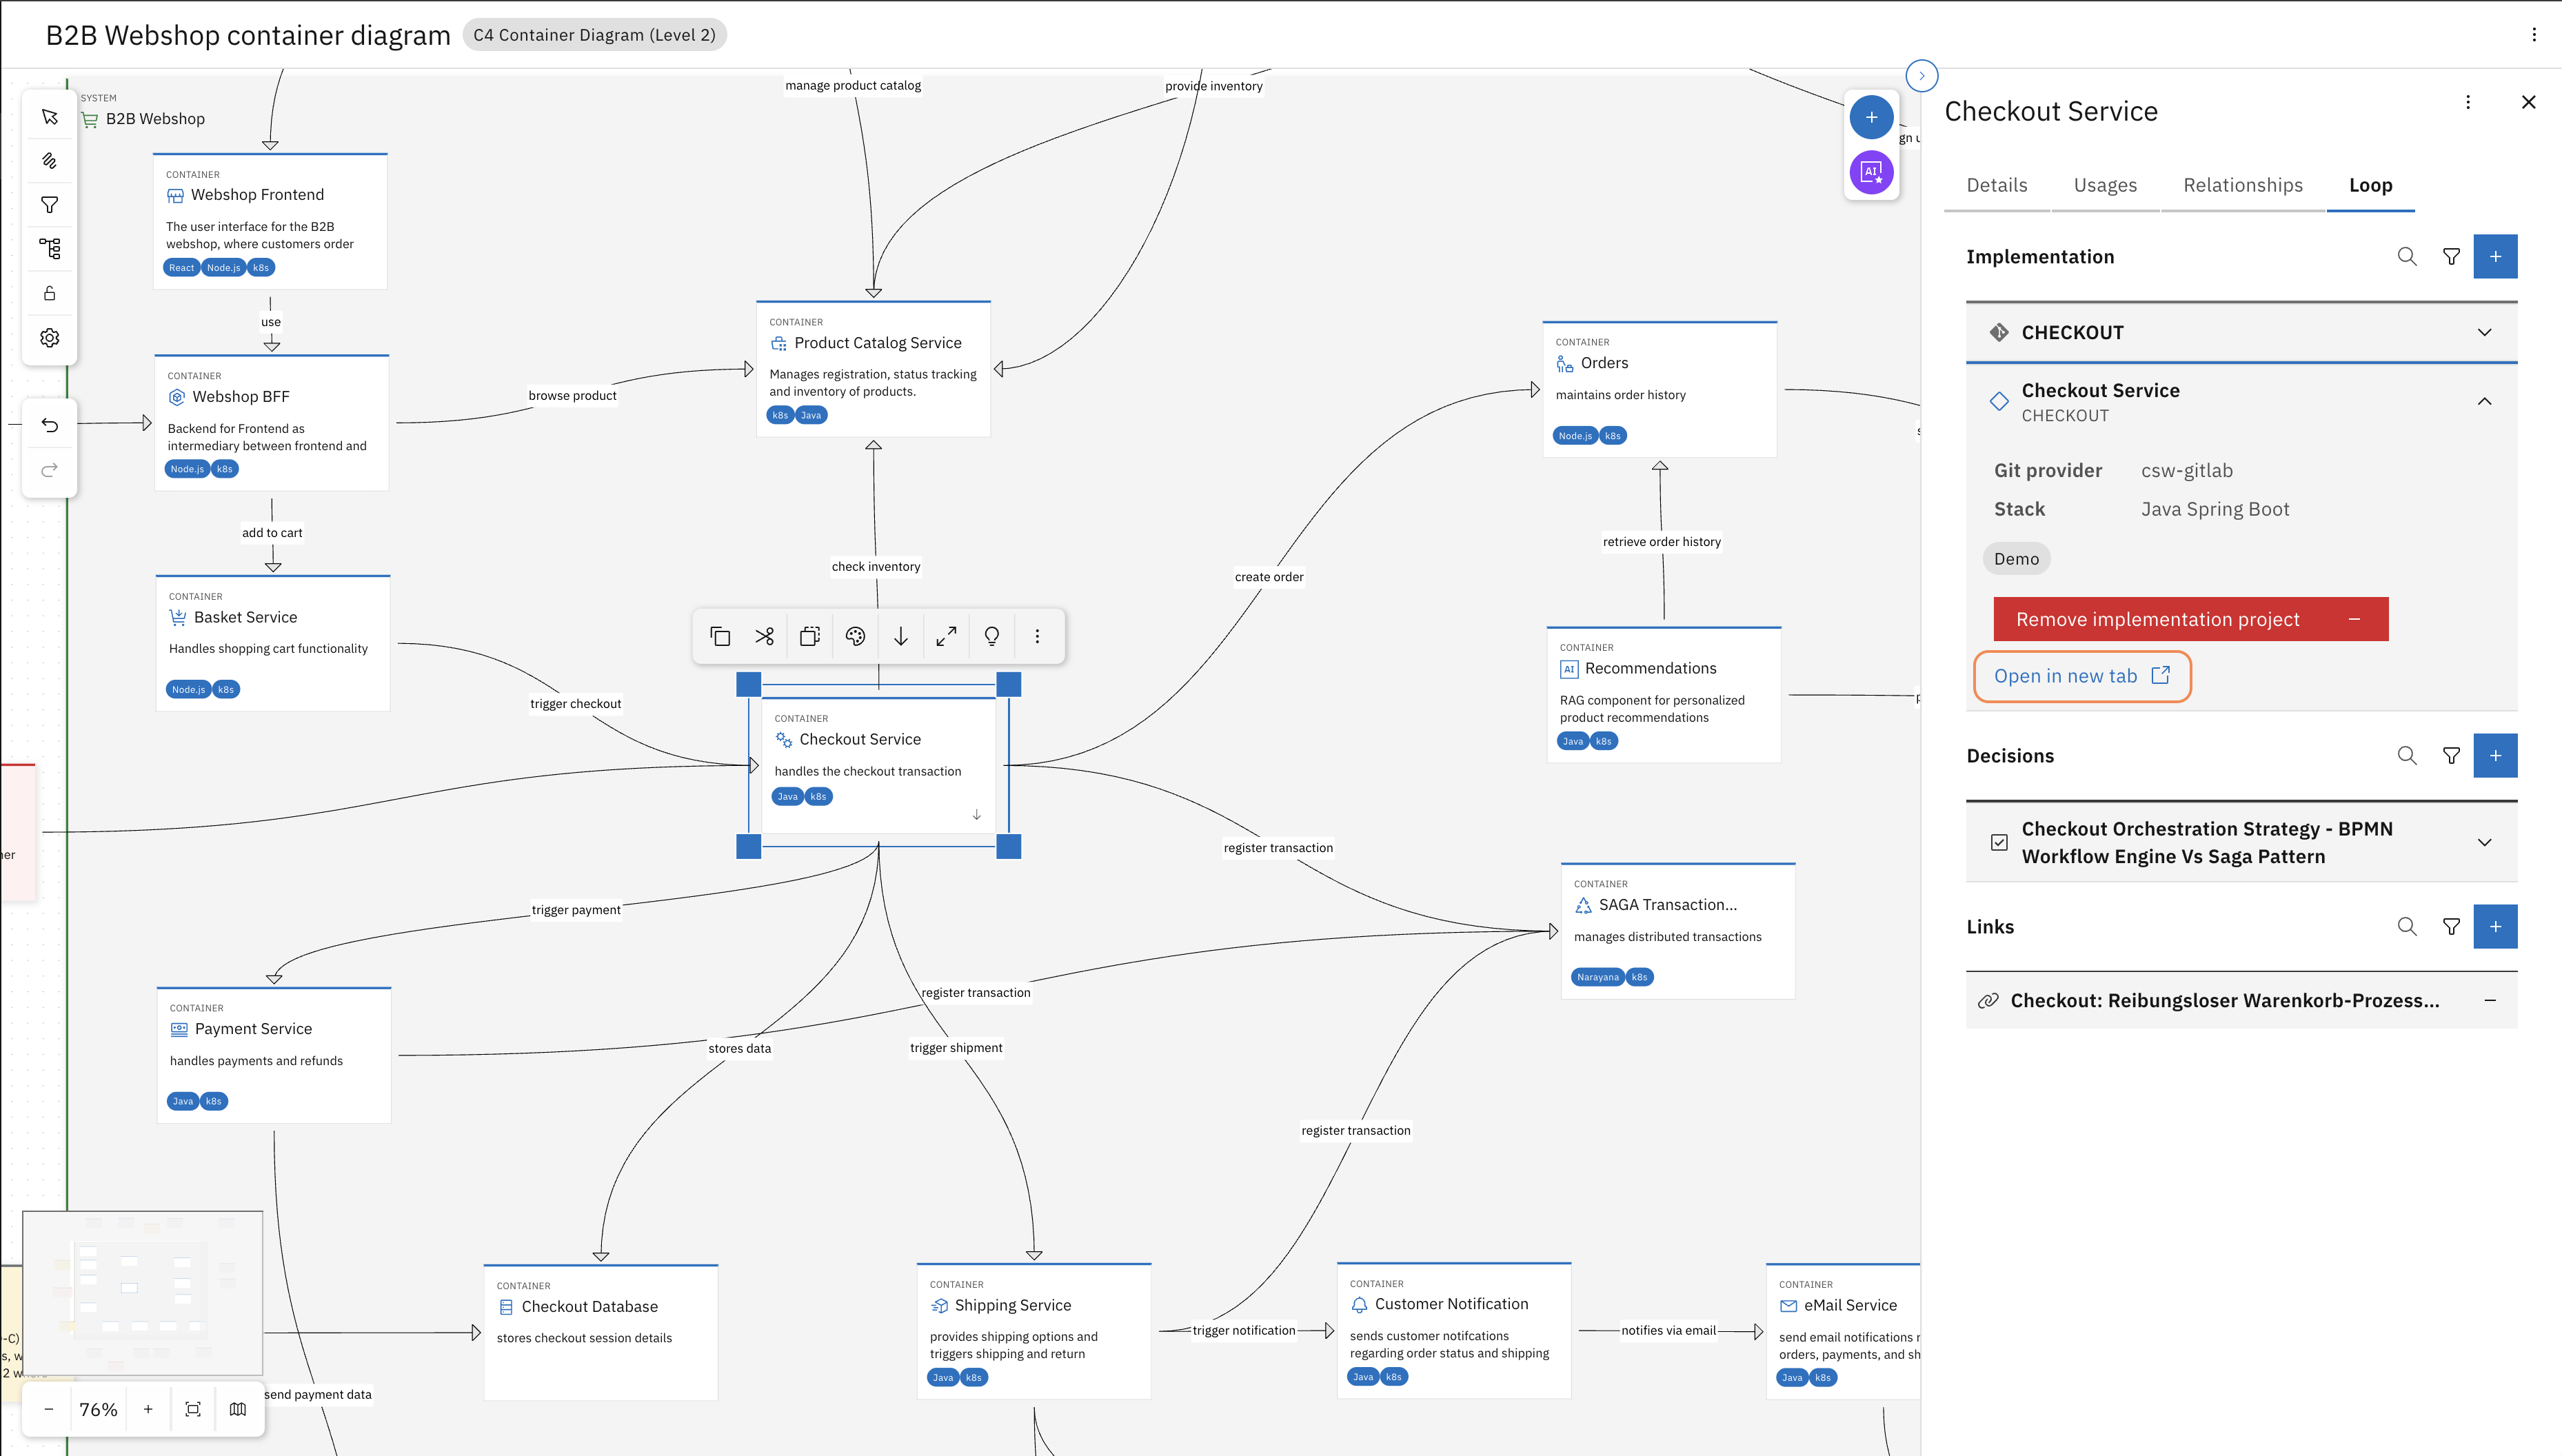
Find the Workbench project and "Open in new tab". This will open the service project where the design details of the Checkout Service are modelled and documented.
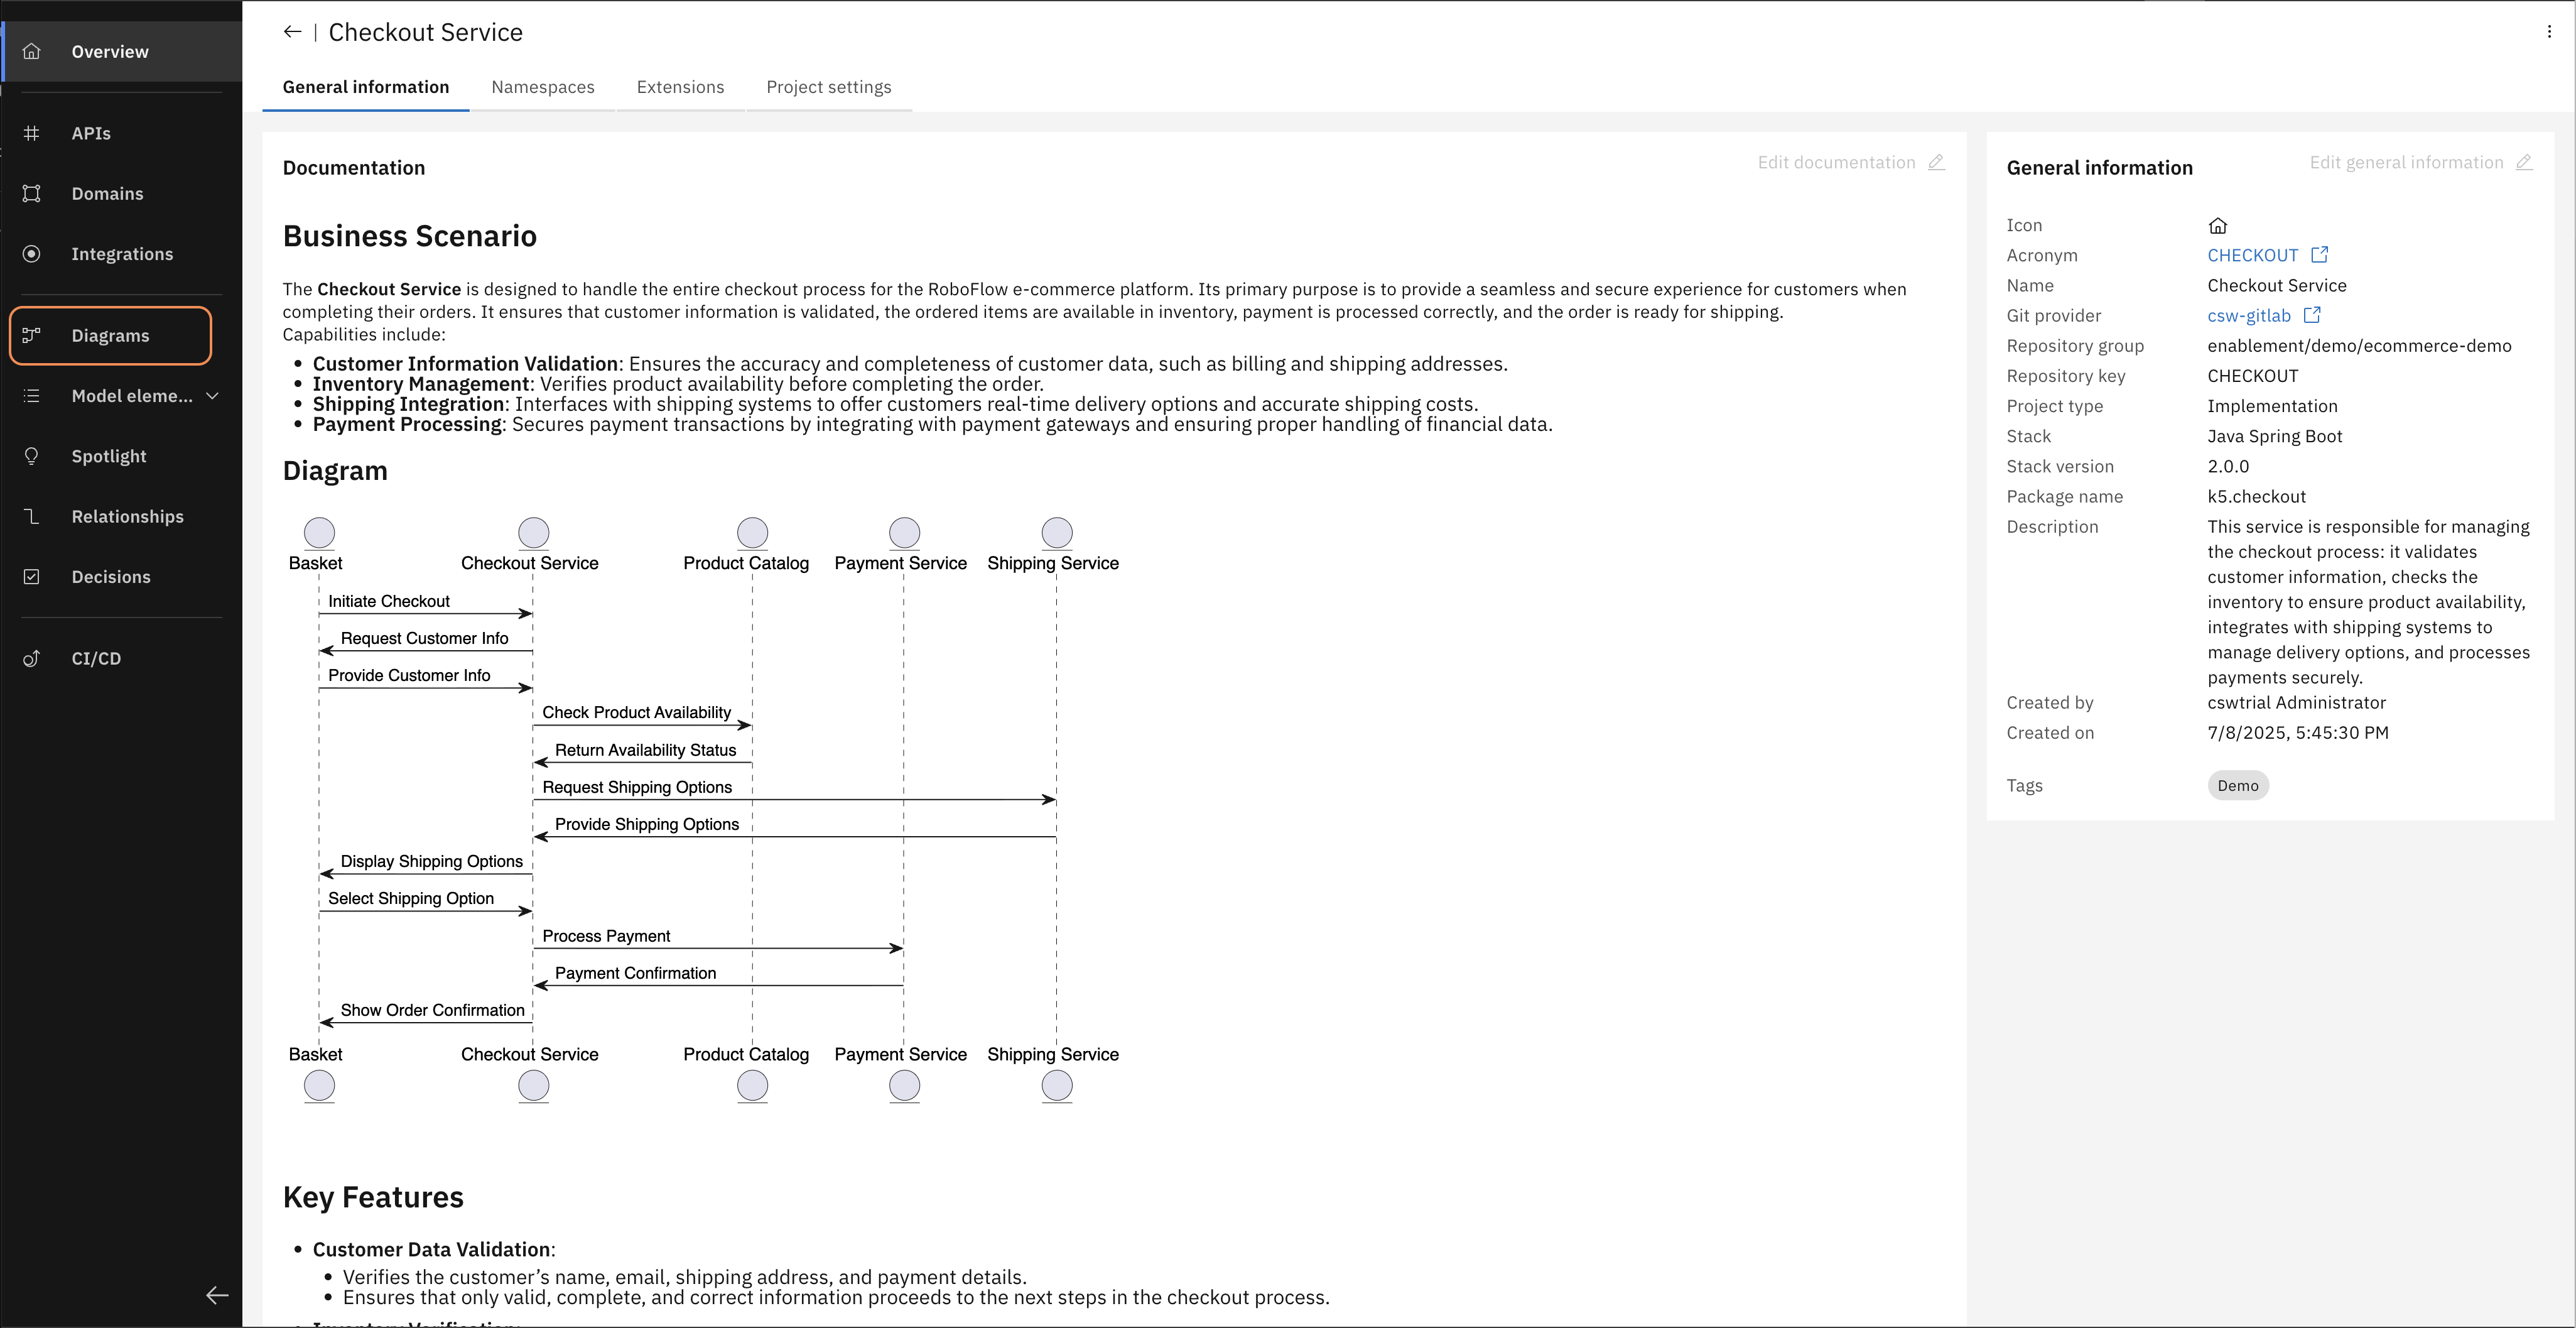
In the left navigation bar, open Diagrams and then open the "Checkout Service component diagram".
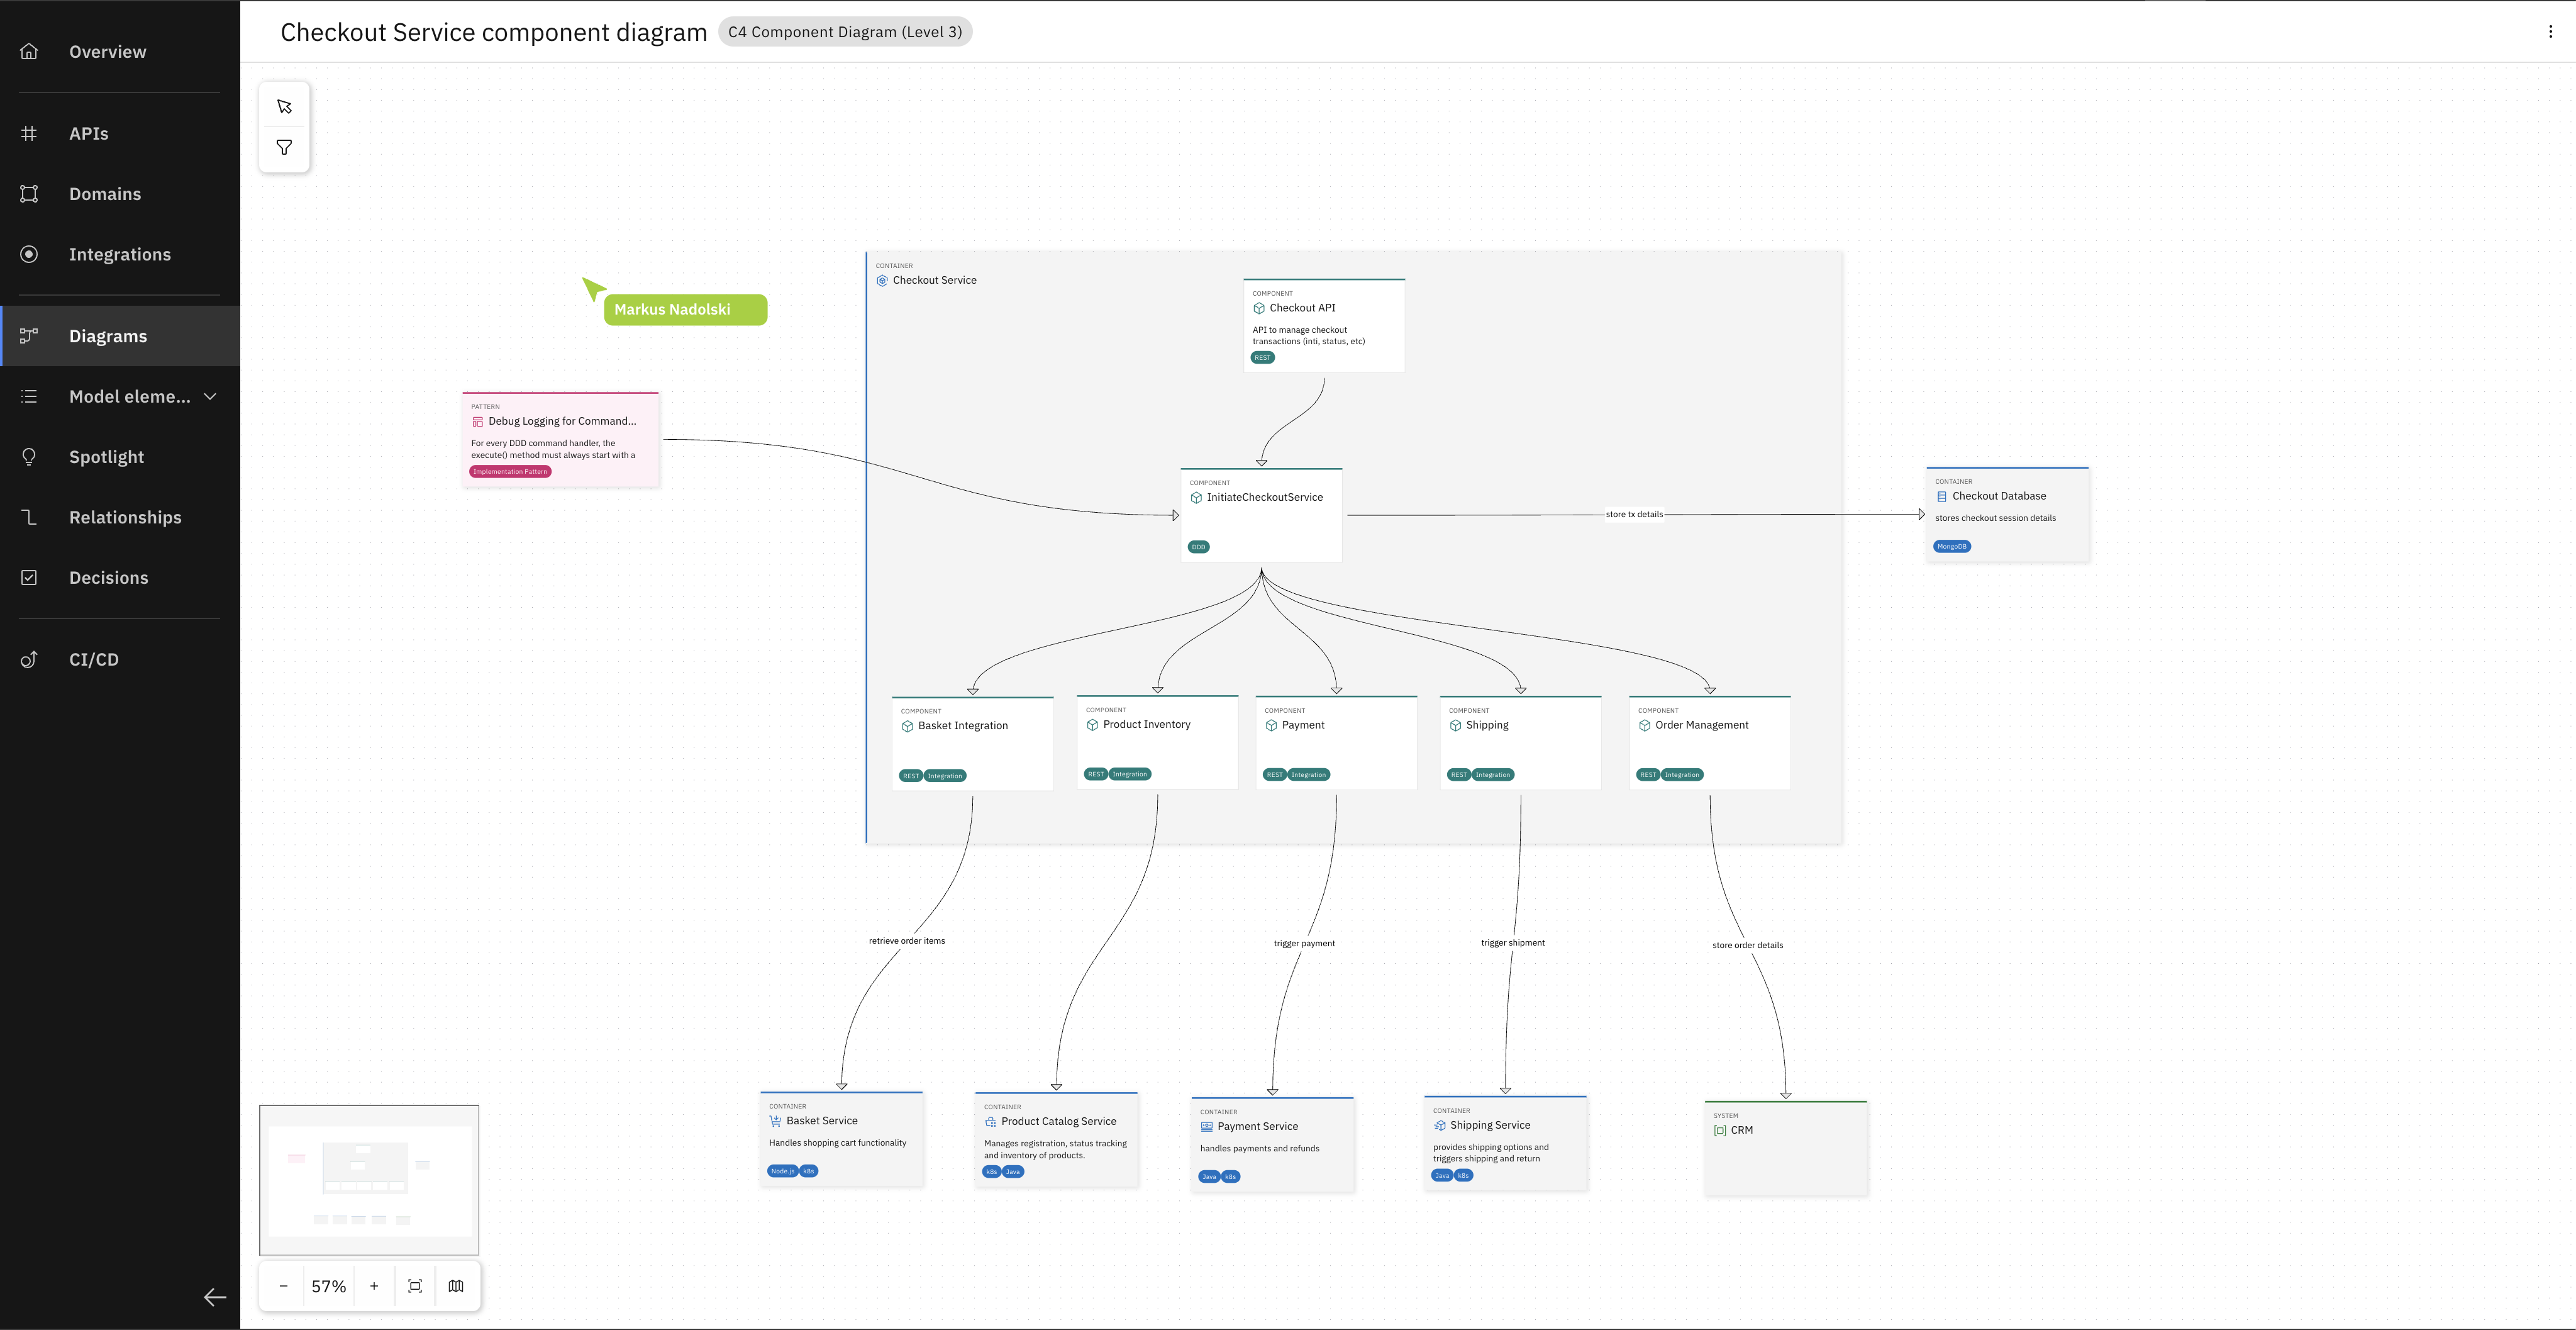
You can now explore the Component Diagram (Level 3 in the C4 model) of the Checkout Service.
Now that you have a feel for how services are structured in the Workbench, let's put it to work. You have a new requirement waiting.
Step 2 - Meet your new requirement
The Gift Card Service has already been designed. Your job is to implement it.
RoboFlow has a new requirement: Customers should be able to pay with gift card vouchers at checkout. The architect already designed the Gift Card Service and documented it in the Workbench — service boundaries defined, domain model specified, architectural decisions attached. What doesn't exist yet is the implementation. That's what you're about to do.
Let's start by orienting ourselves in the Workbench and retrieving the URL of the Git repository to clone the project.
Open Workbench by clicking here.
Intro to Workbench
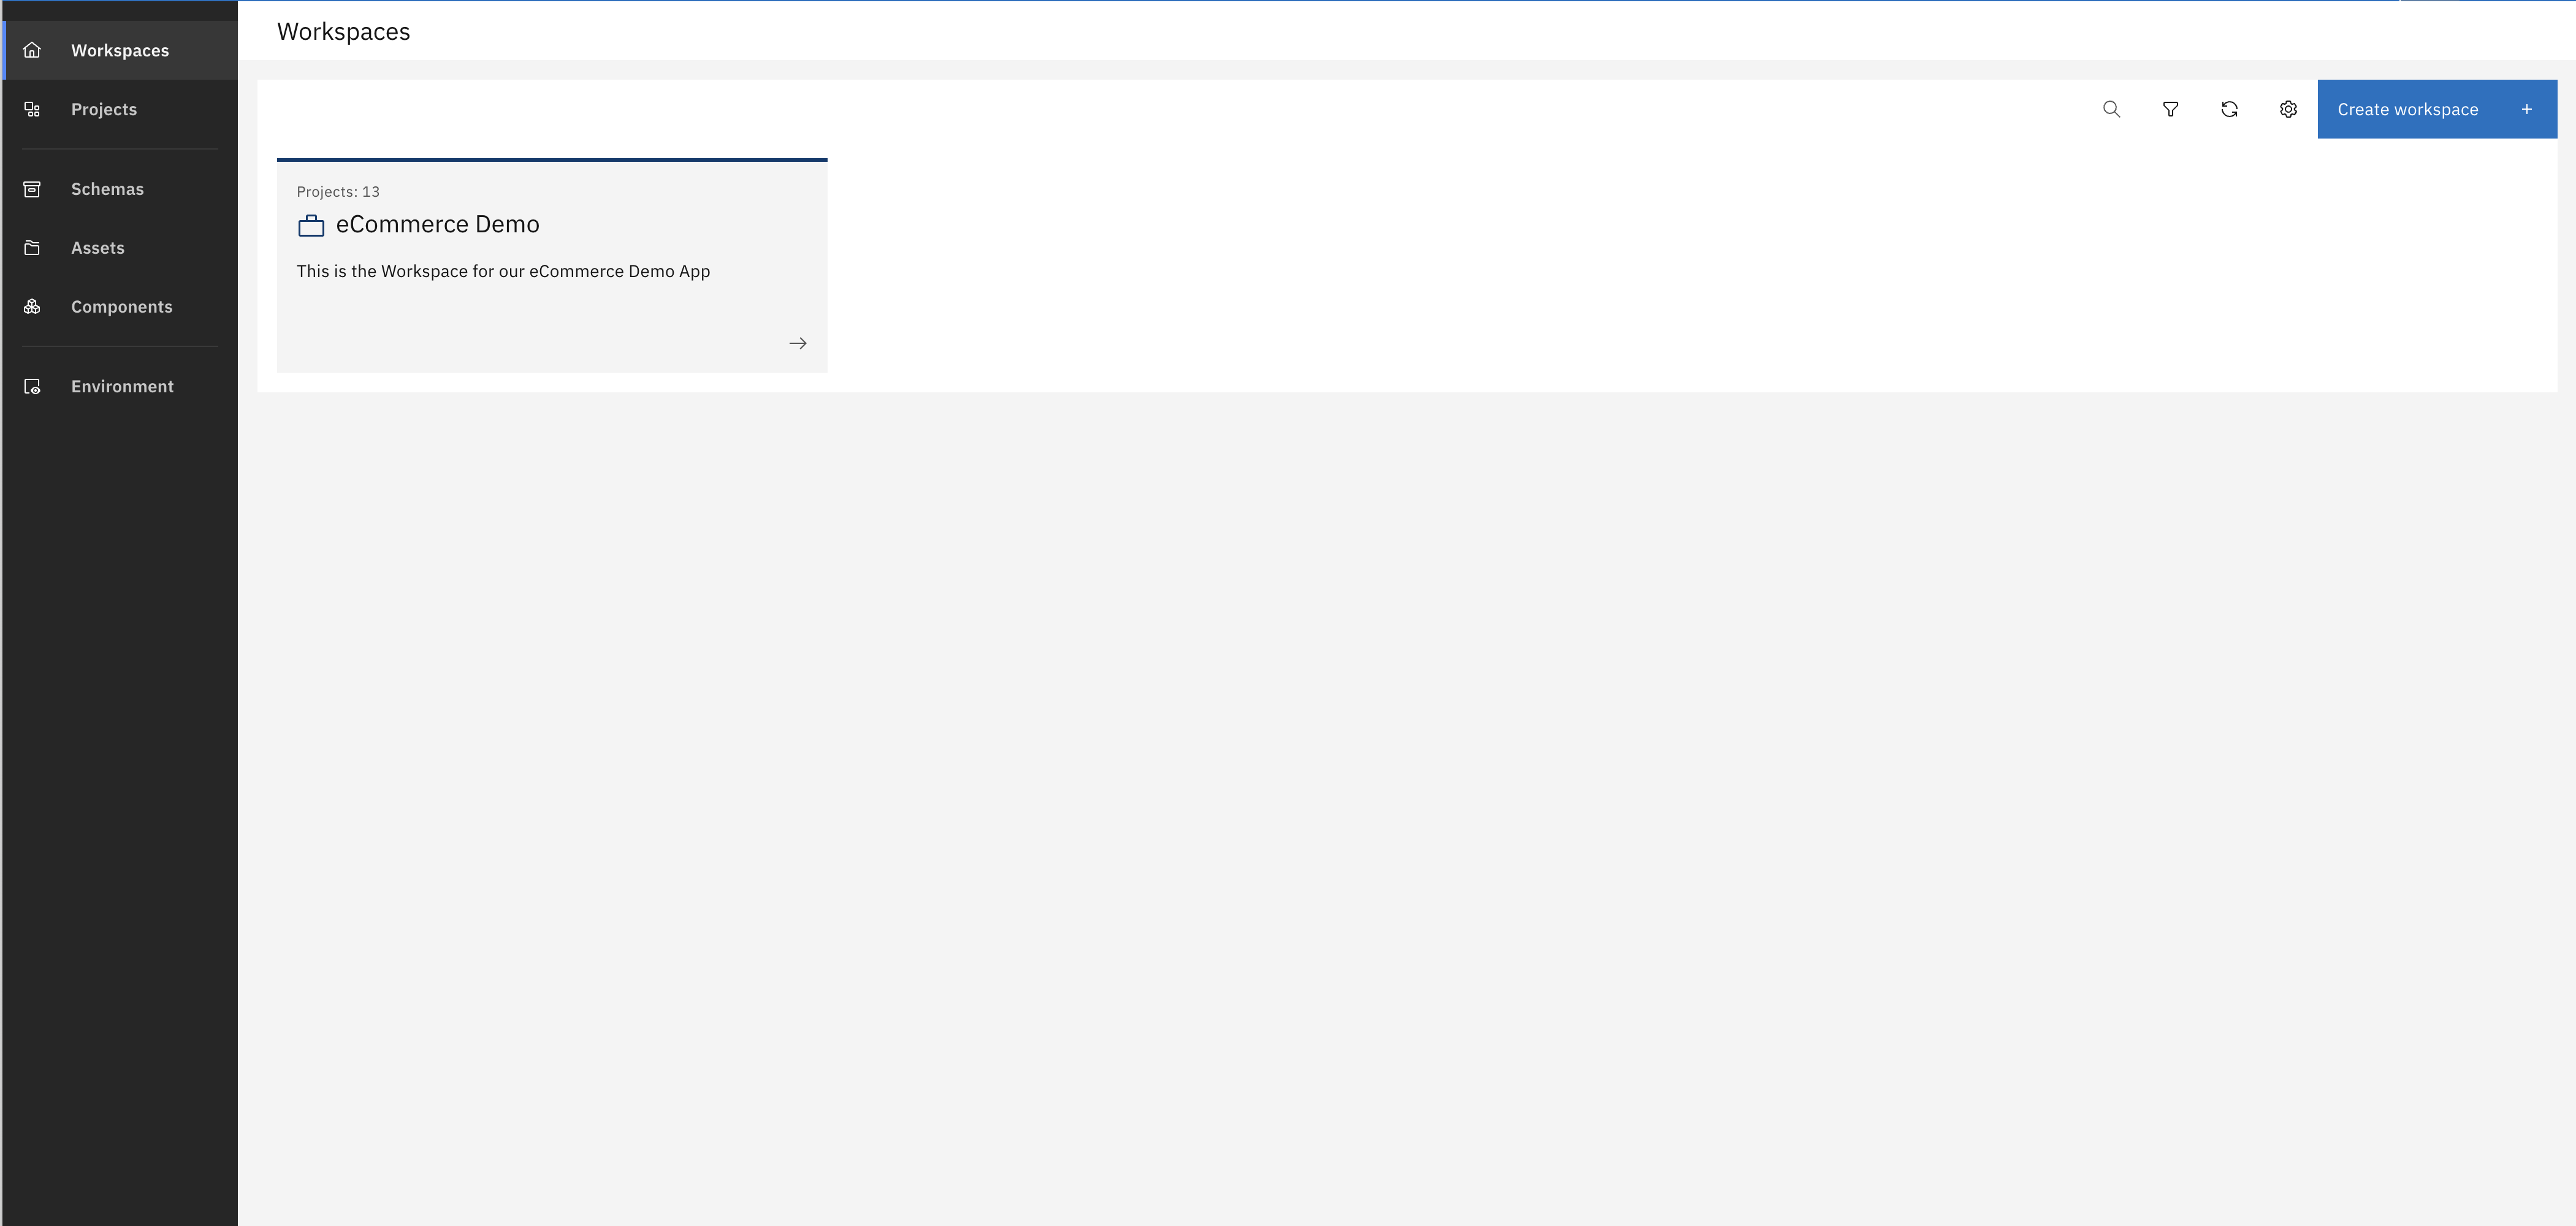
On this page you can see Workbench organizes projects in Workspaces. We have prepared the "eCommerce Demo" workspace for you that contains the RoboFlow web application. Open it.
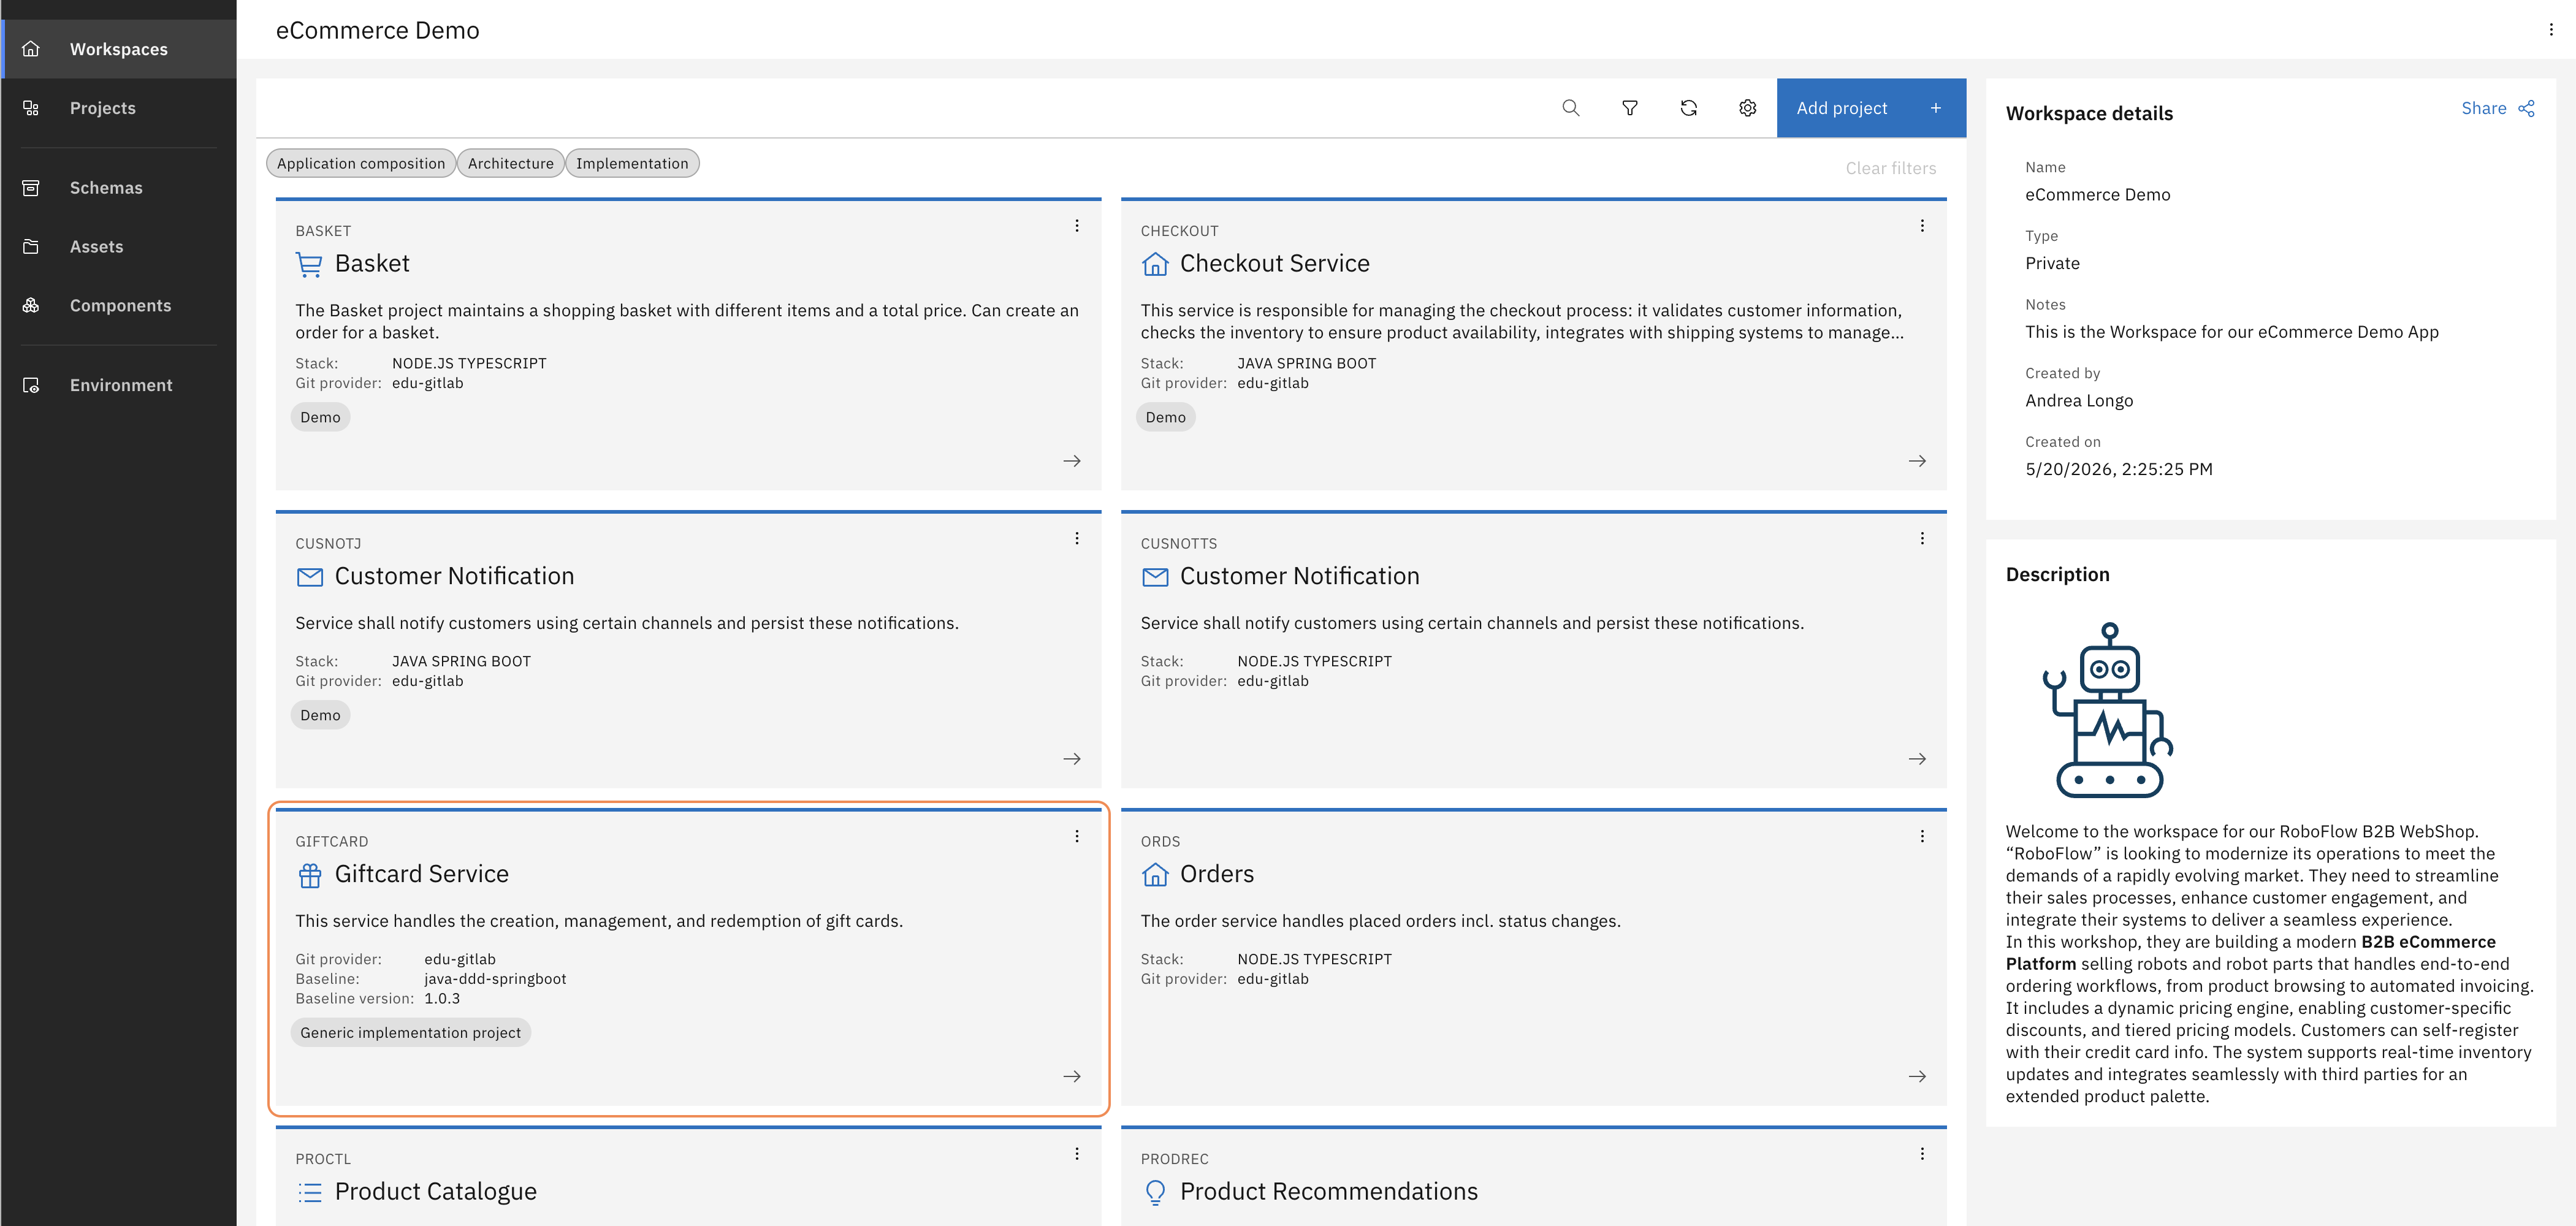
Now you can see all the projects the workspace contains and that make up the RoboFlow application. Select the "Giftcard Service" project that contains the design model you will work from.
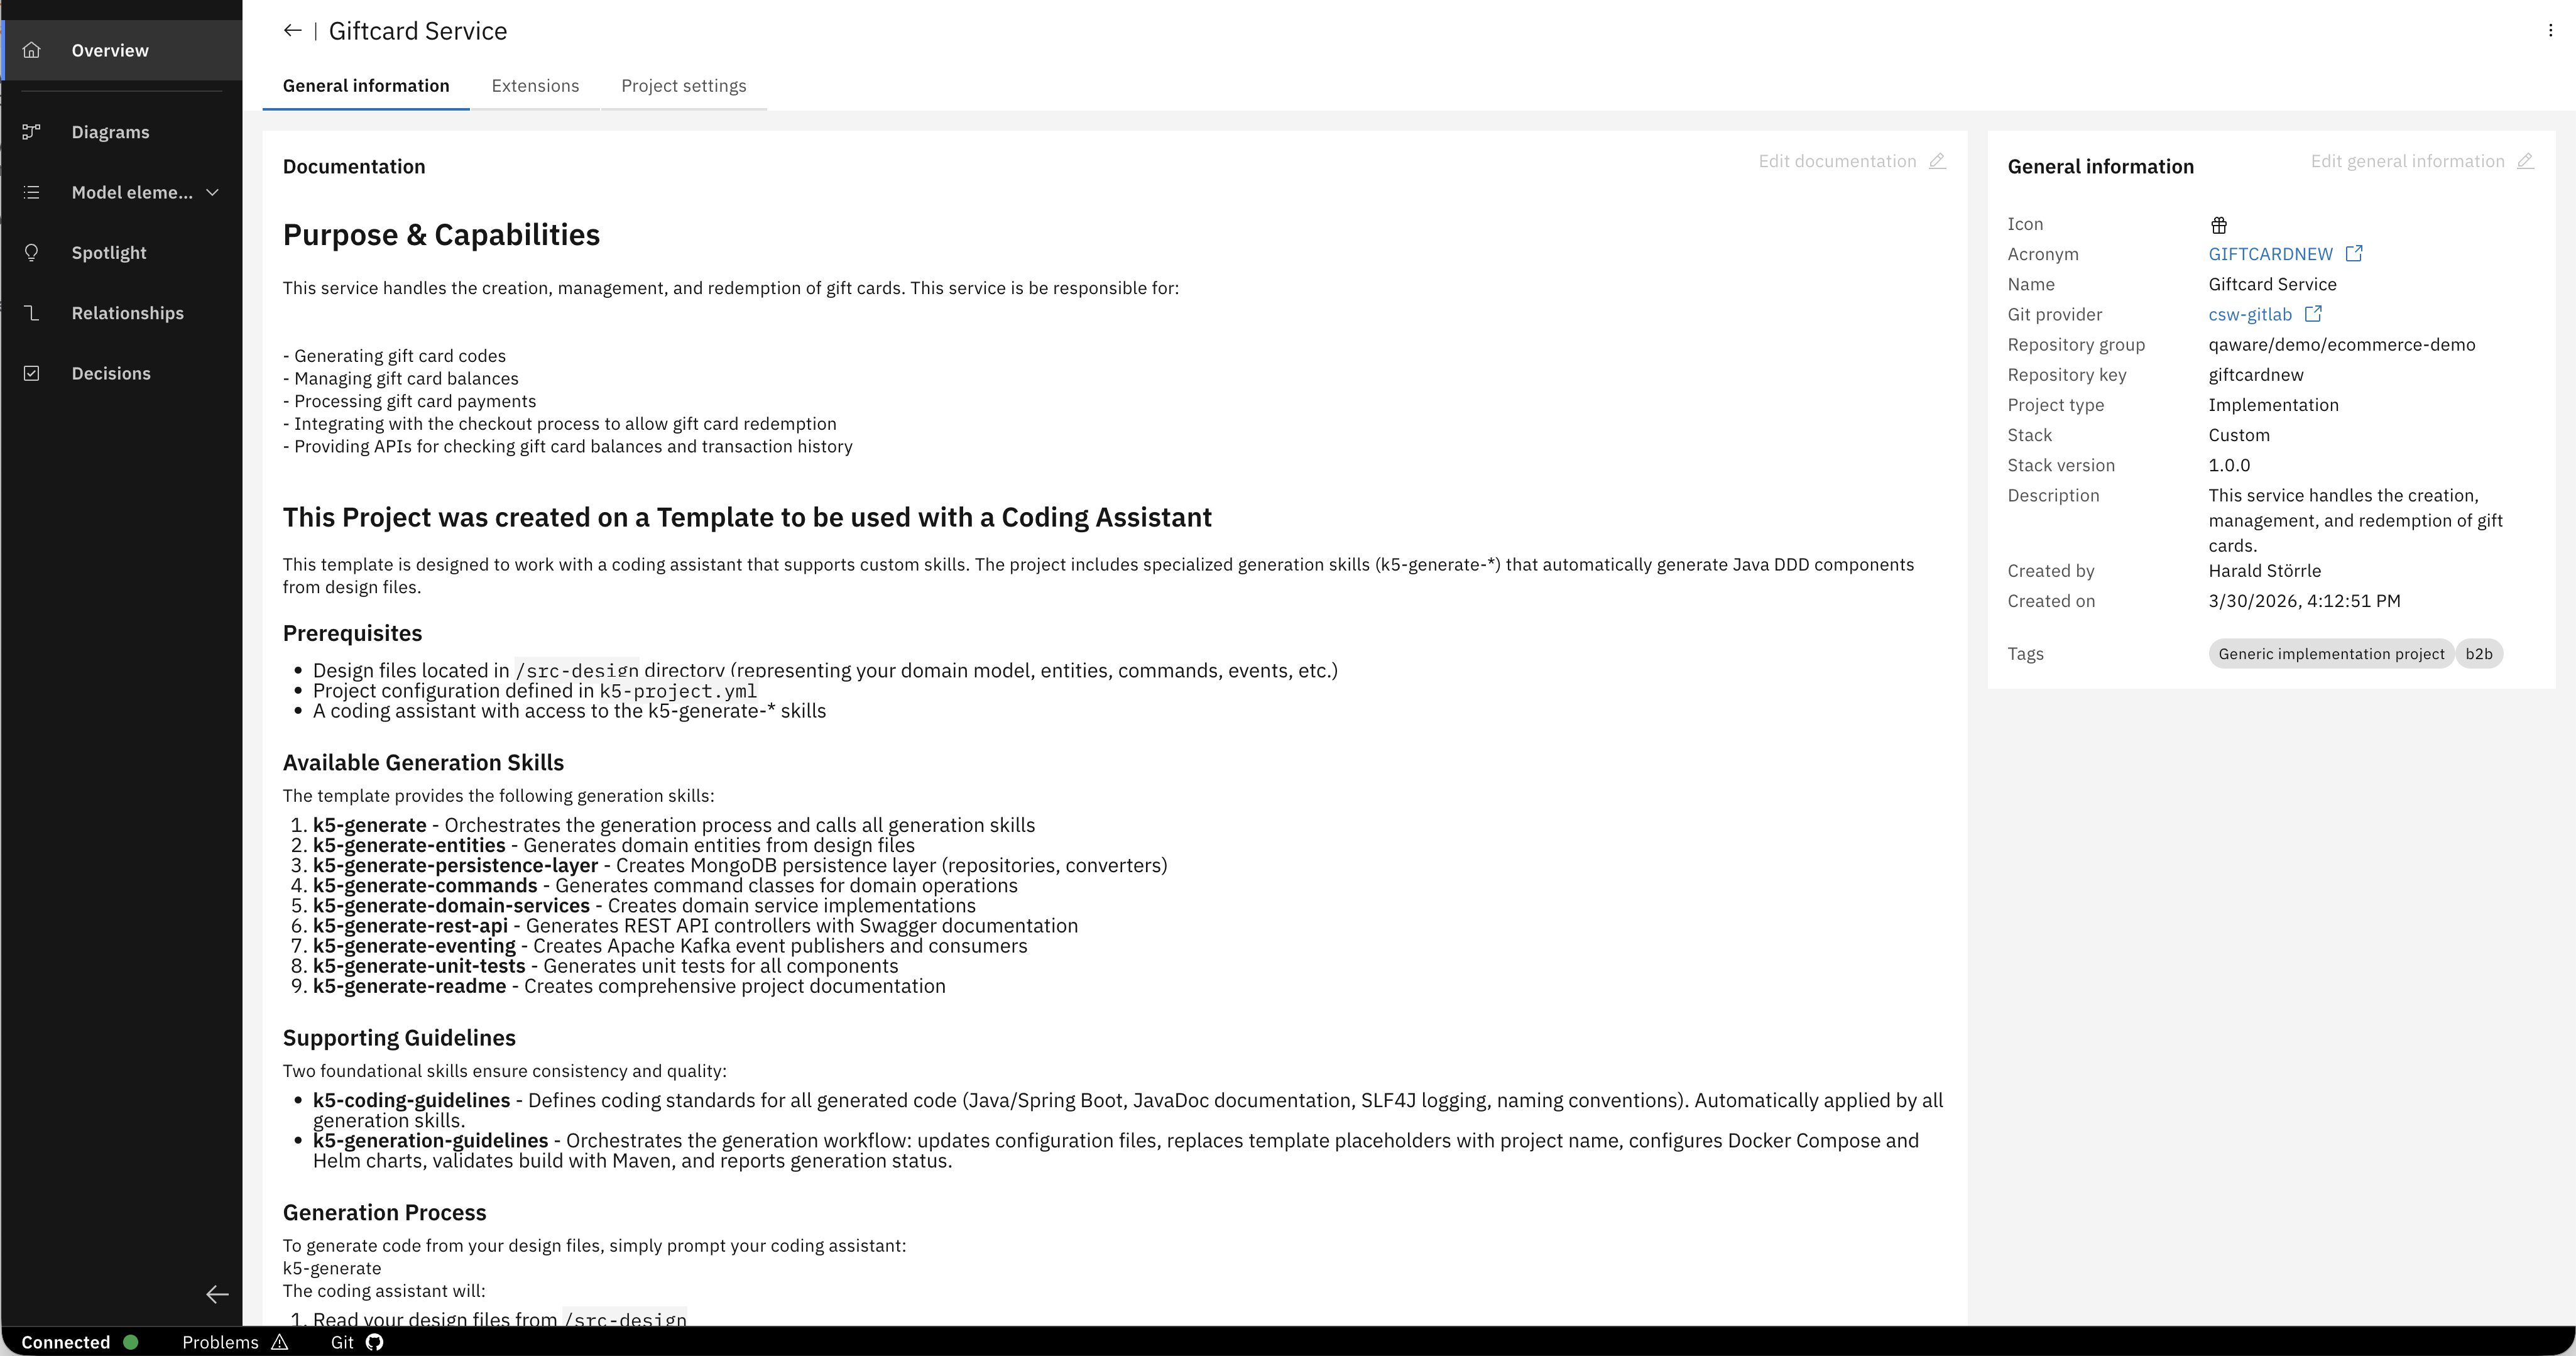
You are now on the overview page of the Gift Card service. The Gift Card service is where the service specification lives and which is just a window to your Git repository. The Git information can be found in the "General Information" on the right hand side.
Let's grab the URL, head to our IDE and generate the service based on this specification.
Step 3 — Clone the project
To clone the project, you will need the Git URL from the Workbench and a Personal Access Token. If you haven't set this up yet, see the About your trial environment section above.
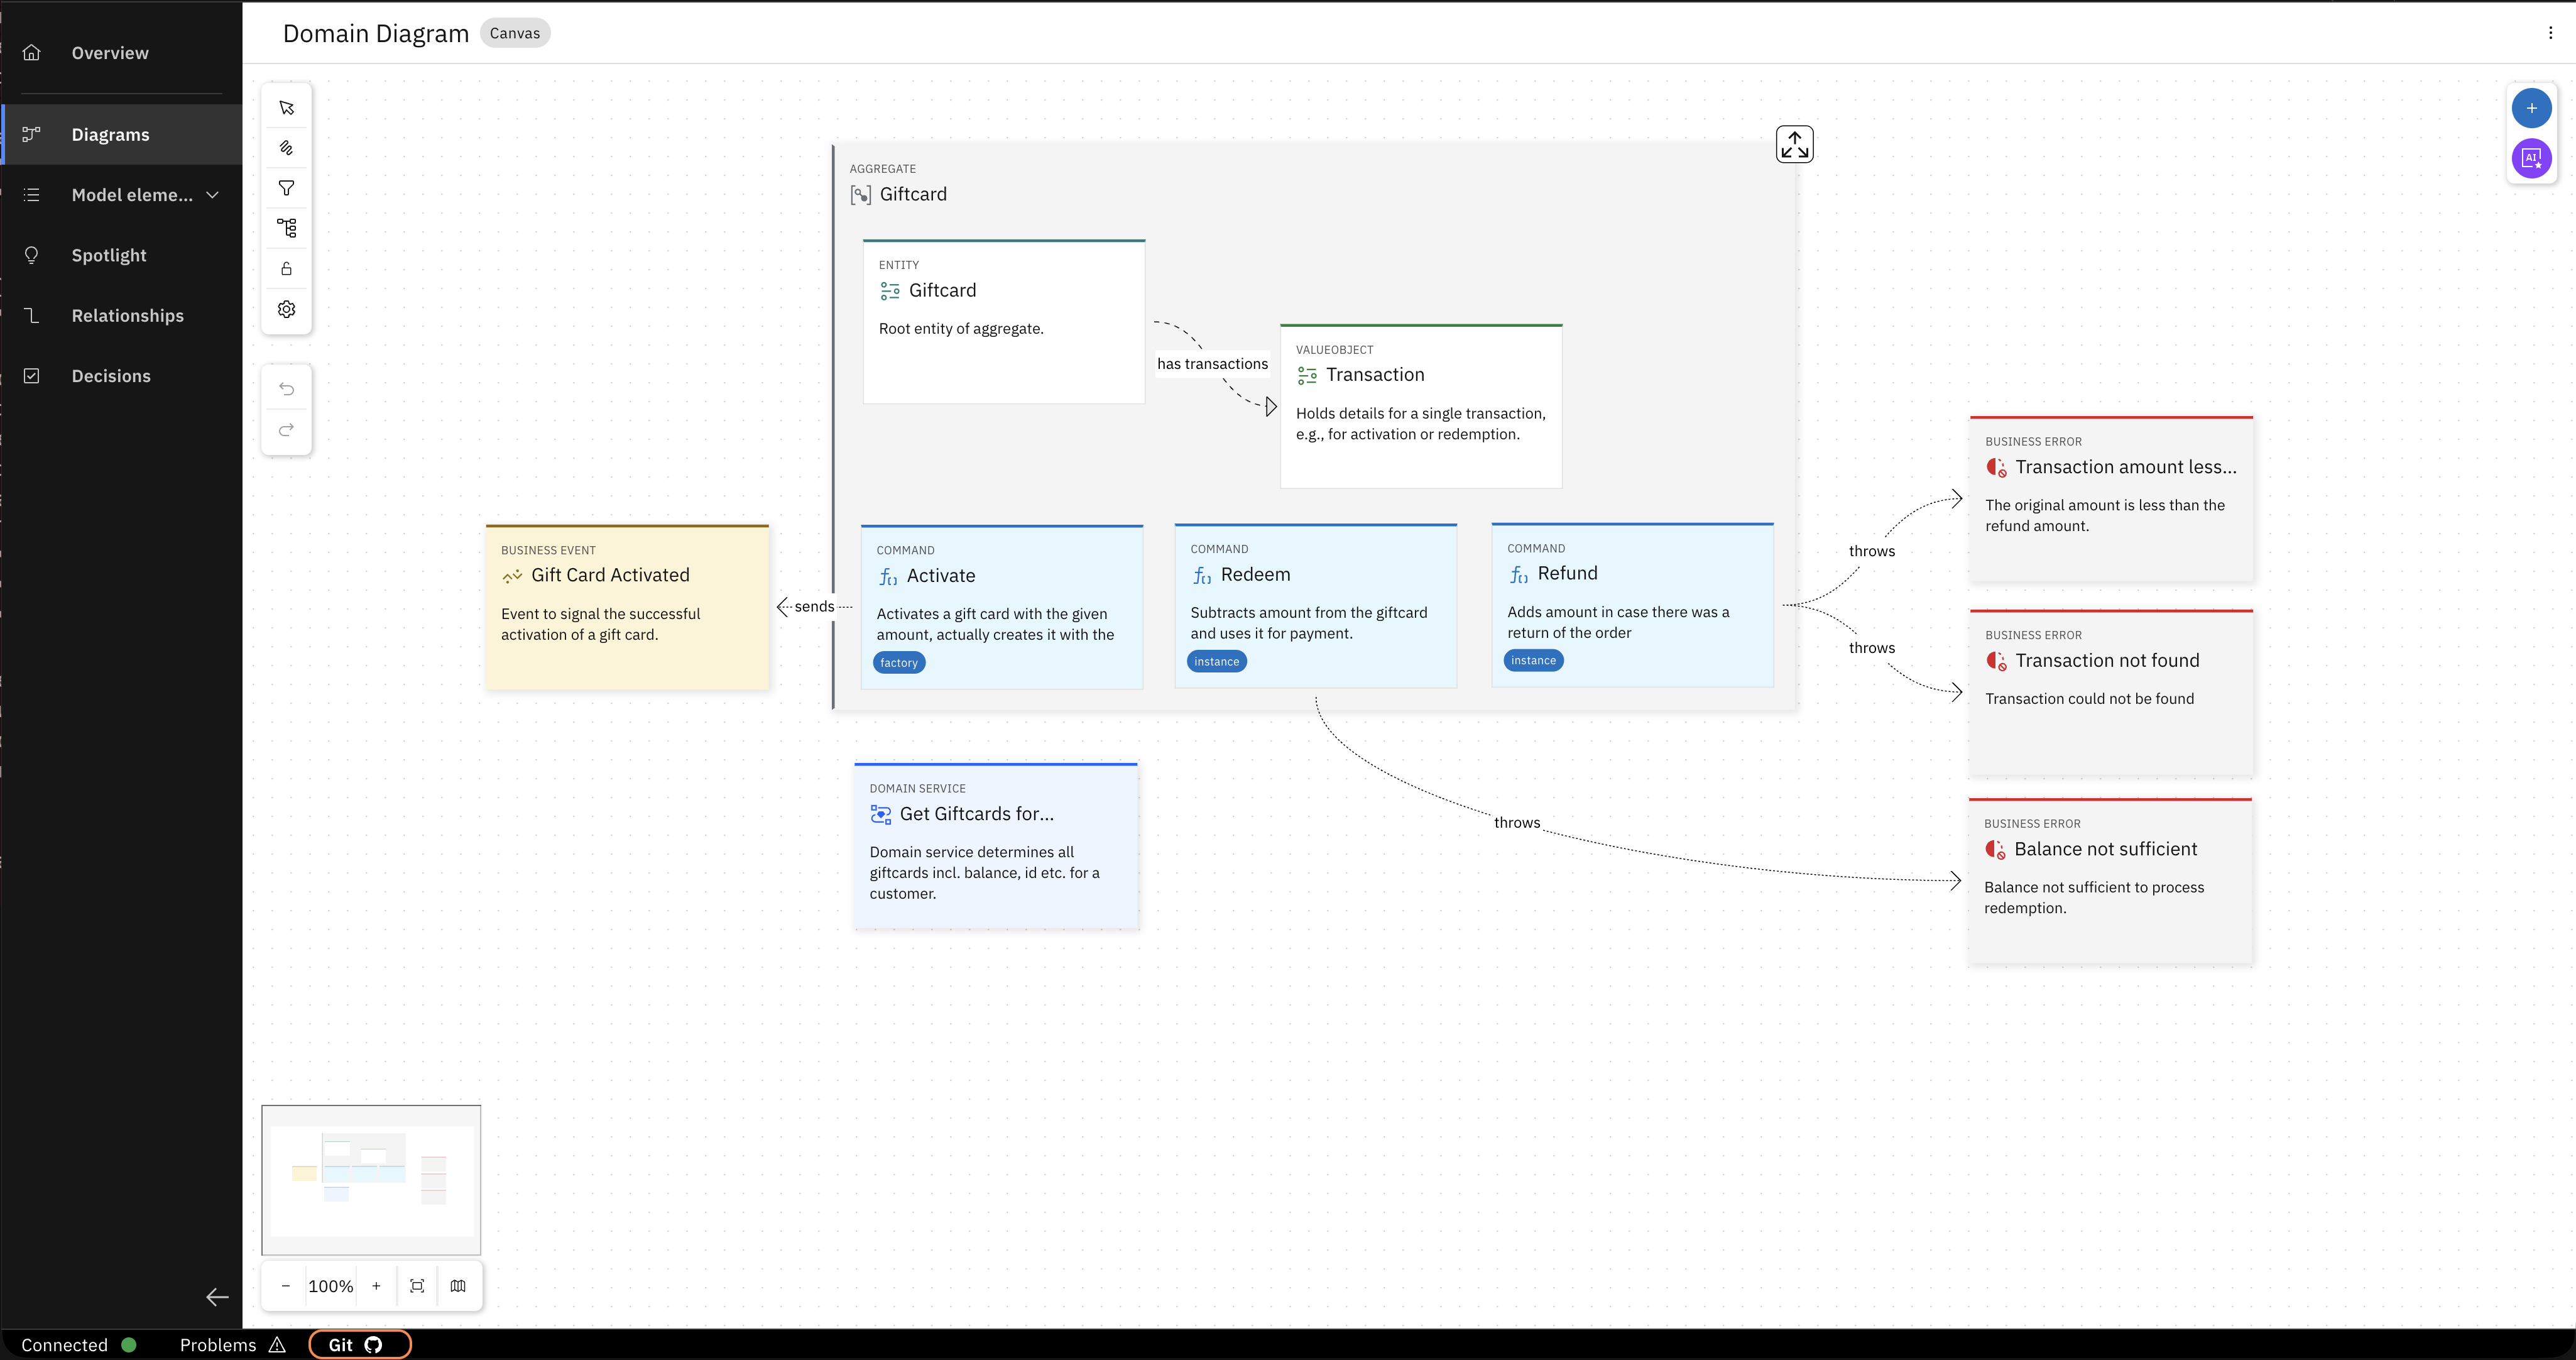
Click on the "Git" tab in the footer of the page.
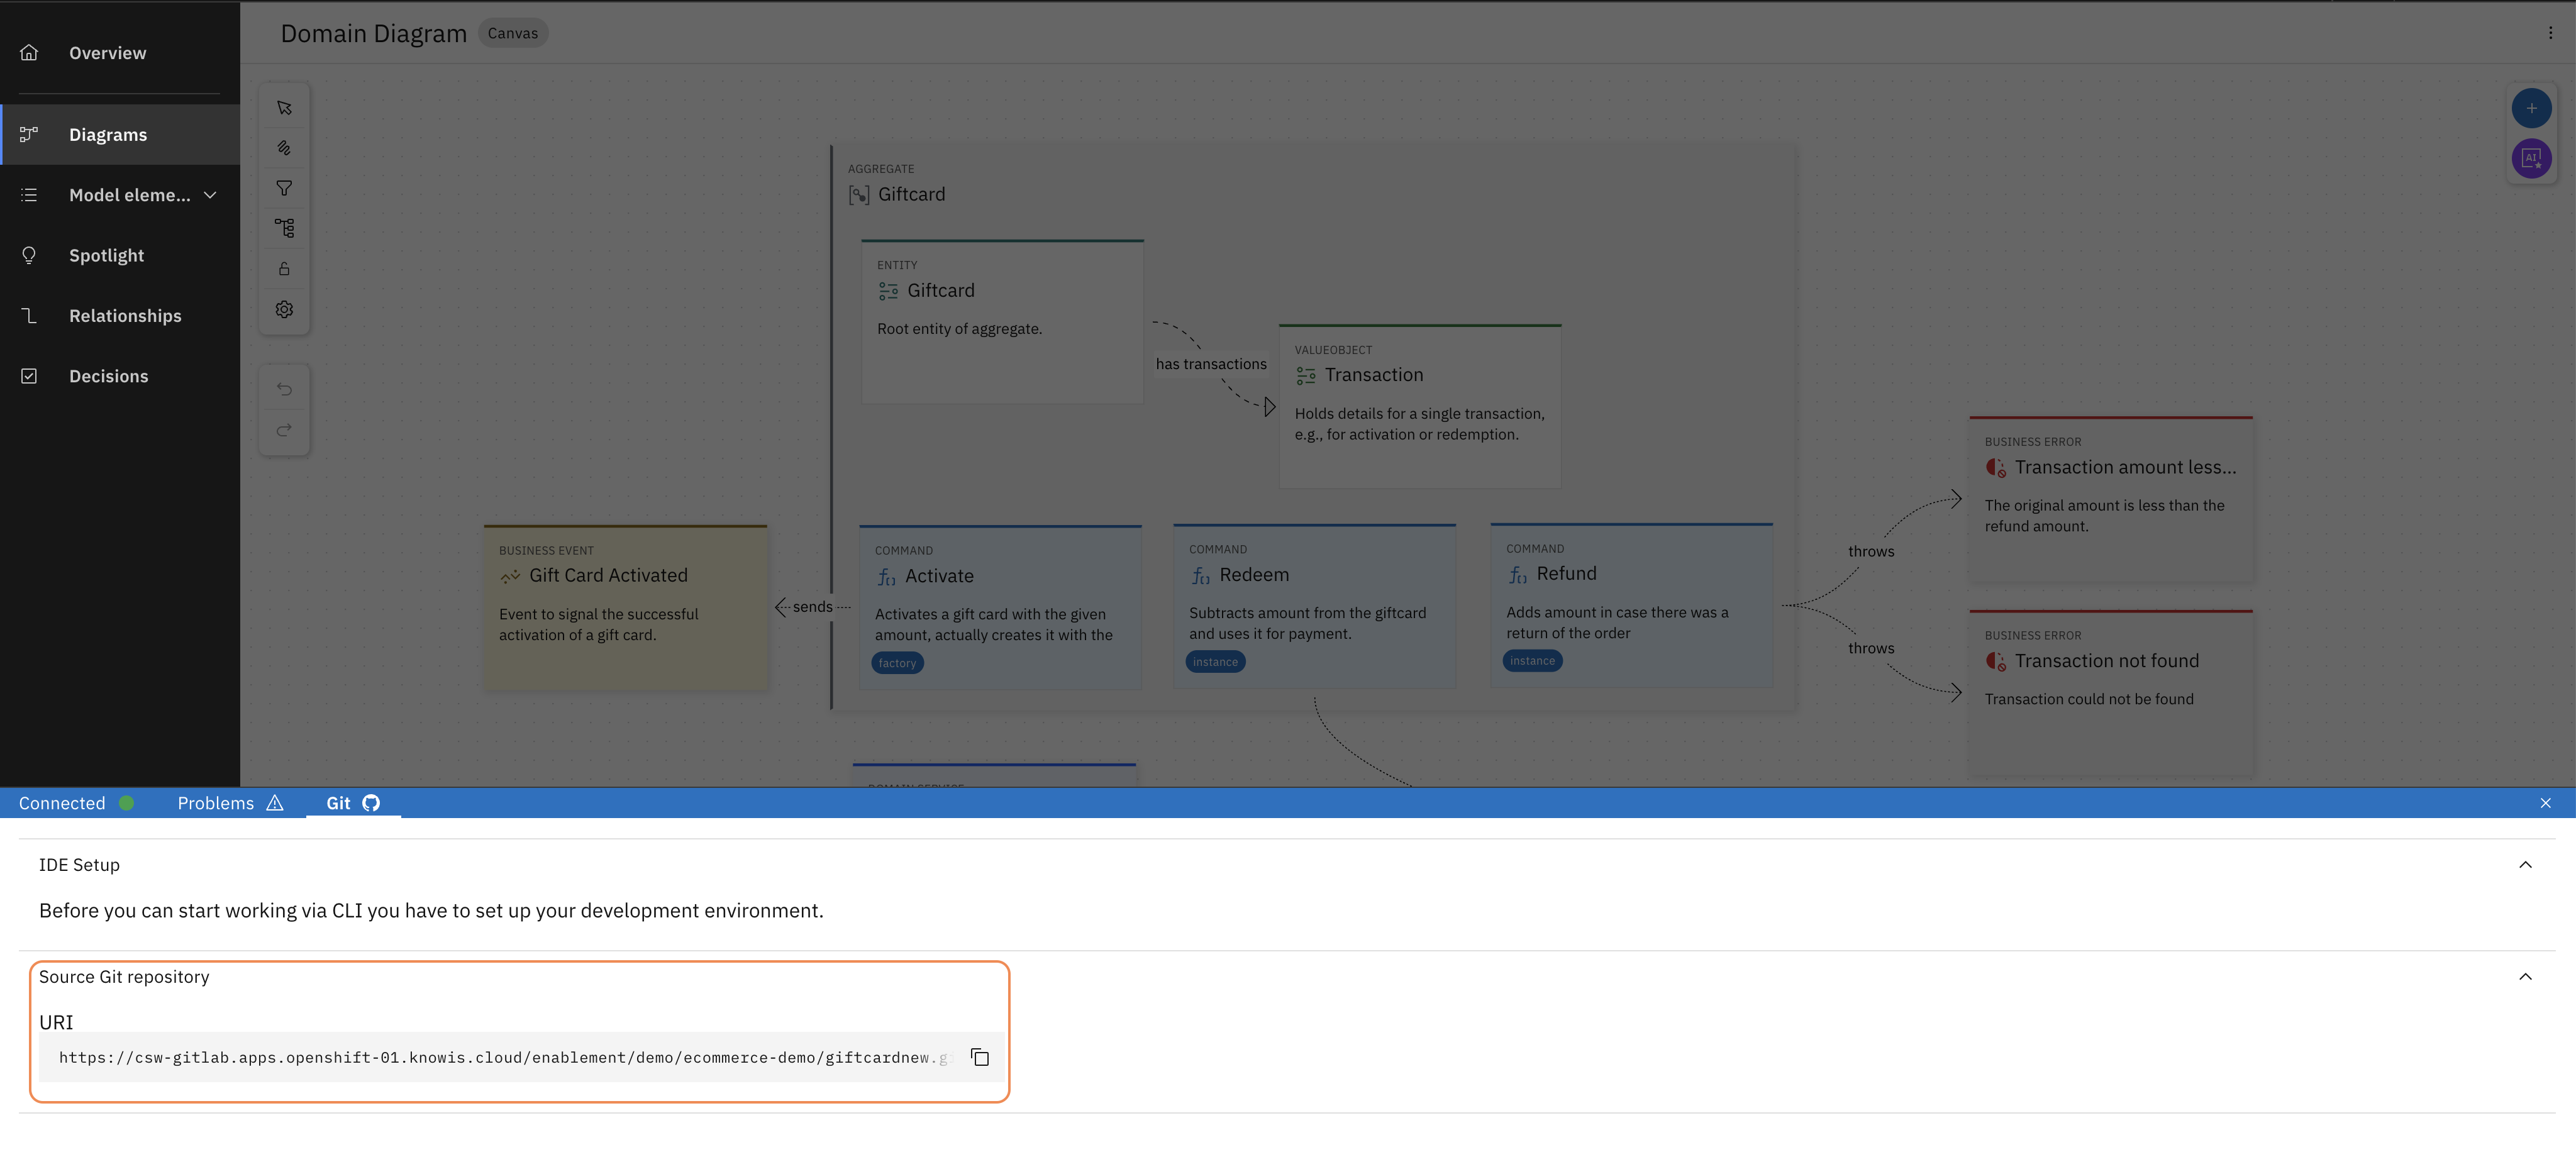
Copy the Git URL of the project.
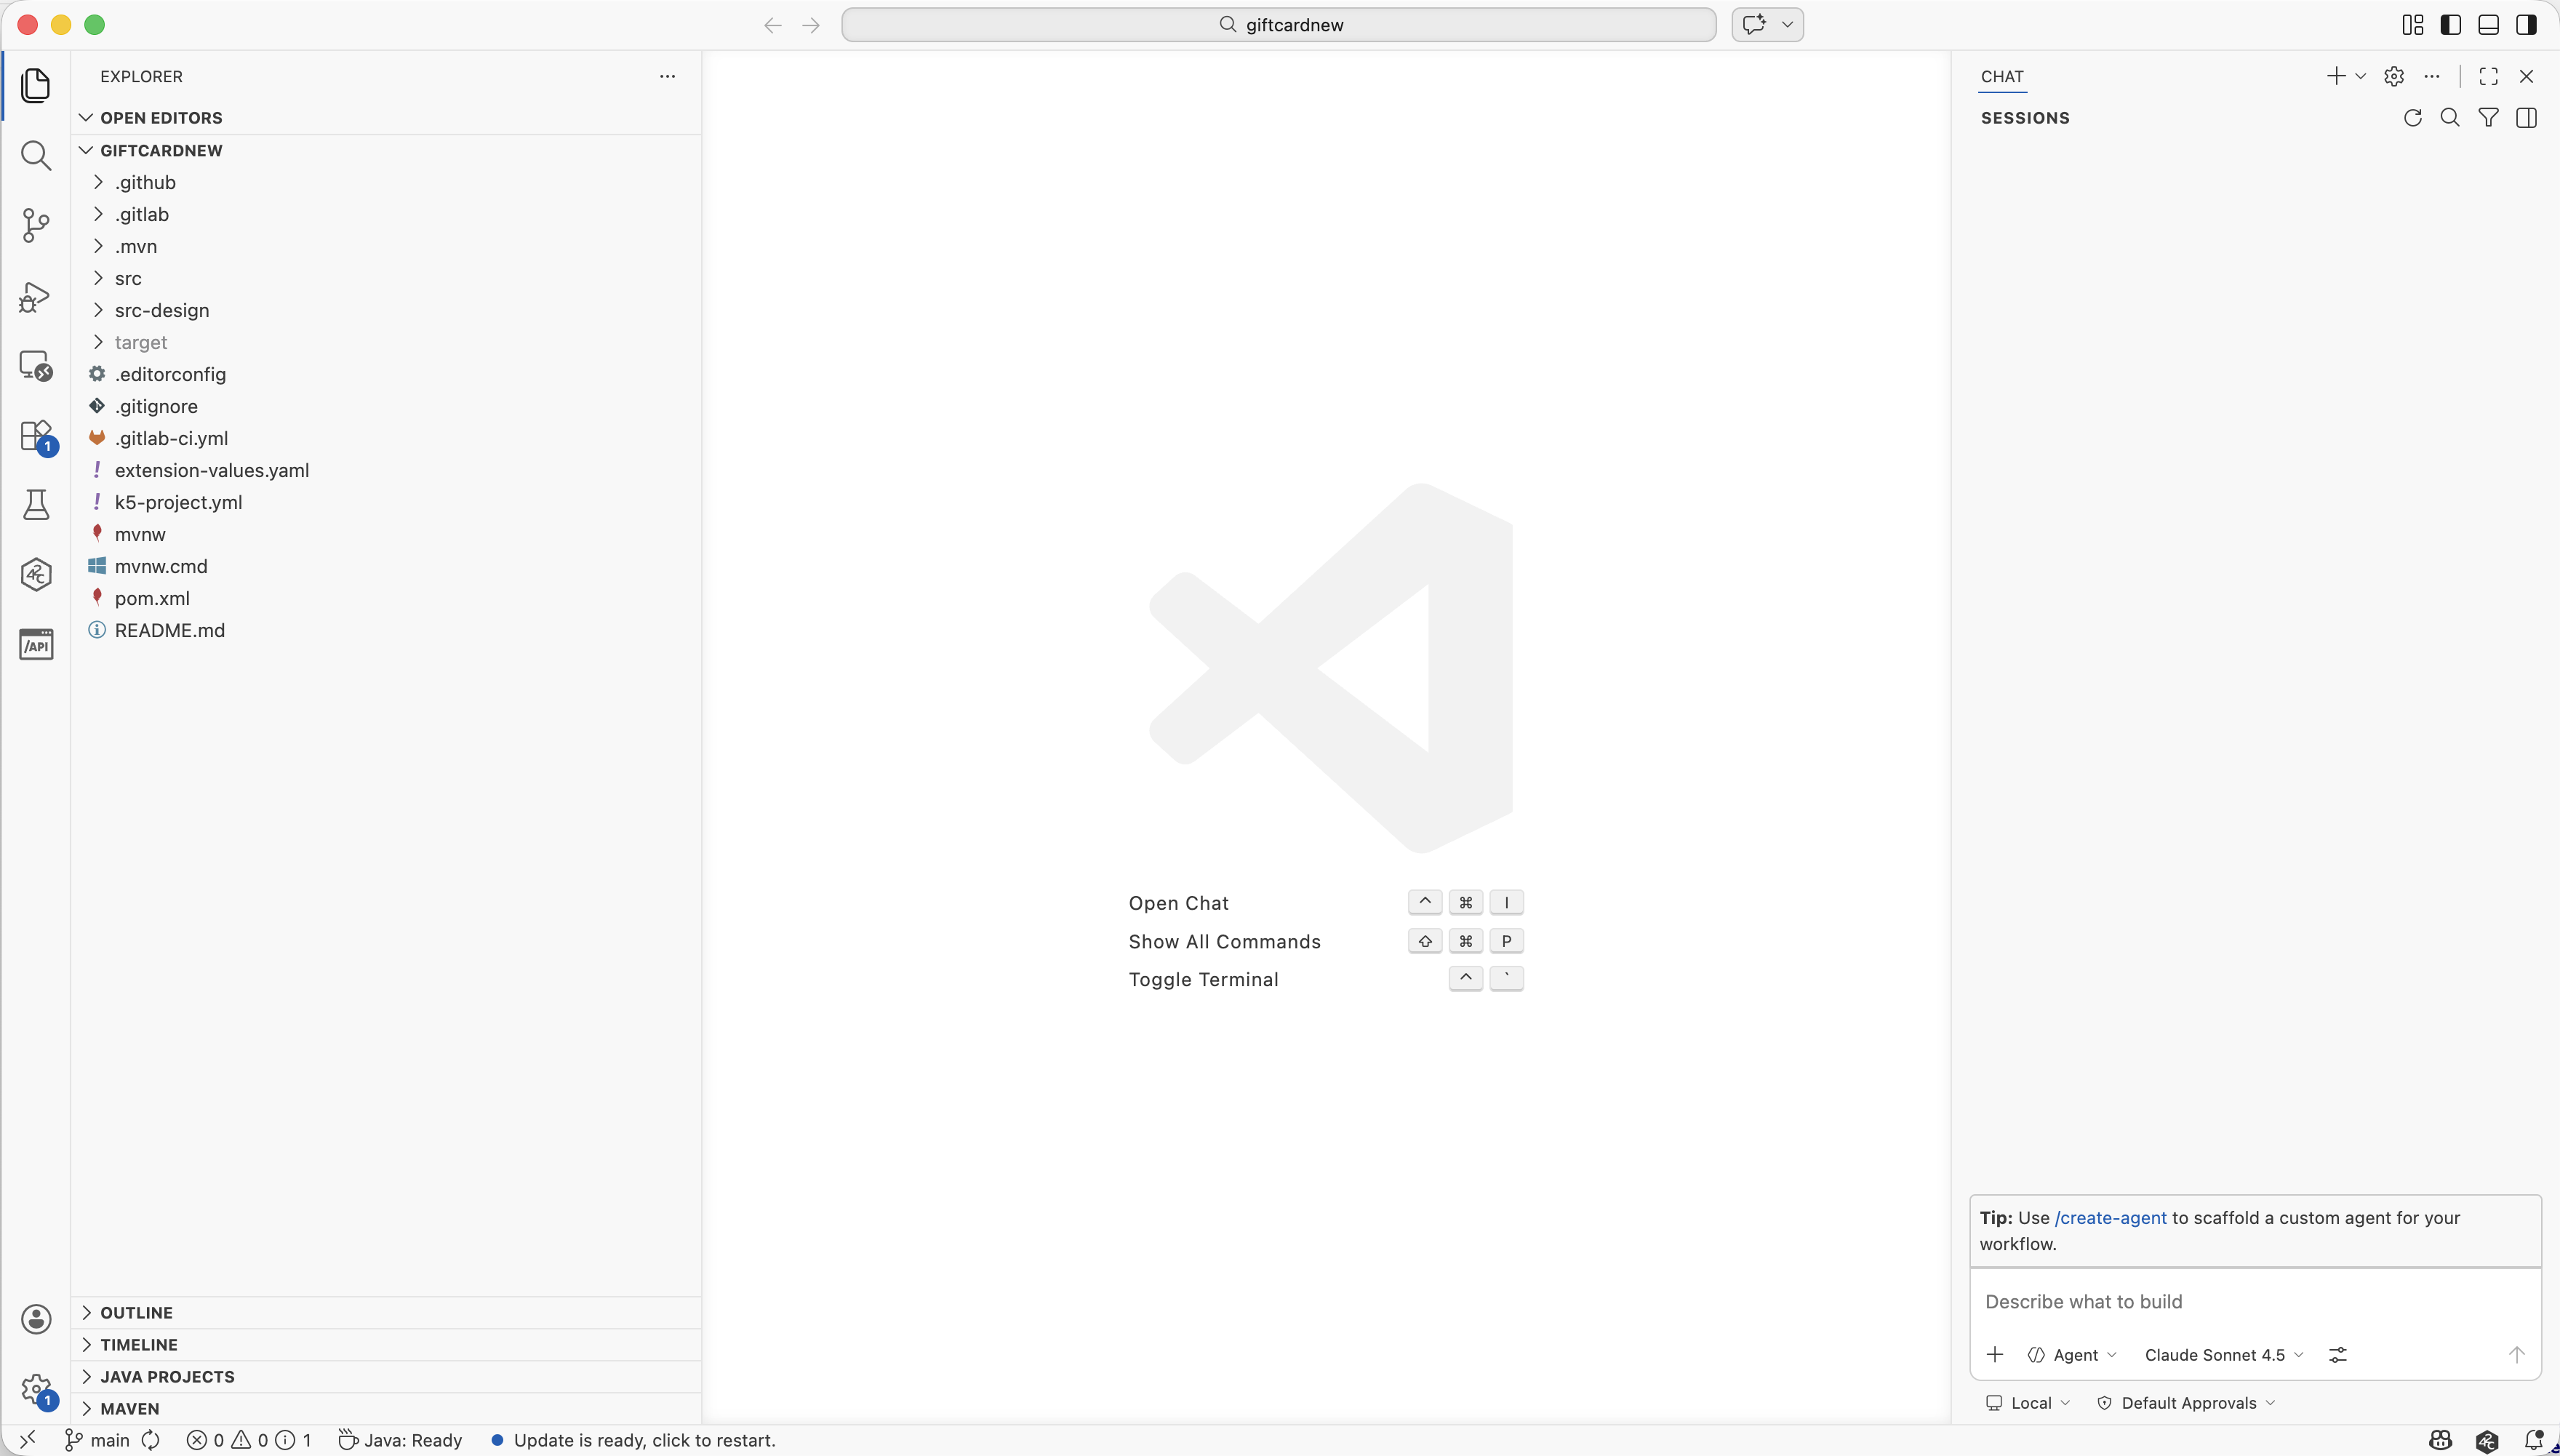
Open a terminal, clone the project to your local machine, and open it in your IDE of choice. We are using VS Code with GitHub Copilot for this trial but any IDE and coding assistant will work.
Step 4 — Generate the service
Nothing in the codebase is generated yet. Your project only contains the design specification of the Gift Card Service in the folder src-design, but the implementation still needs to be created.
Through Project Baselines, your coding assistant has access to predefined skills and commands that encode your organisation's standards — entity patterns, structural conventions, compliance rules — contributed once by your experts and available to every developer automatically.
These skills and commands assemble the full design intent at generation time by pulling from the design model created in Workbench.
This is why the prompt is short, everything the AI needs is already there. With k5-generate - one of the provided skills - your coding assistant will generate the complete Gift Card Service
based on the design specification in the Workbench.
We will explore that design after the next step. For now, just run the command and let it generate the service.
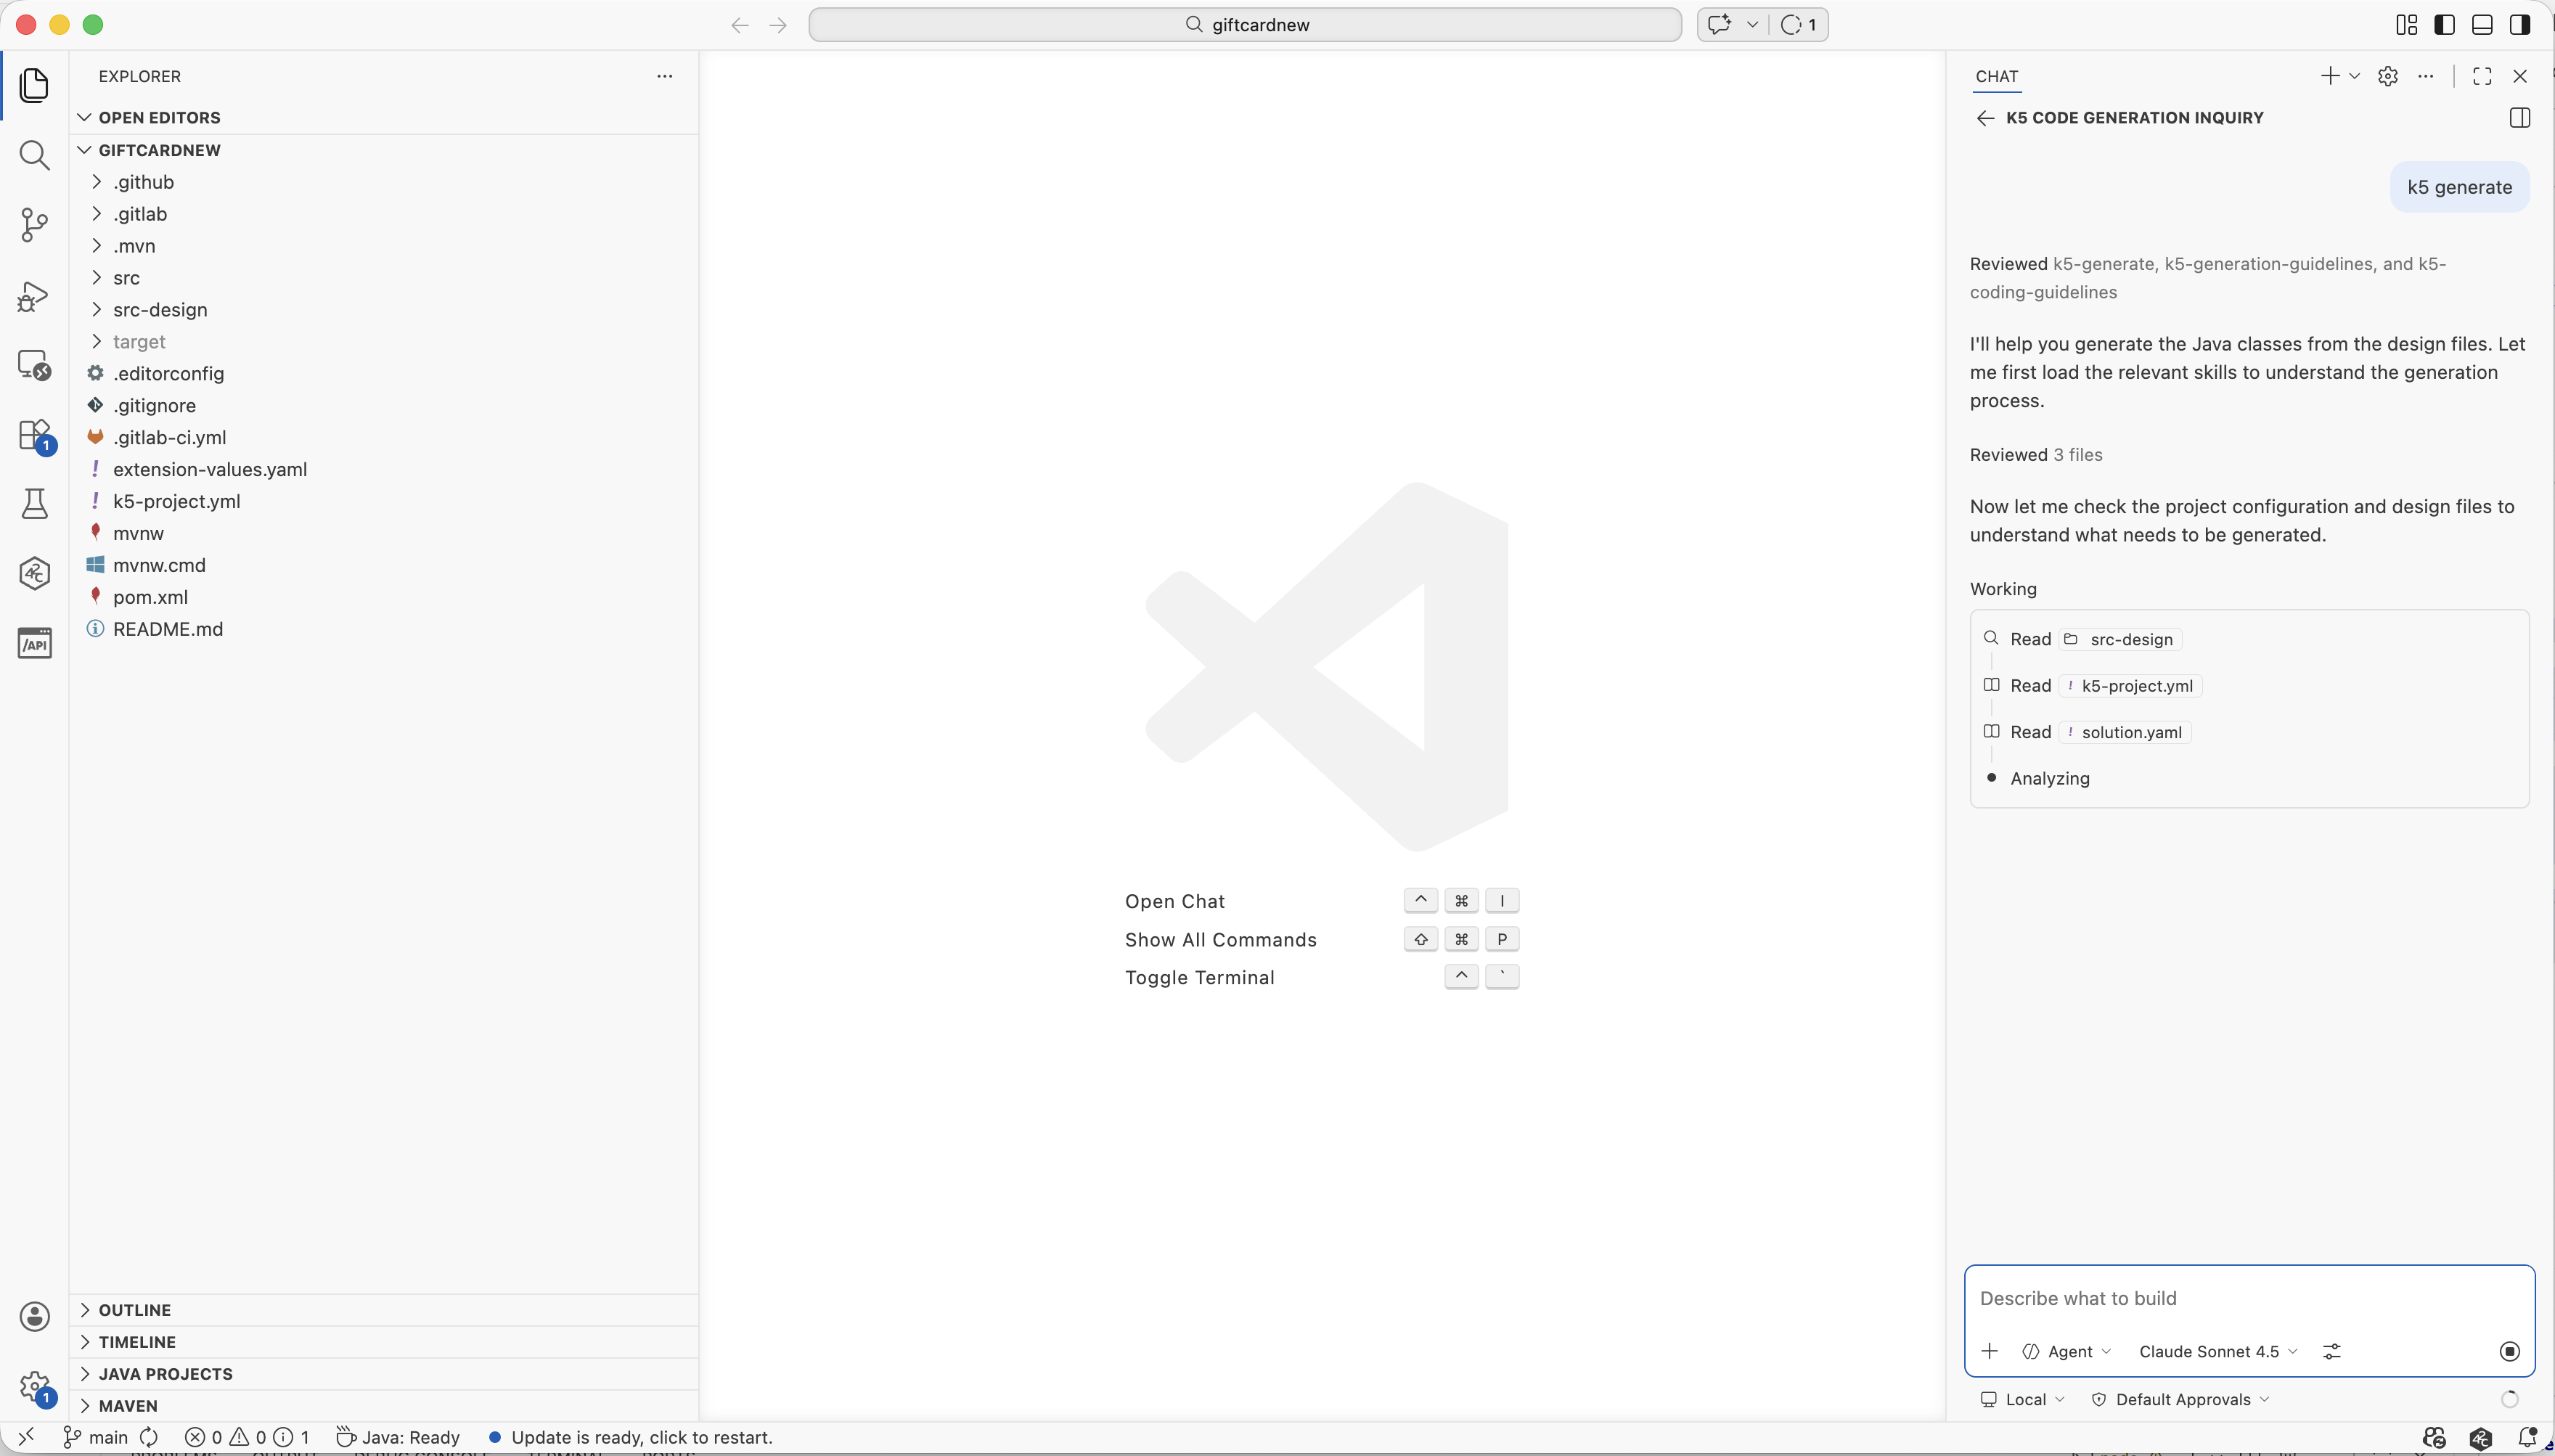
Open a new Chat in Agent Mode in your coding assistant and enter the prompt k5-generate. This single command generates the entire Gift Card Service — entities, persistence, REST endpoints, unit tests — exactly as your Java expert and your architect intended.
This will take a few minutes. Move to the next step while it runs.
Step 5 — Explore while it generates
While the service is being generated, open the .github folder in your project. Here you will find the skills that k5 is applying right now.
If you are using a different coding assistant, the name of the folder would be different (e.g., .cursor, .claude, ...).
Browse the files
These skills are supplied by Workbench through the Project Baselines feature, which means they are defined by experts once and encode the standards for how services should be generated based on a given design model.
These files serve two purposes:
- They encode the knowledge of your organisation's experts: your Java specialist's entity patterns, your architect's structural conventions, your compliance rules. They define how code should be written.
- They assemble the full design intent for the AI at generation time, pulling in the design model: the service name, the domain entities, their relationships, the interfaces, the architectural decisions your team attached in the Workbench.
This is the compounding effect that makes Workbench different. An expert contributes once. That contribution becomes part of every generation run, and is the same for every developer and across services — without anyone needing to remember or enforce it.
One command. No description required.
Notice that you didn't have to describe any of the service specifics to the AI. No prompt explaining the entity relationships, no text describing which external services the Giftcard Service depends on, no instructions about how adapters should be wired. All of that is already in the model — relationships between entities, dependencies on other services, interface contracts — modeled precisely, leaving no room for interpretation.
k5-generate is short because the design is complete.
Step 6 — Read what the AI read
Go back to the Workbench and open the Giftcard Service project. While your service is being generated, we look at what the AI is working from.
The domain model
Open the Domain Diagram. The link above should take your directly there. If not, navigate to "Diagrams" in the left sidebar and open the diagram with the name "Domain Diagram".
You are looking at the Giftcard aggregate — the core of the service.
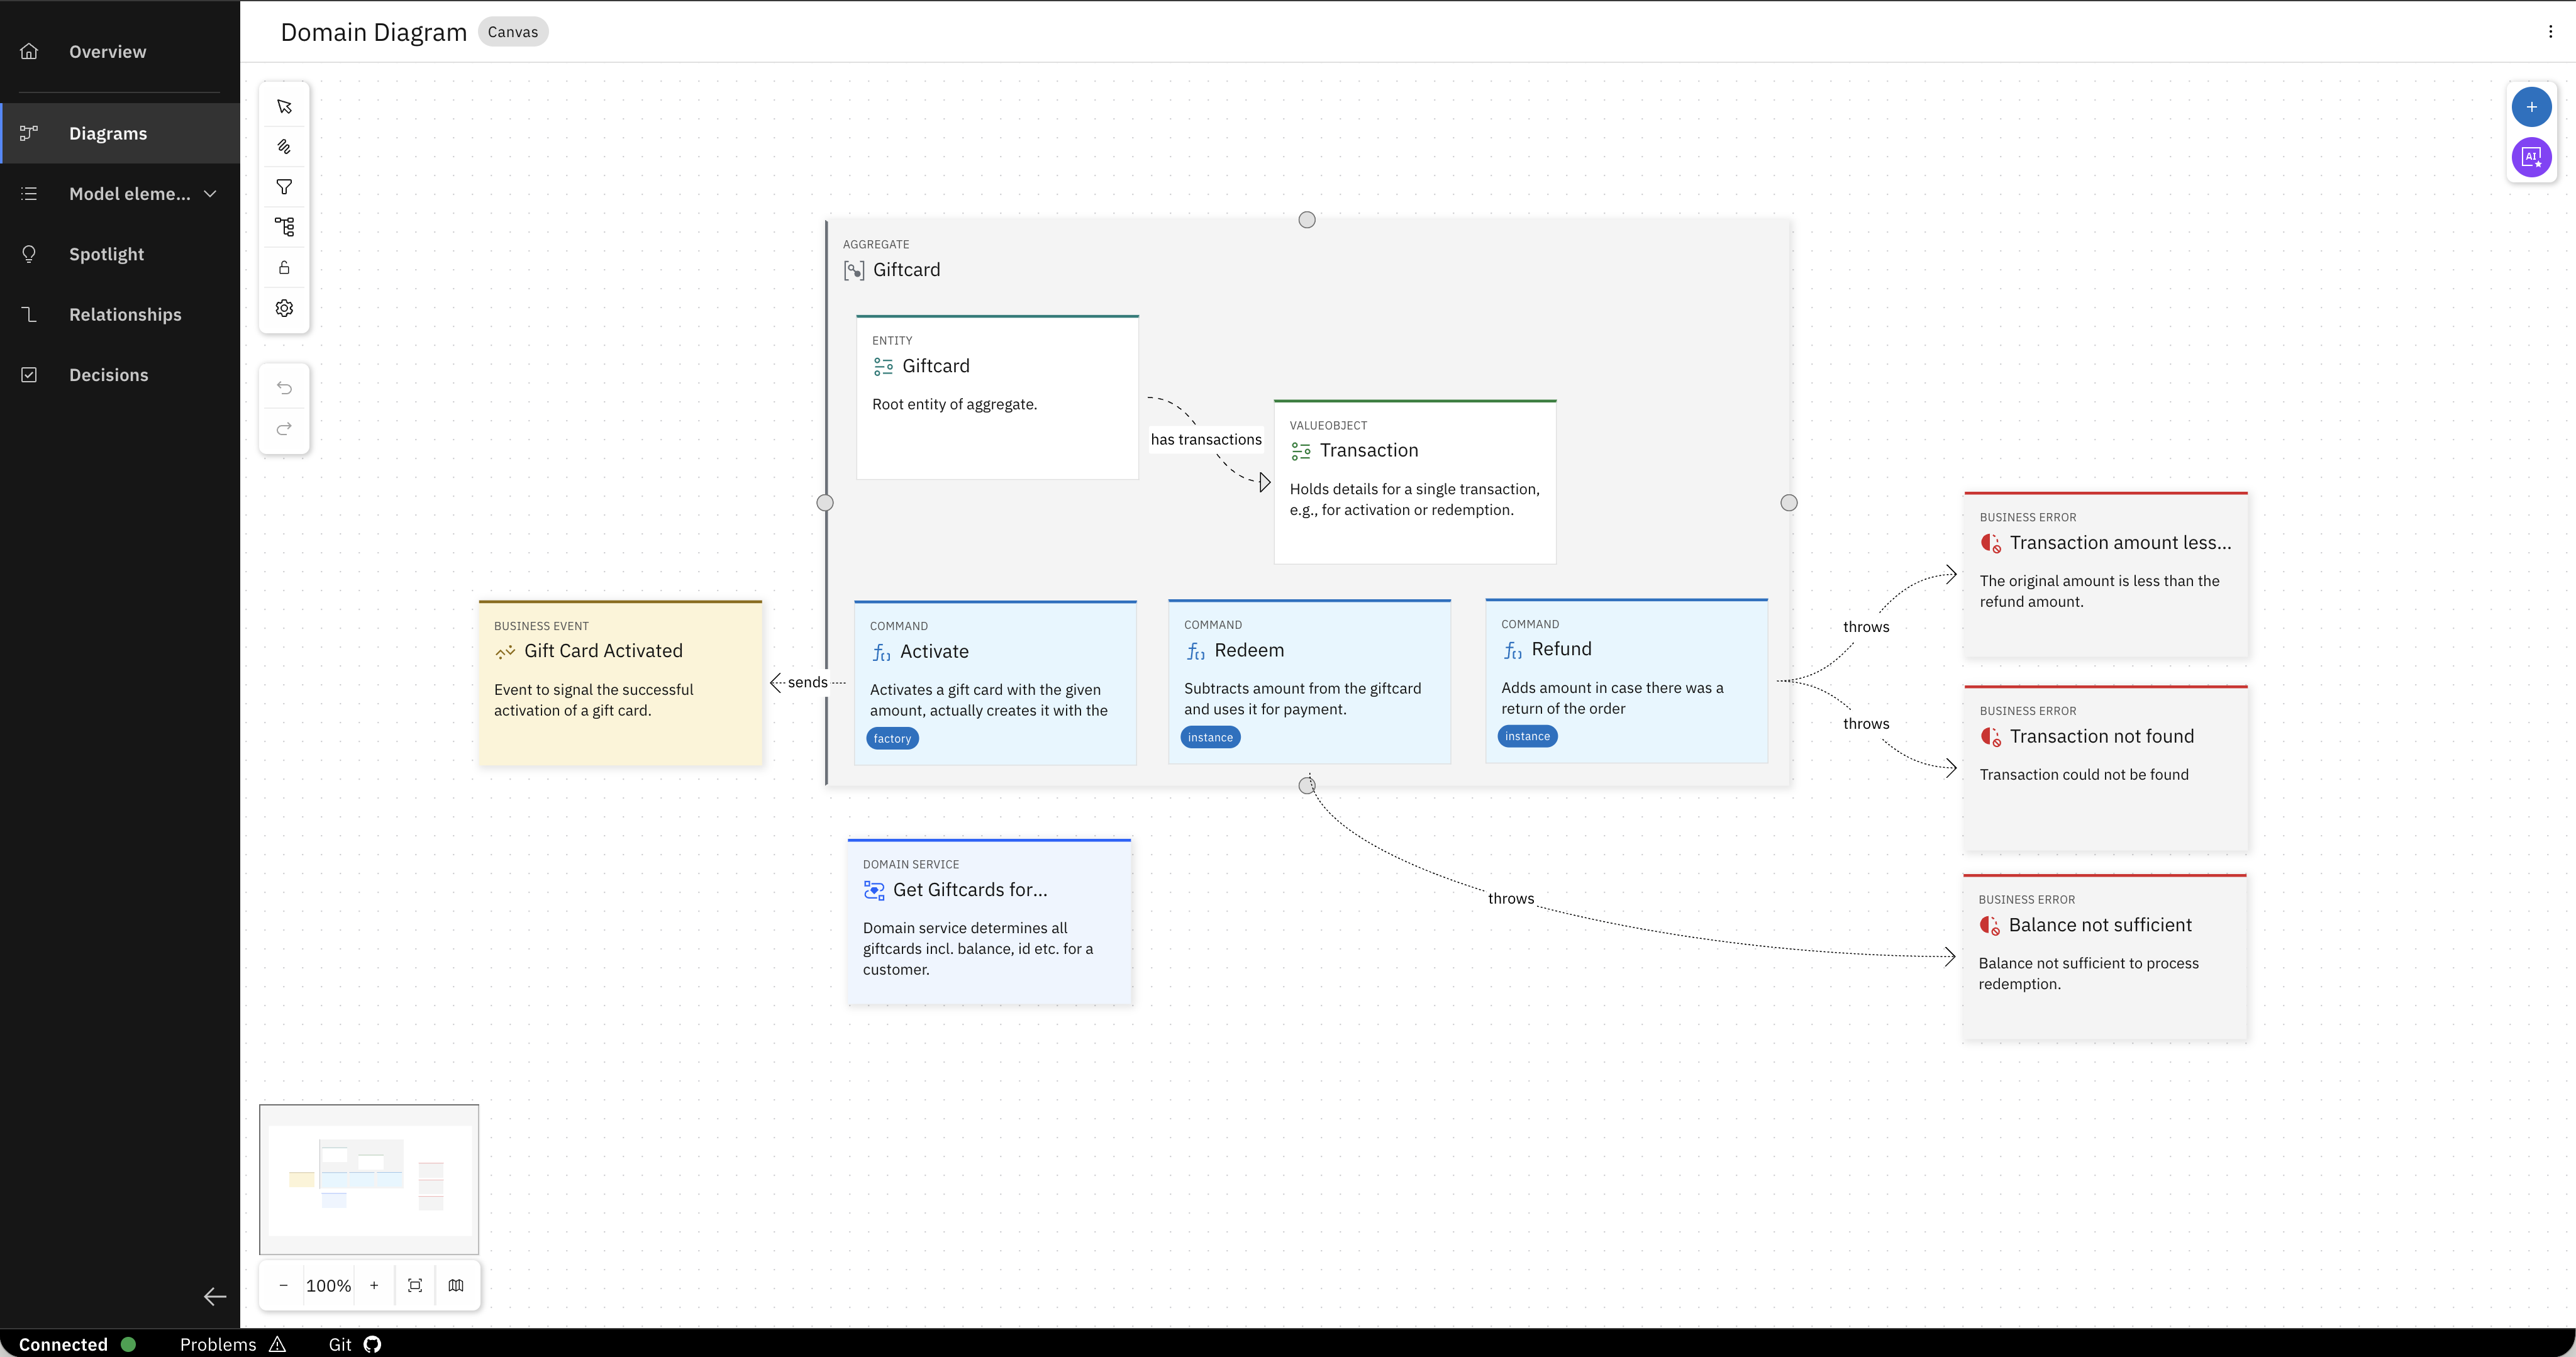
Notice what is already defined here:
- The Giftcard entity and its relationship to the Transaction value object, where every redemption, activation, and refund is recorded as a transaction
- The three commands Activate, Redeem and Refund
- The business errors and when they are triggered: balance not sufficient, transaction not found, refund amount exceeds original
- The business event Gift Card Activated — signalling the outside world when activation succeeds
Now click on the Redeem command. In the details panel on the right, open the description. This is the business logic your architect wrote:
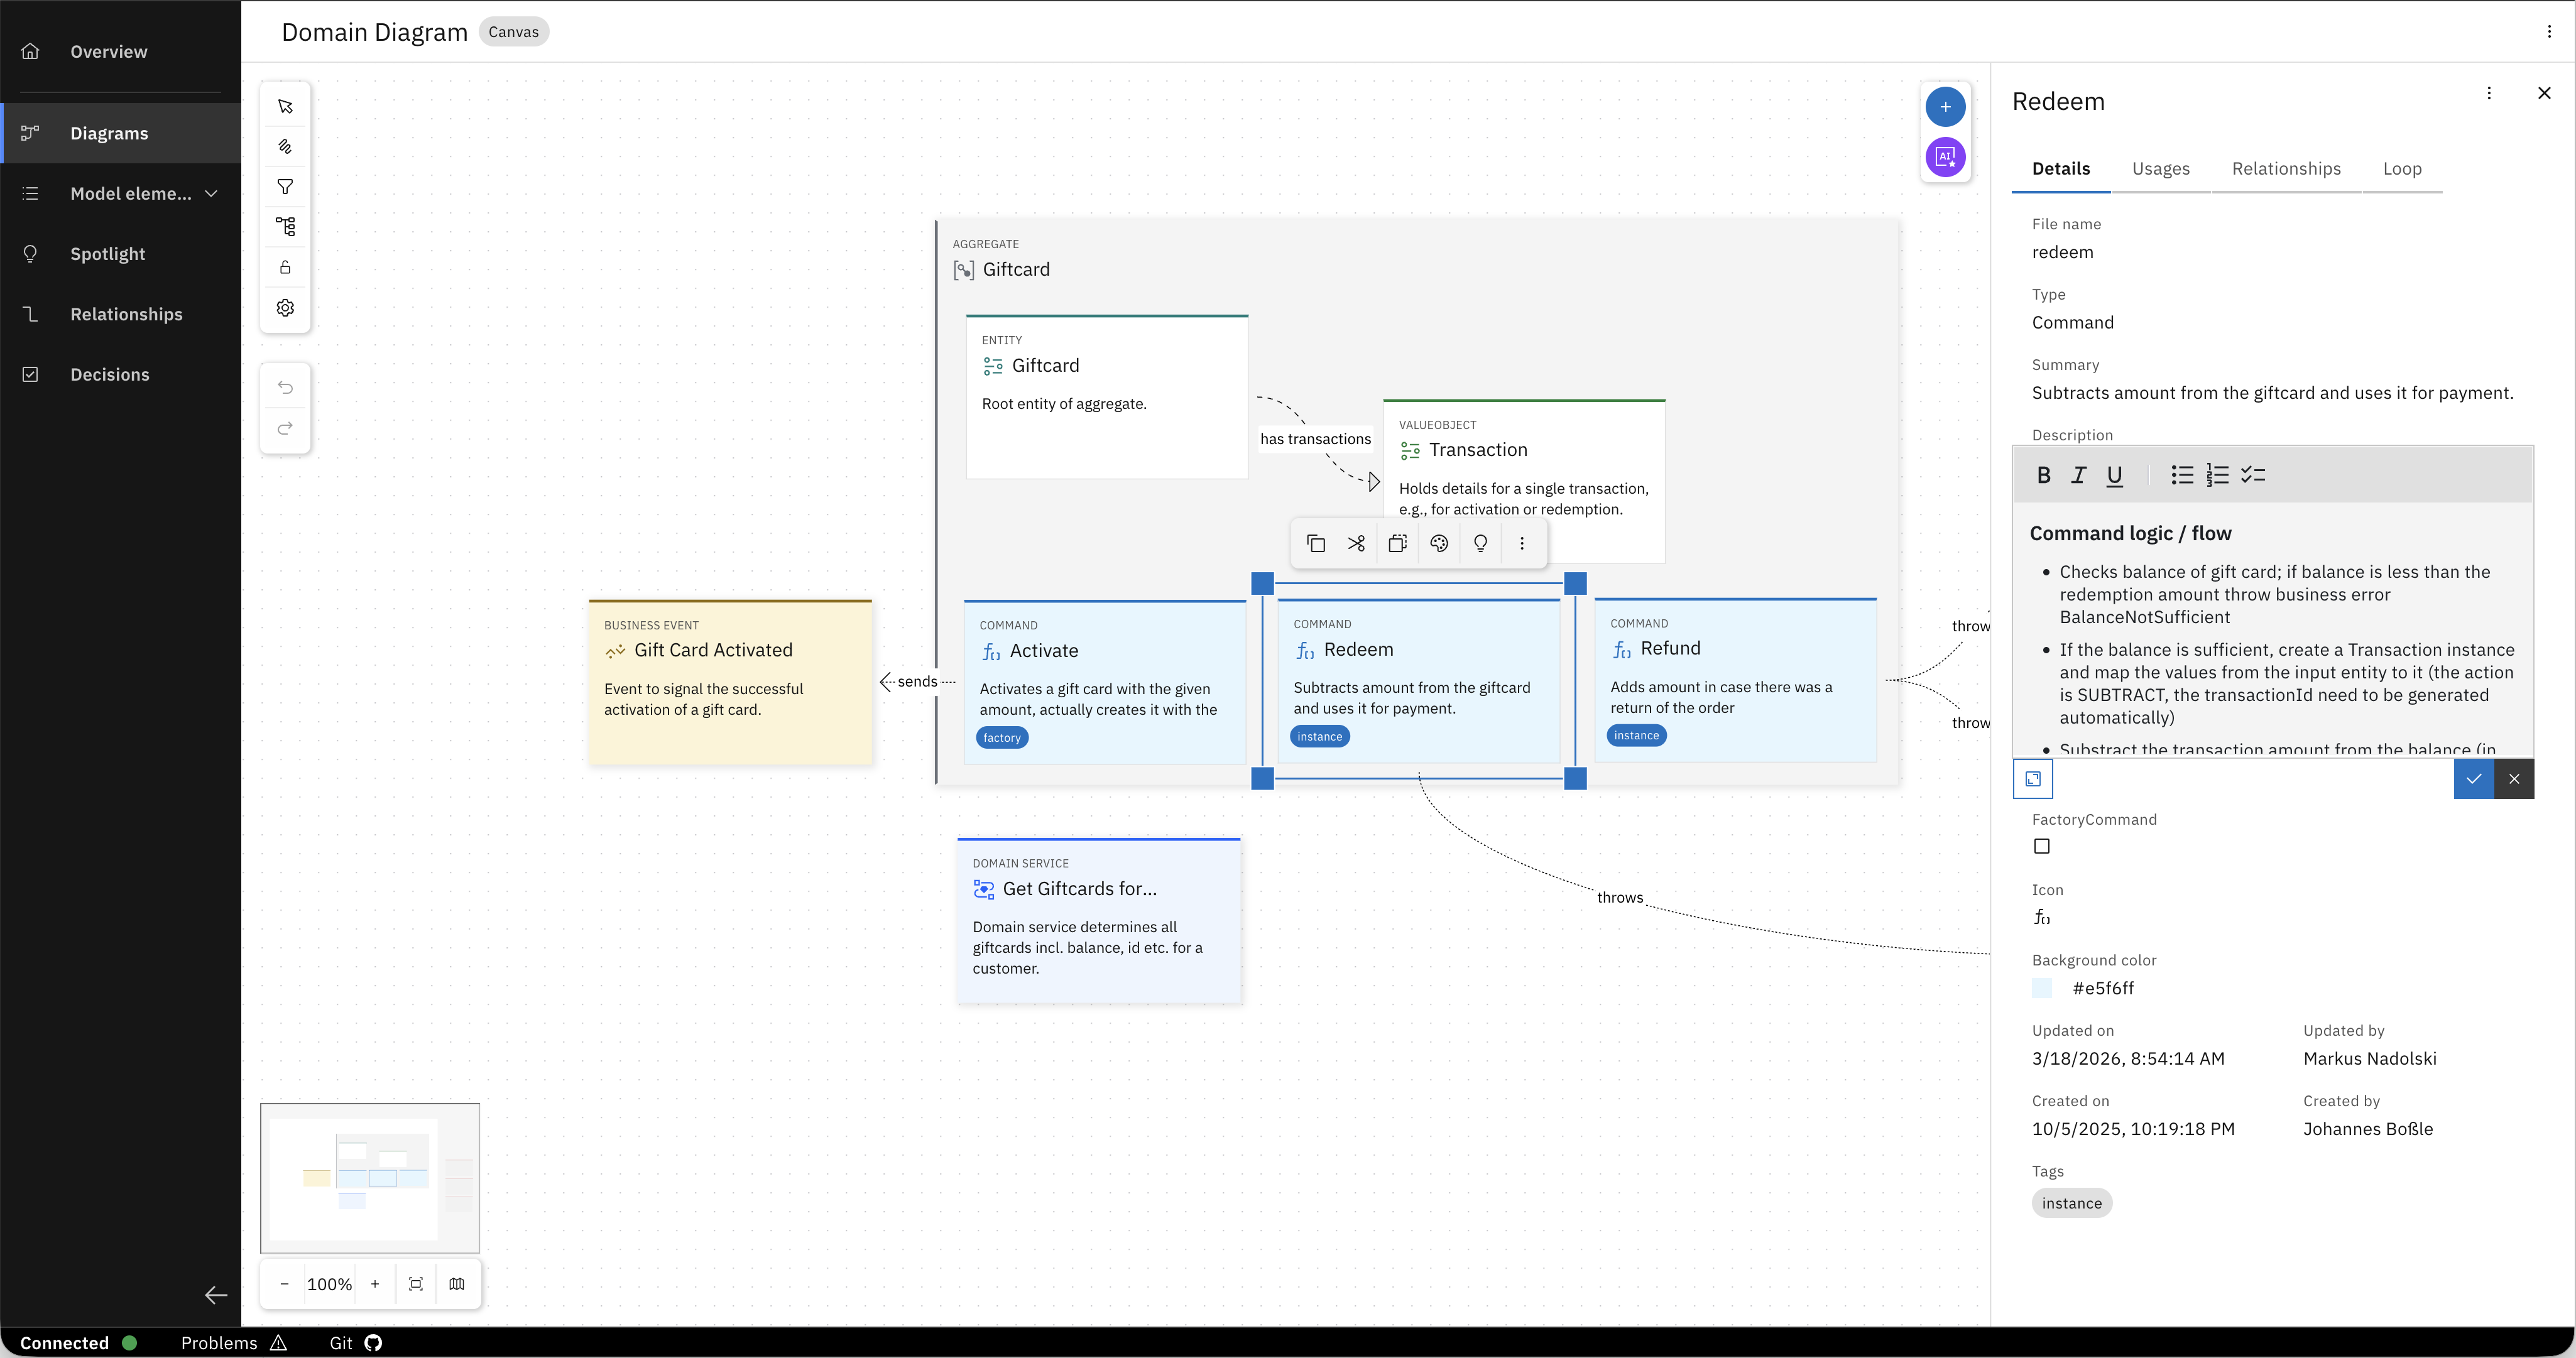
- Check the balance; if insufficient, throw
BalanceNotSufficient - If sufficient, create a Transaction instance, subtract the amount, generate a transaction ID
Everything is here: the technical decisions, the description of the business logic. It is structured and attached to the element it describes, which means the AI has precise context without needing to guess at what you meant.
The API
Open the API diagram by navigating to "Diagrams" in the left sidebar and the opening the "API Diagram". The commands you just read surface here as REST operations — Redeem, Refund, Activate, each mapped to an endpoint. The DB collection is explicit. The domain service is there.
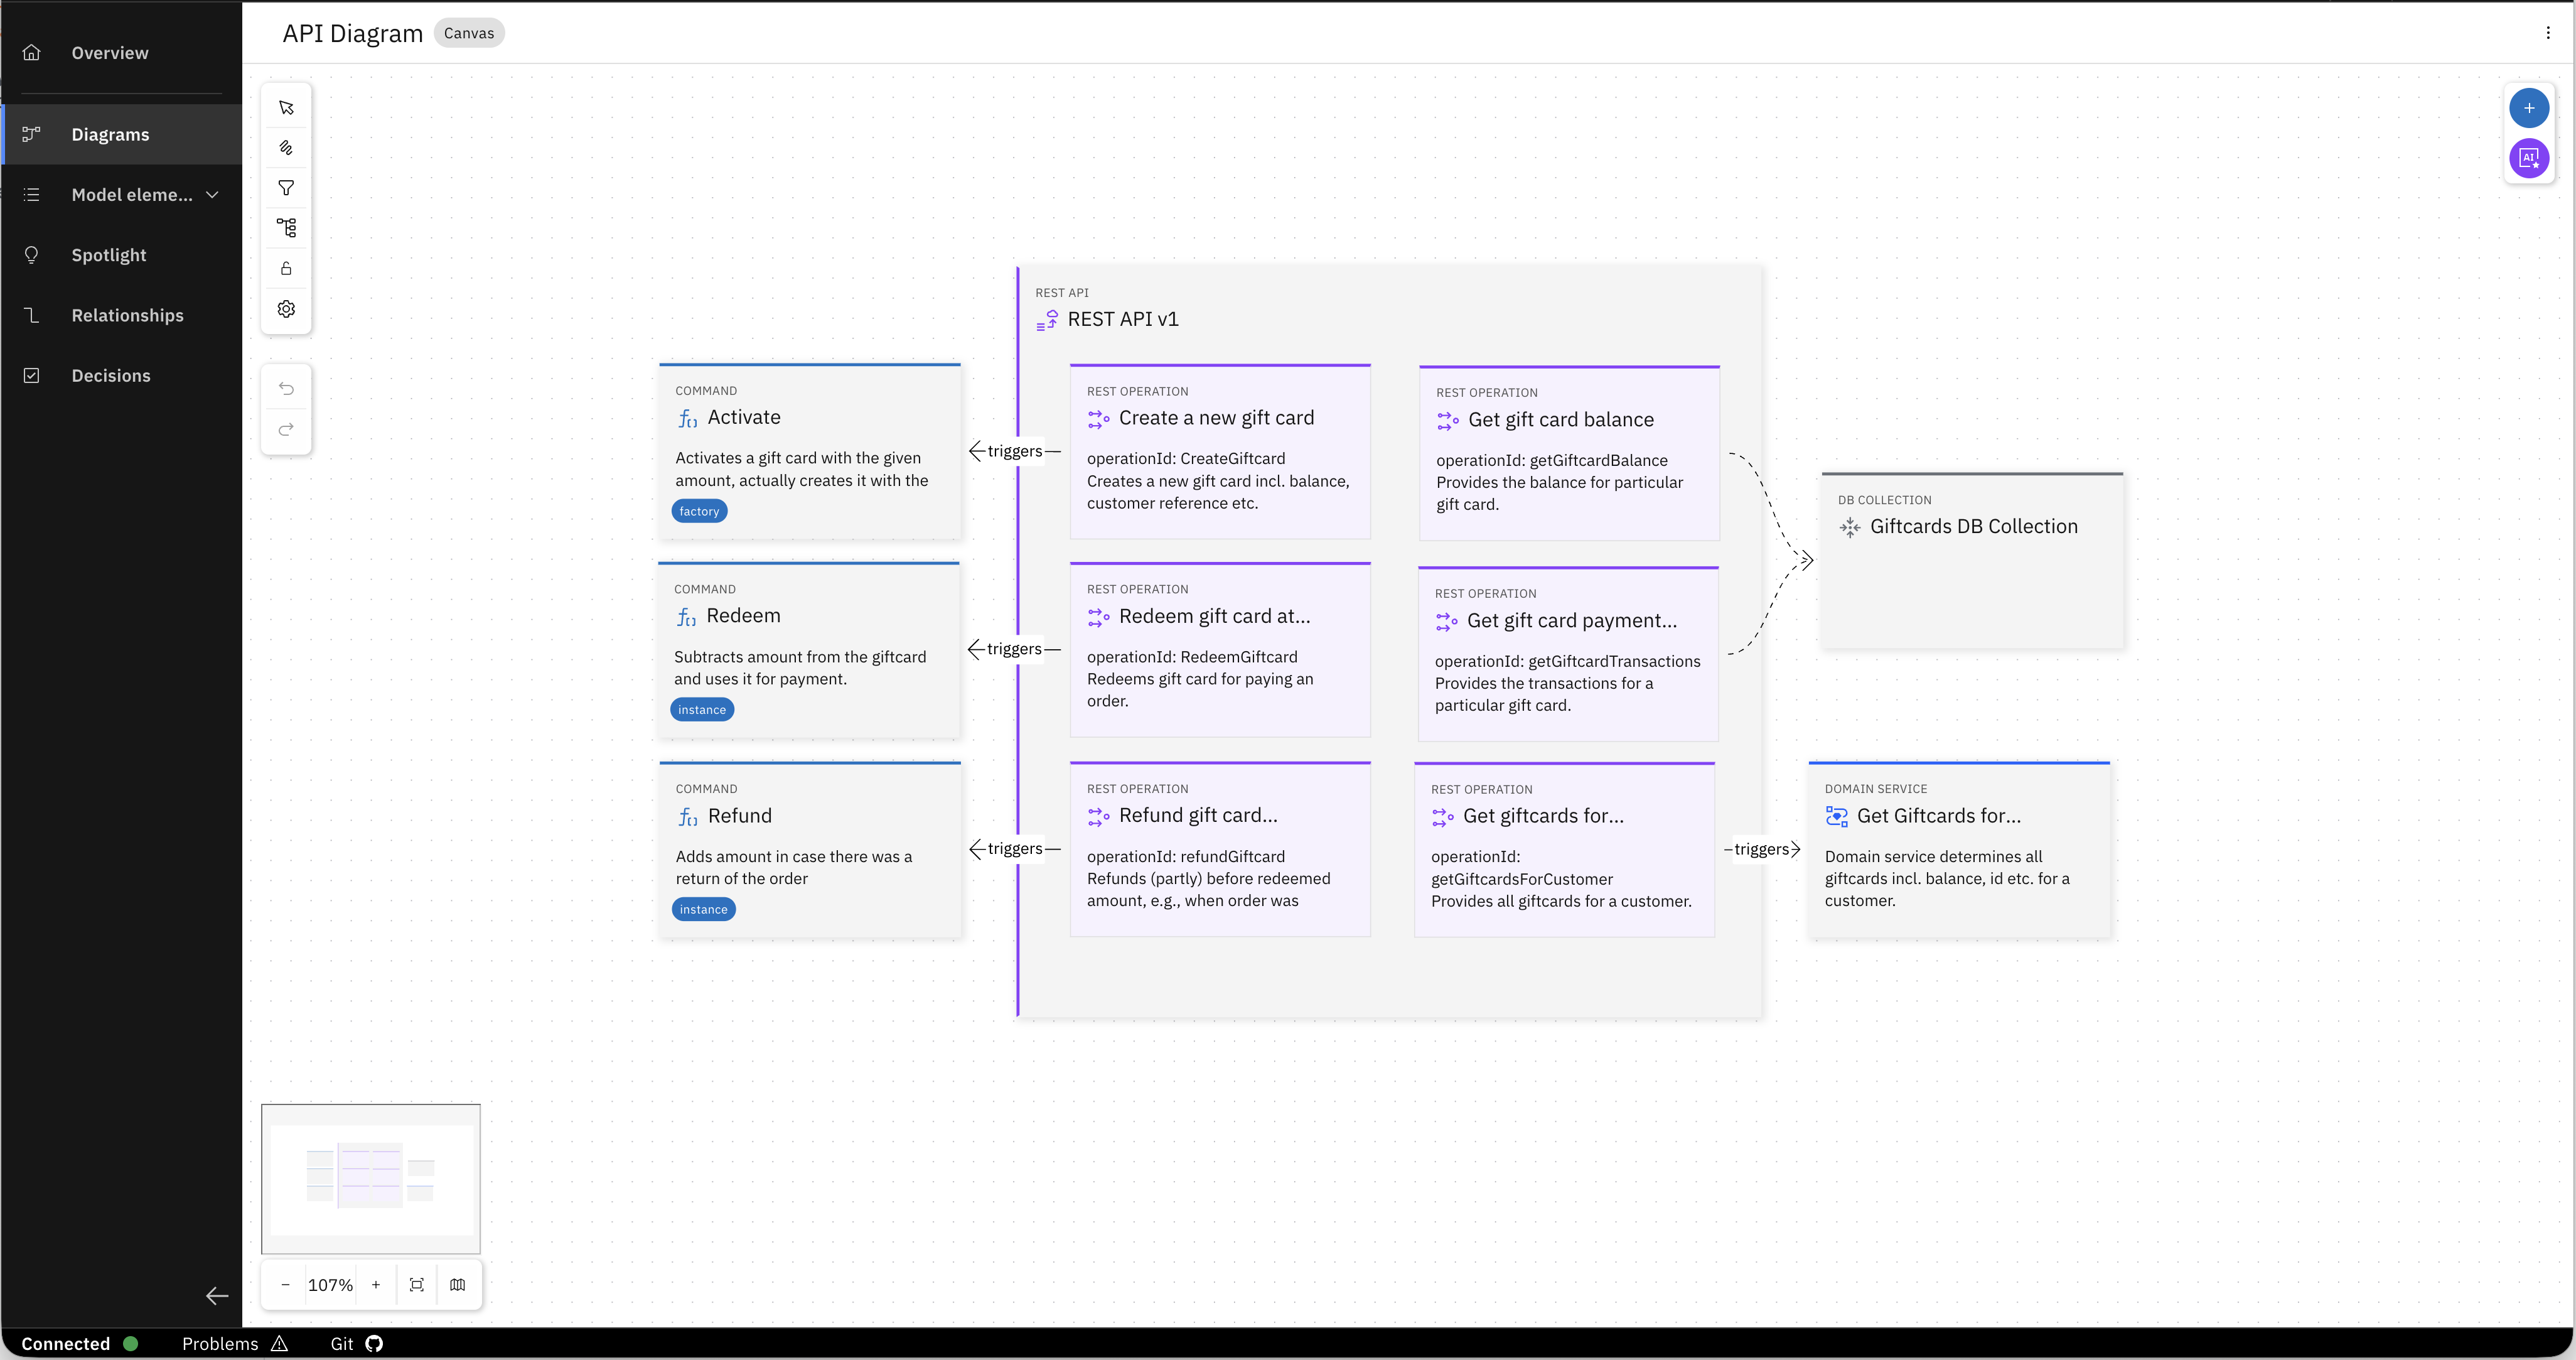
The relationship between the domain entities and the API was defined in the model, and the generator followed it.
A developer joining this team tomorrow could open this project and understand the service without asking anyone. And so could the AI. And with the guidelines defined once by the organisation's experts, the AI can generate a service that is consistent with the team's standards. Every time, for every developer.
Step 7 — Explore the generated service
Head back to your IDE. When the generation is complete you have a fully functioning Java Spring Boot microservice - ready to be deployed.
Dependent on the LLM you choose, generation might not yet be completed. Check out the files that have already been generated by your Coding Assistant.
Browse through what was created:
- Entities — the
Giftcardentity and theTransactionvalue object, with the relationship you saw in the domain model - Persistence layer — repository and database wiring, ready to connect to the Giftcards DB Collection
- Commands —
Activate,Redeem,Refund, each as a structured class reflecting the command logic you read in the Workbench - Domain services — the
GetGiftcardsForCustomerservice, as defined - REST API — controllers and endpoints mapping directly to the API diagram you explored
- Eventing — the
GiftCardActivatedbusiness event, wired up and ready - Unit tests — generated alongside the code right away
- README — documenting the service structure automatically
The entity relationships, the error conditions, the API structure — none of it was described in a prompt. It was modeled, and the Coding Assistant followed it.
Find the Redeem command class. You will notice the business logic described in the Workbench — the balance check, the transaction creation, the error handling — is already implemented.
What just happened
You gave the AI something real to work from.
Not a lengthy text prompt describing your architecture. Not a ticket that assumed the developer already knew all the architectural decisions that have been made for the system. A machine-readable design model — with service boundaries, domain entities, interfaces, and architectural decisions all attached where they belong. And guidelines encoded in the model that ensure that each service is generated the same way as the next.
Without any background about the system, or searching for instructions on how to create a Java Spring Boot service for RoboFlow, you generated a fully functioning microservice that is consistent with the rest of the system.
Go deeper
From Prompt to Design-Aware AI
See what changes when your coding assistant works from structured design context — including decisions someone else made that you never knew about.
What is RoboFlow?
Learn more about the reference application used in this trial and how it illustrates real-world design challenges.